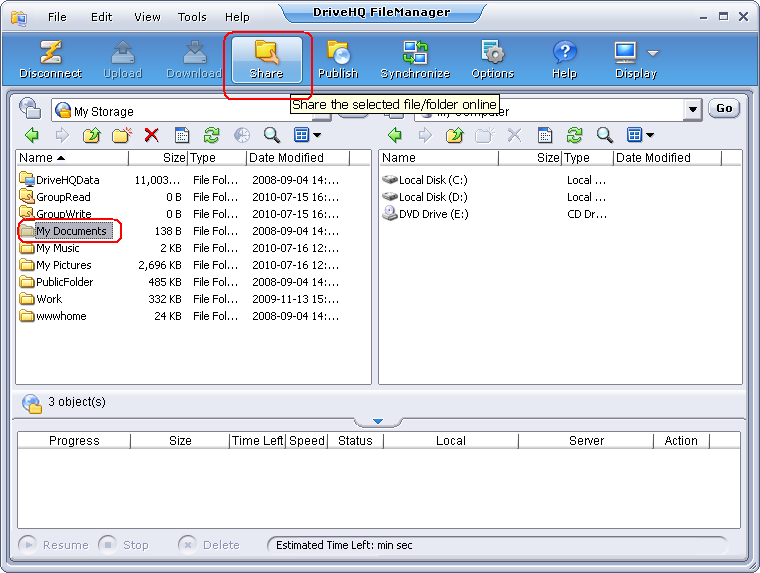
Using DriveHQ FileManager, it is extremely easy to share folders / files online. Just logon DriveHQ FileManager, select a folder and click on the Share button.
- Navigate through the shares you have created
- Click the dropdown button next the address bar on the remote pane, and then select DriveHQ Control Panel --> Manage My Share;
-or-
Click on Tools on the top menu, then select Manage My Share;
- To access a Share, click its share folder (URL);
-or-
Right click one share name, and select Open Share Folder from the popup menu;
- Click on
 to go to the folder visited previously;
- Click on
 to go to the folder visited next;
- Click on
 to go to the parent folder.
- Share a remote folder
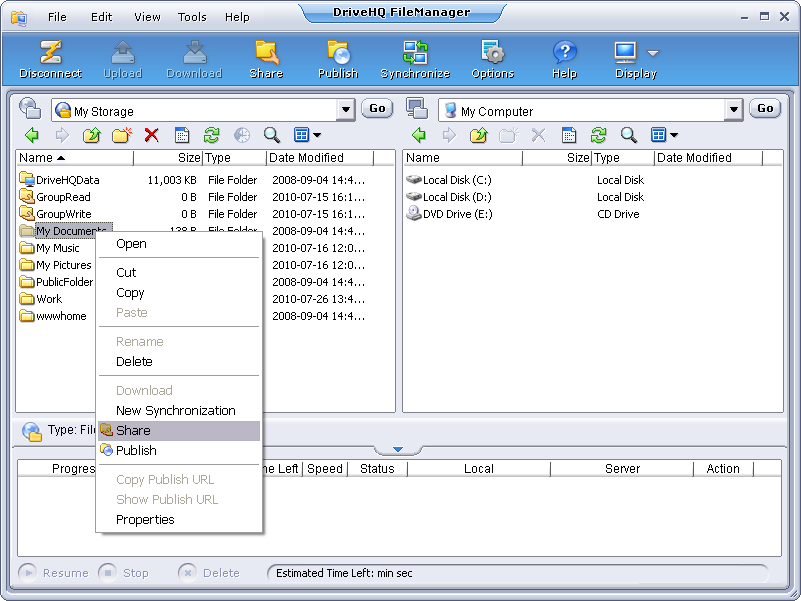
- Select the online file / folder to share, click on
 button;
-or-
Right click the file / folder name, and select Share from the popup menu.
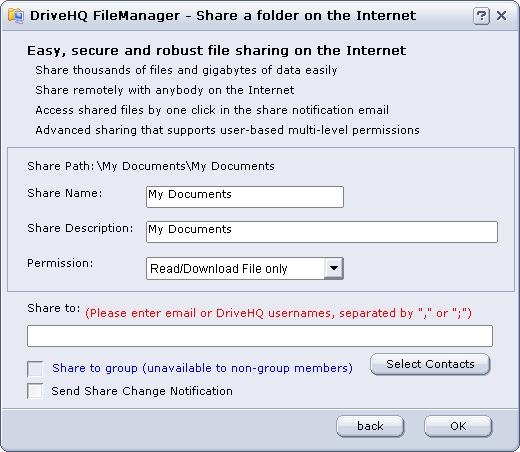
- Once the Share a folder screen shows up, enter the following required info:
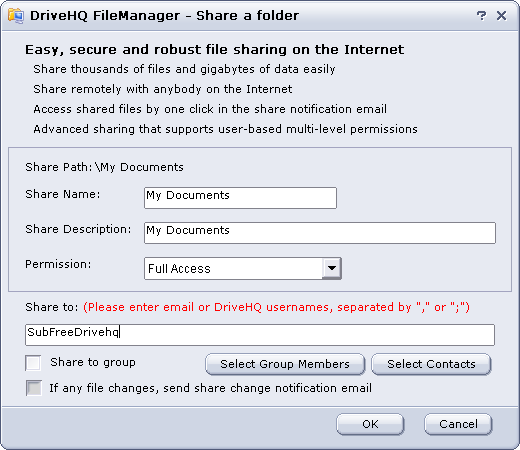
By default, the Share Name is the same as the folder name, you can change the Share Name and Share Description, select a permission level from the following levels:
- View file list / icon only
- Read / download file only
- Add / upload files
- Full access
In the Share-to field, please enter the email addresses or DriveHQ username of the persons who you want to share the folder to. If the person does not have a DriveHQ account, or if you don't know the person's DriveHQ username, you can just use the person's email address. You can enter multiple usernames / email addresses separated by "," or ";".
If you have a group account, then you can check the checkbox Share to group, which shares the folder to all members in the group. You can also click on Select Group Members button to add some group members into the Share-to list.
Select Contacts button: click on this button will let you select users from your contact lists. You can create a contact list from DriveHQ Webmail section.
The If any file changes, send share change notification email checkbox is only available for the paid users.
- Click on OK, and then the Share is created and a following dialog pops up:
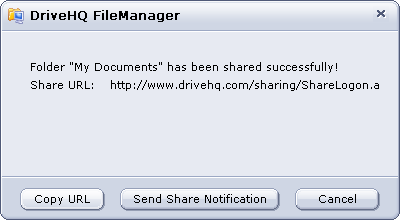
The remote folder "\My Documents" has been shared to the user: SubFreeDrivehq. If all Share-to users are DriveHQ members, then it is not necessary to send the share notification email. The "share-to" users can logon www.drivehq.com or DriveHQ FileManager, go to the virtual folder: \DriveHQ Share\YOUR_USERNAME\SHARE_NAME
In the case of this demo, it is: \DriveHQ Share\FreeDrivehq\My Documents.
- If you also share the folder to a non-DriveHQ member using his / her email address, then you need to click on "Send Share Notification" button, which will open your email client software, e.g. Outlook. See the screenshot below:
Note: you must send the Share notification email using your own email account and your own email client software. DriveHQ emails are more likely to be filled / blocked, so sending from your own email server tends to be more reliable.
In the share notification email template, you can find the "Share URL".
- Share a local folder
- Select the local file / folder to share, click on button;
-or-
Right-click the file / folder name, and select Share from the popup menu.
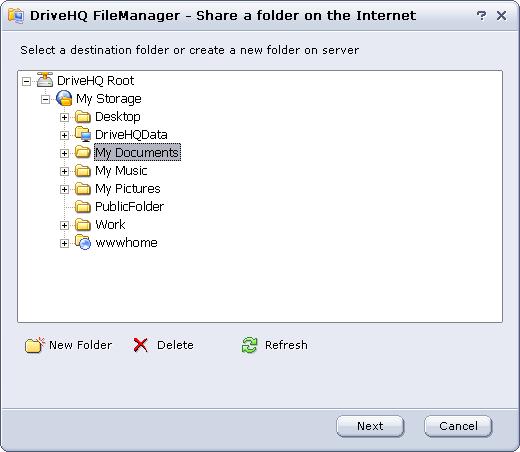
- The Share a folder on the Internet screen will show up. Select a destination folder under which you want the shared folder to be located, or create a new folder on server, and click on Next button.
- Then enter the required information for the new share in the following screen;
- Click on OK, then local file / folder will be uploaded and the share will be created.
Basically, you need to upload the files to DriveHQ storage first. Then it will share the uploaded folder online. This sharing method is far better than other local-network based folder sharing methods:
- You can share folders / files to remote users, incl. co-workers, friends, customers or guests.
- Your computer can be turned off, which will not affect the shared folder.
- Edit a share
- In the Remote Pane, navigate to the Manage My Share screen;
- Double click the Share name that you want to edit;
-or-
Select one Share, and click on  button;
-or-
Right click the Share name, and select Properties from the popup menu;
- The Edit Share page will popup. This page is very familiar with the Share a folder page;
- Click on Save after you finish the modifications.
- Delete a share
- Under the Manage My Share screen, select the Share to delete;
- Click on
 button or select Delete from the right-click popup menu;
- The system will pop up a confirmation message box. Select Yes to delete the Share or select No to cancel this operation.
- Access a share
After you have shared a folder using DriveHQ FileManager, the folder can be accessed by the "Share-to" users online. Whether you share a folder using DriveHQ FileManager or DriveHQ.com website, the result is completely the same. You can share a folder using DriveHQ FileManager or DriveHQ.com website; you can also access a shared folder using DriveHQ FileManager or DriveHQ.com website. There is no difference, except using DriveHQ FileManager is more efficient in uploading / downloading files / folders. Using DriveHQ.com website is more convenient if you (or a non-DriveHQ member) don’t have DriveHQ FileManager installed.
Accessing a shared folder online using DriveHQ.com website is covered in "Using DriveHQ Web --> Share --> How to access folders shared by other users?" section within the DriveHQ Online Help. In this section, it only covers accessing shared folders using DriveHQ FileManager.
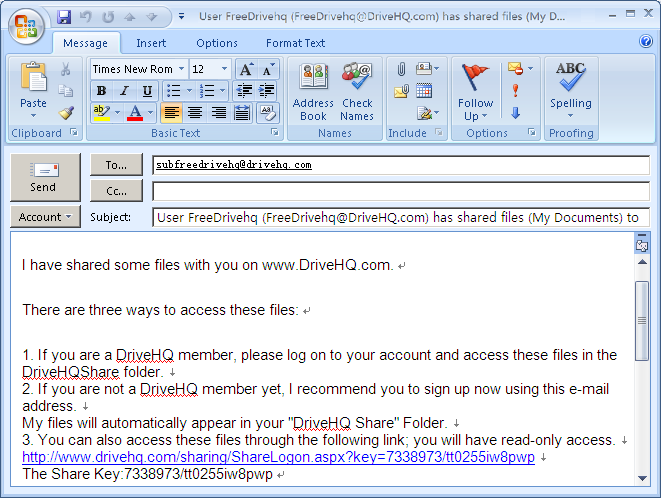
If another DriveHQ user shares a folder to you, he / she usually sends a "Share notification email", which has the detailed instructions about how to access the shared folder, e.g. a typical share notification email includes the following info:
There are three ways to access these files:
- If you are a DriveHQ member, please log on to your account and access these files in the DriveHQShare folder.
- If you are not a DriveHQ member yet, I recommend you to sign up now using this e-mail address. My files will automatically appear in your "DriveHQ Share" Folder.
- You can also access these files through the following link; you will have read-only access.
https://www.drivehq.com/sharing/ShareLogon.aspx?Key=7338973/tt0255iw8pwp
The Share Key: 7338973/tt0255iw8pwp
Please install DriveHQ FileManager to download all files. It works like Windows Explorer or FTP, supports drag-n-drop.
It can download / upload any size files reliably. Please download it at:
https://www.drivehq.com/downloads/downloads.aspx
Using DriveHQ FileManager to access a shared folder, you must have a DriveHQ account. If you are not a DriveHQ member, you can sign up a DriveHQ account using the email address that received the share notification email.
If your DriveHQ username or your registered email address is in the "Share-to" list when the other user shared the folder, then you can logon DriveHQ FileManager. The folder(s) shared to you is automatically linked to the special virtual folder:
\DriveHQ Share\FOLDEROWNER_USERNAME\SHARE_NAME
Dependent on the permission of the share, (which is set by the user who shared the folder to you), you might be able to access the folder with "Read-only", "Add / Upload" or "Full Access" right, etc.
As an example, user FreeDrivehq shared a folder My Documents to user SubFreeDrivehq with full-access right. FreeDrivehq also shared GroupRead to the whole group with Read-only access; GroupWrite with full-acess right. The screenshot below shows when the user SubFreeDrivehq logs on his own account, he can see the shared folders in the virtual folder:
\DriveHQ Share\FreeDrivehq\
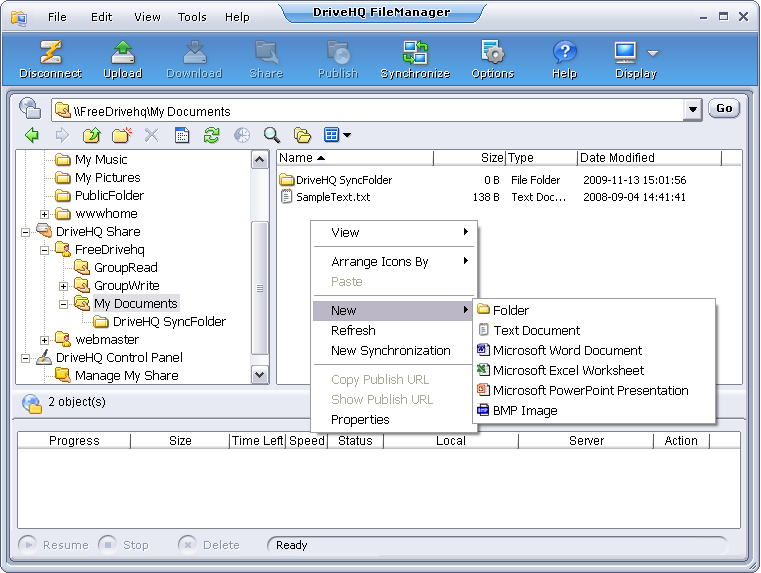
In the above screen, since the folder My Documents was shared with full-access right, he can right click on a blank area to create files / folders in it. He can also drag and drop files / folders into this shared folder. If the folder is shared with read-only access, then the menu item "New" will be disabled and you cannot upload files into the shared folder.