Using Mobile FTP/WebDAV App to Access DriveHQ Cloud Storage
Accessing DriveHQ Cloud file server using mobile FTP/WebDAV applications
You can access DriveHQ cloud file server using m.drivehq.com and drivehq.com websites without installing any software on your device. If you are willing to install software on your device(s), then you can use any FTP, WebDAV applications or DriveHQ Mobile FileManager. Mobile applications are usually easier to use, though it may not support some advanced features.
Please note this document describes how to access DriveHQ cloud service using some 3rd party software. DriveHQ is not currently affiliated with any of these 3rd party companies. The information provided here is to the best of our knowledge at the time of this writing, but may contain inaccurate information or outdated information.
Configure FTP and WebDAV for Android phones
Accessing DriveHQ Cloud File Server using FTP
ES File Explorer is a free file manager & FTP client application for Android market. It is very popular. We have tested it to work with DriveHQ FTP service. The only known issue is the software keeps logging on DriveHQ FTP server for each file download / upload, which is not efficient. It is recommended that you have a paid account on DriveHQ to use this application.
Install ES File Explorer: Go to Android Market, search for ES File Explorer, then follow the on-screen instructions to install it. After finished installing it, you should be able to see the new application icon in your applications screen as shown below in Screen 1.
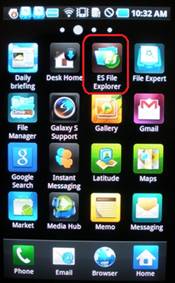
1. Click on ES File Explorer |
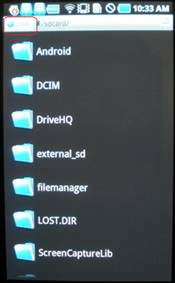
2. Click on Local as shown above |

3. Select FTP |
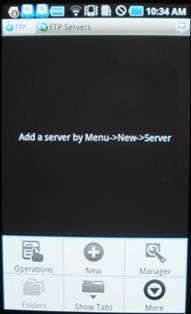
4. Press the (hardware) Menu key, then click on New. |
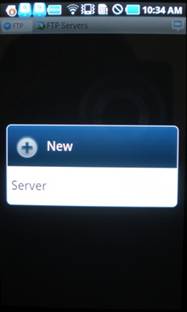
5. Click Server |
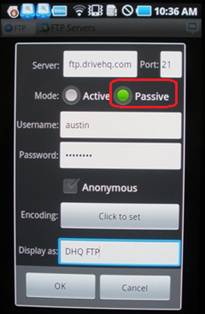
6. Enter FTP server and your account information as shown above. Make sure to select Passive. Click Ok to save the account information. |
7. A new DriveHQ FTP server account is created. Click it to access your DriveHQ FTP account. |
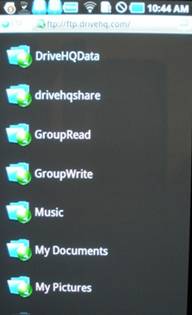
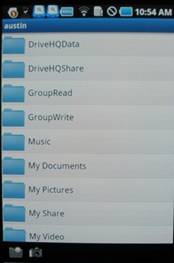
8. It is displaying the root folder of your DriveHQ account. |
9. You can navigate to any folders in your account, as well as folders shared to you by other DriveHQ members. |

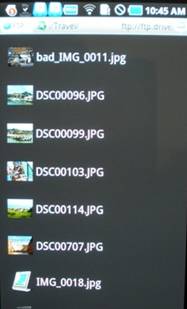
10. Click on an image in Screen 9, you can open it. |
|
|
Access DriveHQ cloud file server using WebDAV
WebDAV Navigator Lite is a free application on Android market and iOS app store. We’ve tested it to work with DriveHQ cloud service. To install the software on your Android device, please search for “WebDAV NAV”. Follow the on-screen instructions to install it. After finished installing, you should see a new application icon as shown below.
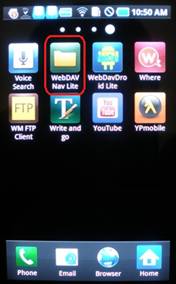
1. Click WebDAV Nav Lite |
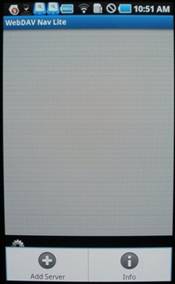
2. Press the (hardware) menu key. It will display the Add Server button. Click it. |
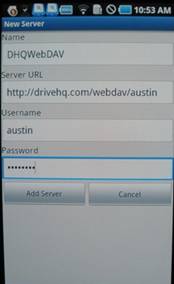
3. Enter the server and your account information as shown in the screenshot. Click Add Server to save it. |
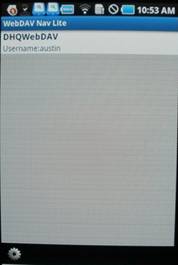
4. A new WebDAV account is created and saved. Click it to access your account files. |
5. It is displaying the root folder of your DriveHQ account. You can navigate to any folder and open/download any files; you can also click on the camera icon at the bottom and upload photos to your DriveHQ folder. |

6. You can navigate to any folder and click on any file to open / view it. |
Quick Comparison between ES File Explorer and WebDAV NAV Lite
Comparing ES File Explorer and WebDAV NAV Lite, ES File Explorer has a lot more features. It is also more versatile as it supports browsing and managing local files. You can also easily copy / paste (upload/download) files between your local device and DriveHQ cloud file server.
WebDAV NAV Lite can only upload images taken by the built-in camera. It has fewer features. However, if you only have a free service account on DriveHQ and don’t plan to upgrade, then WebDAV NAV Lite is recommended as it will not log on DriveHQ service too frequently. (Free service users are limited to about 25 logons per day.)
Configure FTP / WebDAV for iPad / iPhone
Configuring FTP/WebDAV on iPad and iPhone is almost identical. We will only show how to do so on iPad.
Accessing DriveHQ cloud file server using WebDAV
WebDAV Navigator is a free application on Apple’s App Store and Android Market. We have tested it to work with DriveHQ cloud service.
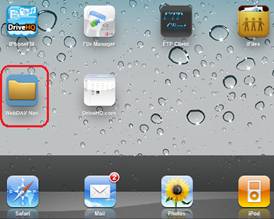
Install WebDAV Navigator: from your iPad/iPhone home screen, find App Store and click on it, then search for “WebDAV Navigator”. Click on it and follow the on-screen instructions to install the application on your device. After finished installing it, you should see a new application icon as shown in screen 1.
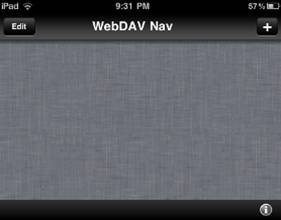
1. Click WebDAV Nav |
2. Click + |
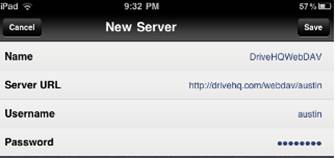
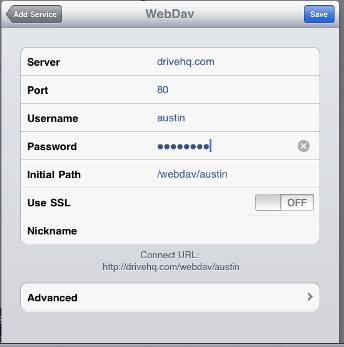
3. Enter WebDAV and account information as shown above. Use the server URL as:http://drivehq.com/webdav/YOUR_USERNAME |
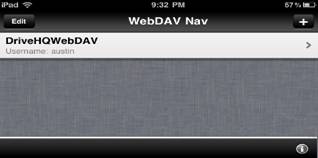
4. DriveHQ WebDAV server link is created. Click on it. |
5. It displays the root folder of your DriveHQ account. You can access folders shared to you in "DriveHQShare" folder. You can upload photos by clicking on the camera icon |
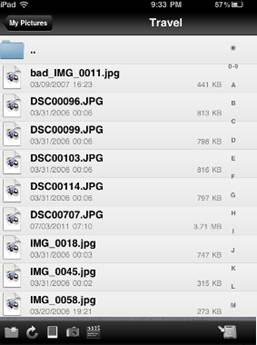
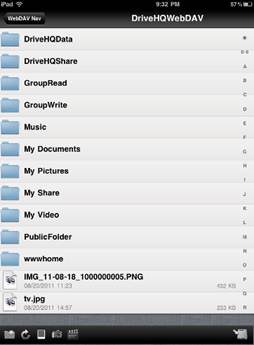
6. You can navigate to any folders and see a list of files / subfolders. You can click on an image to view it. |

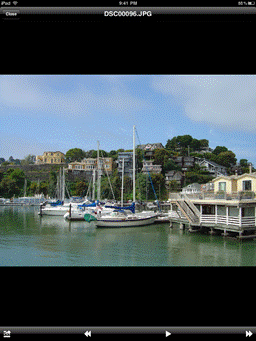
7. View an image on iPad. You can view text, HTML, DOC and PDF files |

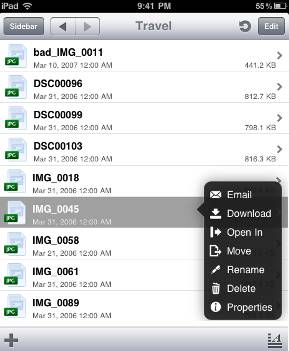
8. You can click a file and hold it to open a pop-up menu. You can copy, open or download the file. |
Accessing DriveHQ cloud file server using FTP (or WebDAV)
iFiles is a great FTP / WebDAV client application on Apple's APP Store. Unfortunately, it is not a free application. However, the price is very low so you might want to purchase it.
Install iFiles: visit Apple's APP Store from your iPad / iPhone, search for "iFiles", follow the on-screen instruction to install the application. After finished installing, you should see a new application icon iFiles. Click it to launch the software.
1. Click iFiles to launch the application. |
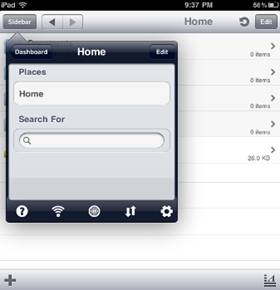
2. Click "Dashboard" |
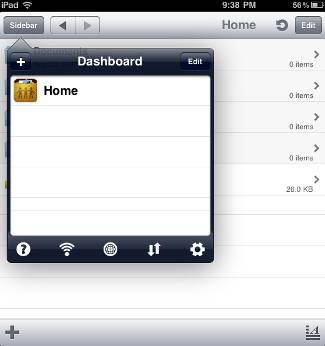
3. Click + |
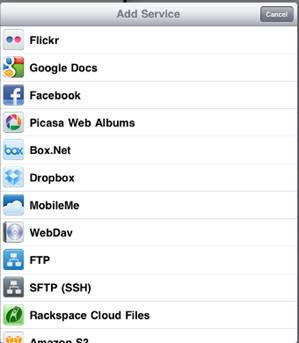
4. Click FTP |

5. Enter your DriveHQ FTP server and account information as shown above. If you have a paid account, you can also use proFTP.drivehq.com as the FTP server. When finished, click Save. |

6. A new FTP Server link (Austin) is created on the dashboard. Click it. |
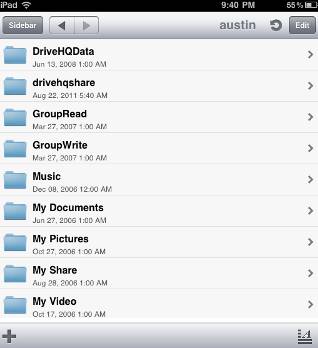
7. It displays the root folder of your DriveHQ account. You can navigate to any folders. |
8. Navigate to a folder with images and click on an image file, it will show the image. You can click on the play button to run slide show, or tap and drag the screen to show the next image. |
9. You can click and hold on a file to open a pop-up menu as shown above. |
10. iFiles also supports WebDAV. In Screen 4, you can select WebDAV, then enter DriveHQ webDAV server and your own account information as shown above. |

11. You can upload files from your device to DriveHQ cloud file server by clicking on the "+" sign. |
|
Configuring FTP service on Windows Phone
As of this writing, there are limited FTP / WebDAV client applications on Windows Phone platform. It might be easier to access DriveHQ cloud file server using mobile web browser. If you still prefer FTP / WebDAV, you can install the software "My FTP", which is an FTP client application available on WindowsMobile market place. My FTP is not free, but the price is under $2.
Installing My FTP: Click on the Search button (hardware button) to launch Bing search. Enter "My FTP PCSupport", then click on the link:
http://wp7.apphab.com/my-ftp-by-pcsupport-ch/
then zoom in and click on the Download icon, follow the on-screen instructions to purchase and install the software. After finished installing, you should see a new application entry as shown in the screen 1 below.
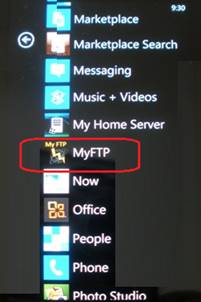
1. Click MyFTP to launch the application. |
2. Click + |
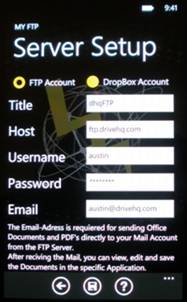
3. Check FTP Account, then enter DriveHQ FTP server and your own account information. When finished, click Save. (you can use proFTP.drivehq.com as the FTP server if you have a paid account) |

4. DriveHQ FTP server link is added to the application's main screen. Click it. |
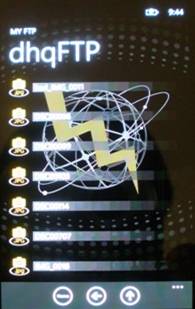
5. It displays the root folder of your DriveHQ account. You can navigate to any folders, or download a file to the local device. |
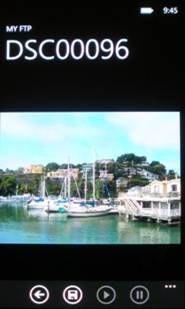
6. Navigate to a folder with images, click an image file, it will display the image. |