Setup DriveHQ Email Account on Mobile Devices
Configure DriveHQ email account on smart phones and tablets
DriveHQ email server hosting service is designed for businesses. For users who are only interested in free email services, please note our service is not suitable for you.
DriveHQ email server hosting service supports standard email protocols such as SMTP, POP3 and IMAP4, as well as SMTP, POP3 and IMAP4 over SSL, it can support almost all email client software / devices.
POP3 (POP) vs. IMAP4 (IMAP)
POP stands for Post Office Protocol. IMAP stands for Internet Message Access Protocol. They are two email retrieving protocols.
The main difference between these two protocols is where you want to keep your mail box folders. With POP, your email client will keep checking the email server for new emails and download them to your local device. Downloaded emails are usually deleted from the server, however, you can optionally leave those emails on server.
With IMAP, your email box folders are kept on the email server. Your email client software may also create local mail box folders, which are periodically synchronized with the email folders on the server.
The advantages of POP include:
- It can reduce the load on the email server. Emails on the server are usually removed after being downloaded to the local device. Therefore, the server does not need a lot of storage space to hold all the emails.
- The email client usually runs faster as it does not need to synchronize email folders with the server.
The advantages of IMAP include:
- You can view your emails from multiple computers, devices or locations. Your email folders are synchronized among multiple devices. Not only you can synchronize the inbox, you can also synchronize other email folders such as Sent box.
- Your email client software usually creates a local copy of your email folders. So you can access your emails while you are offline (the same as POP). Now your emails are automatically backed up on the email server. So even if your computer crashes, you will not lose your emails. Migrating emails from one computer to another computer is easier with IMAP as your email boxes are saved on the email server.
You must have a paid account to use IMAP on DriveHQ. The instructions below use IMAP as an example. Configuring POP account is very similar.
Configure DriveHQ email account on iPhone / iPad
Step by step instruction is provided below:
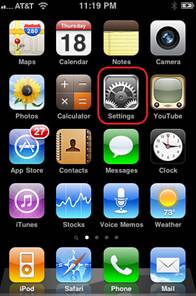
1. Click on Settings |
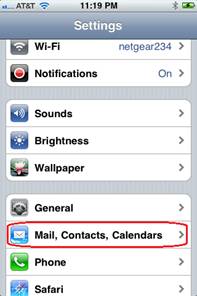
2. Click Mail, Contacts, Calendars |
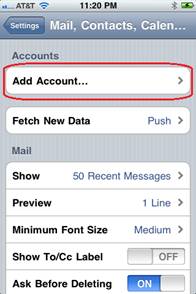
3. Click Add Account |
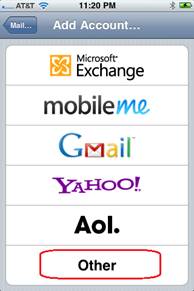
4. Click Other |
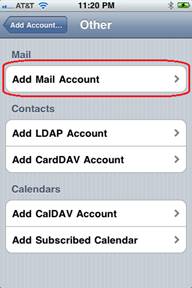
5. Add Mail Account |
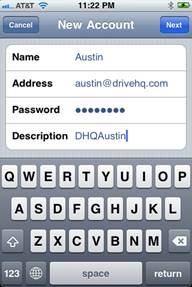
6. Enter your own email account information, then click Next. |
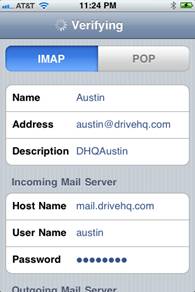
7. Enter IMAP or POP information. The host name is mail.firstcloudit.com. |
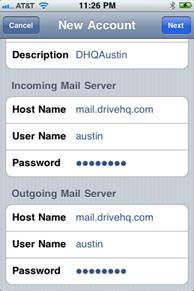
8. Scroll down and enter more information for outgoing mail server, then click Next. |
9. If the default SMTP/POP/IMAP works, then just click Save. Your email account is setup. You can go to your device’s home screen and click Mail to check emails. |
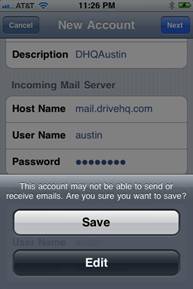
Your ISP or mobile service operator may block the standard SMTP / POP3 / IMAP4 ports. In this case, you will see a message “The account may not be able to send or receive emails. Are you sure you want to save?”
You can still save it and try again to see if you can send / receive emails. Or you can click on Edit to enter more advanced options. |
10. Click on Edit at Step 9; or see 11. |
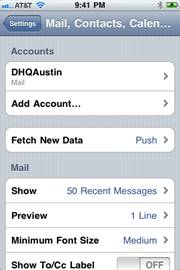
11. Click on Save at Step 9. Now go to your device’s home screen and repeat Step 1 and 2, you will see a new account “DHQAustin” |
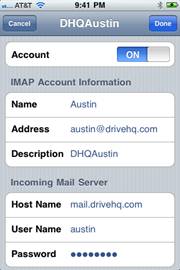
12. Click your DriveHQ email account (in this demo, it is “DHQAustin”) at step 11. |
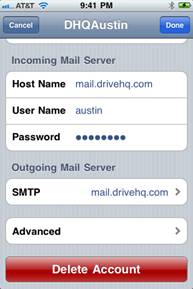
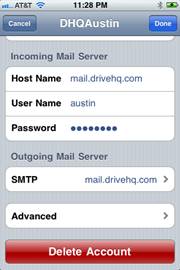
13. Scroll down so that you can see SMTP and Advanced. Click on SMTP. |

14. Click on “mail.firstcloudit.com” |
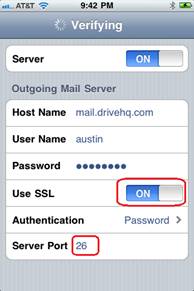
15. Turn on “Use SSL” and change the port number to 465. After verifying, go back to screen 13 and click Advanced. |
16. Turn on “Use SSL” and change port to 993. (993 is the default port number for IMAP over SSL. For POP3 over SSL,
the port number should be 995.)
Save the settings and it should work fine now. |
|
|
Configure DriveHQ email account on Android
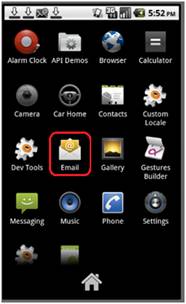
1. Click on the Email icon. Note dependent on the deice type, the Email icon might be at the bottom or as a hardware button |
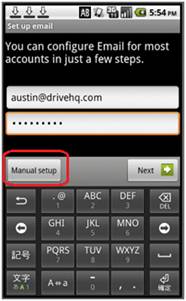
2. Enter your DriveHQ email address and password, then click on Manual Setup. |
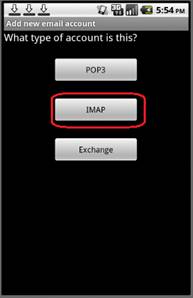
3. Click on IMAP (or POP3) |

4. Enter IMAP information. You can optionally select SSL (accept all certificates) as the security type. The IMAP server is mail.firstcloudit.com, then click Next. |
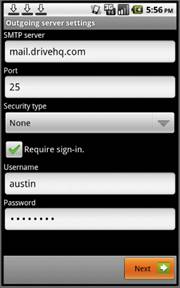
5. Enter SMTP information. The SMTP server is mail.firstcloudit.com. "Require sign-in" must be checked. If you choose SSL as security type, you must change the port number to 465. |
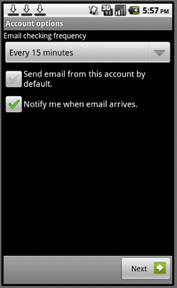
6. Click on Next |
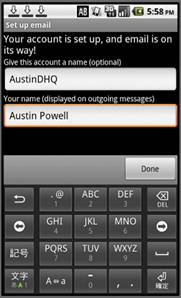
7. Enter your name and account name. Account name is optional. You can enter any name that’s easy for you to remember. Click Done to finish. |
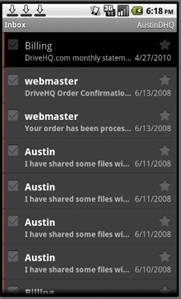
8. From screen 1, click on Email icon again, it will open your DriveHQ email account Inbox. |
|
Configure DriveHQ email account on Windows Mobile
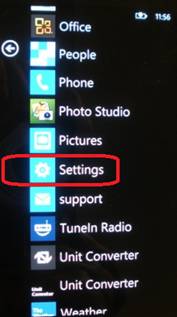
1. Click Settings |
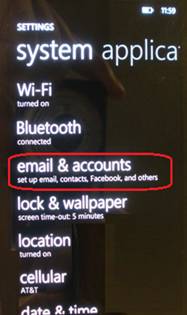
2. Click “Emails & accounts” |
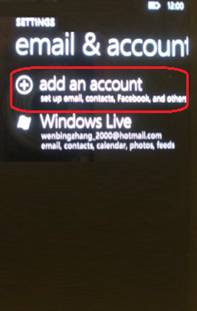
3. Click “Add an Account” |
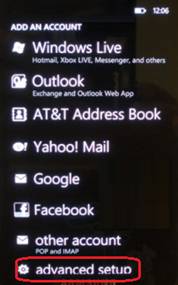
4. Click “Advanced Setup” |
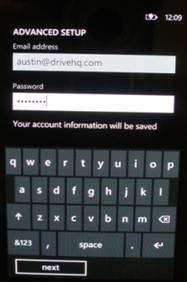
5. Enter your DriveHQ email address and password, then click Next. |
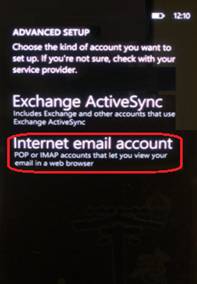
6. Click “Internet email account” |
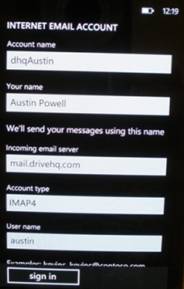
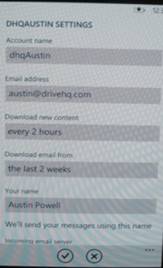
7. Enter your account information as shown above. Account name can be any easy-to-remember name. Incoming email server is mail.firstcloudit.com. Account type is IMAP4 (or POP3) |
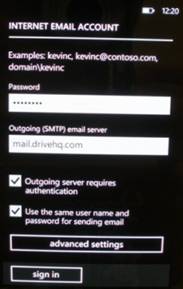
8. Scroll down and enter more information as shown above.Click Sign in to finish setup the new email account. |
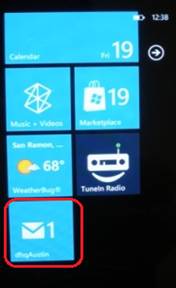
9. Go back to the home screen. You can see a new email icon is added to the home screen. When you have new emails, it will display a number meaning x new emails have been received. |
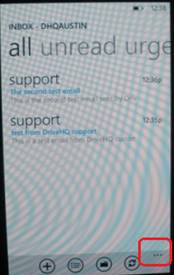
10. By default, Windows Phone does not download all emails in Inbox. You can click on “…” to change the settings. |
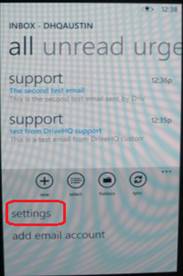
11. Click Settings. |
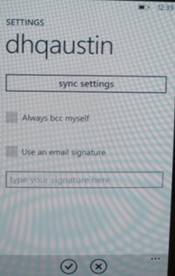
12. Click Sync settings. |
13. You can customize the settings as you like. |
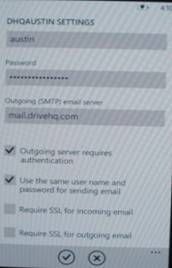
14. If you need to use SSL for SMTP, IMAP4 or POP3, you can set it here.
If you check “Require SSL for outgoing email”, you must also change the outgoing email server name to:
smtp.firstcloudit.com: 465
You don’t need to change the incoming server name. |
|
Configure DriveHQ email account on Blackberry
Blackberry has detailed information about how to configure email accounts on their phones. Because it has many different phone models, it is easier to find more detailed information on Blackberry website.
Please visit this link and select your phone model to find the step by step instructions.
http://us.blackberry.com/support/blackberry101/setup.jsp#tab_tab_email
For quick reference, please follow these steps:
- Locate and select the Setup Wizard.
- Select Email setup, and then choose Other (email service).
- Select Add existing account to your Blackberry device.
- Enter your full email address and email password.
Your device may take a while to connect to the Internet. You will then need to select the type of email account. You can choose either IMAP or POP as DriveHQ supports both. The email server name for incoming email (IMAP / POP) is mail.firstcloudit.com, and the outgoing email server name is mail.firstcloudit.com.
You might also need to activate the new email address on your hand held device.
SSL for your email service
If you need to enable SSL for your email service, please use the following port numbers:
Incoming Port
IMAP: 993
POP: 995
Outgoing Port
SMTP: 465
Please note DriveHQ cannot offer customer support on Blackberry email configuration. You should contact Blackberry or your wireless carrier for customer support.
Trouble shooting tips
If your email account does not work, please verify all your information and note your password is case sensitive. You can also test the same email account settings using Microsoft Outlook on a PC.
If you have a free service account, please note IMAP support is only available to paid members. You can use POP3 instead.
If you use Wi-Fi connection, please check if your company has some anti-virus, security software or firewall that blocked email service ports.