DriveHQ Online Backup 5.0 enterprise edition has proven to be very reliable. However, under certain environment, users may still experience some problems.
- Cannot download DriveHQ Online Backup software or the downloaded file cannot run; or the setup experience an error.
You can download DriveHQ Online Backup from DriveHQ's software download page:
https://www.drivehq.com/downloads/downloadonlinebackup.aspx
Make sure you download the right version (32-bit or 64-bit) for your operating system. You can find your OS version using Internet Explorer and access the following page:
https://www.drivehq.com/downloads/FindOSVersion.aspx
A lot of anti-virus software or network security software could interfere with the download of DriveHQ Online Backup installer file.
On Windows 2008 server, downloading files using Internet Explorer is not allowed by default. You must change Internet Explorer security options to allow file download. You can use Firefox or Chrome to download the file.
Some anti-virus software / security software automatically renames EXE files to other file type. In this case, after you finished downloading the file, you need to change the file extension back to .EXE.
If you still cannot install DriveHQ Online Backup, please make sure your Windows logon account can install software. Using a Windows System Administrator account is recommended.
You might also want to turn off (disable) all firewall software / security software / anti-virus software briefly to check if the problem is fixed.
- I have installed the software. When I try to create the first backup task, it crashes.
Again, this is most likely to be caused by anti-virus software / network security software. Please make sure you don't have any such software blocking DriveHQ Online Backup GUI process and the DHQBackupSvc.exe process. You can turn off / disable such software briefly to check if it caused DriveHQ problem.
Due to too many anti-virus / network security software types and versions, DriveHQ cannot offer more detailed help. However, you can definitely solve the problem as we have a huge number of users, and our users can almost always solve this problem by themselves.
- The software failed to connect to DriveHQ.com. It keeps retrying connecting to DriveHQ.com, but never succeeds.
First of all, please open Internet Explorer (Must use Internet Explorer for this purpose; cannot be any other web browser), try to logon www.drivehq.com . If it doesn't work, then you have an Internet connection problem. You need to fix this problem first.
If you can logon www.drivehq.com using Internet Explorer, then the DriveHQ Online Backup client software should be able to connect DriveHQ.com. The problem could be caused by your anti-virus software, network security software blocking DriveHQ Online Backup.
- If you use a proxy server to connect to the Internet, then you need to change the Windows service DHQBackupSvc.exe's logon account. A proxy server setting usually only applies to the current Windows logon account. However, by default DriveHQ Online Backup service process (DHQBackupSvc.exe) runs as the LocalSystem account, which lacks the proxy server setting. In this case, you need to change the DriveHQ Online Backup service process's logon name. To change the Windows service logon name, please refer to Running as a service process chapter.
- Certain cache servers might also interfere with DriveHQ Online Backup's connection to DriveHQ.com system. A lot of cache servers cannot cache SSL contents. So you can configure DriveHQ Online Backup to use SSL. You can do so from DriveHQ Online Backup client software, click on Options à System Options, then check “Use SSL”.
- DriveHQ Online Backup lost my backup task(s), what to do?
It is very rare that DriveHQ Online Backup loses the backup task list file. It was reported in the 3.x versions. The problem could happen when you create backup tasks on two different computers at about the same time. Also it could happen when the software is uploading a new version backup task list file and the network suddenly becomes unavailable.
If this happens, usually you can restore an older version backup task list file using DriveHQ FileManager. The backup task list file is stored in this remote folder:
\DriveHQData\DriveHQ WWWBackup\Info
The backup task list file name is: BackupTasklist.xml.
A backup copy of the task list file name is saved as “Copy_BackupTasklist.xml”; if the Backup Task list is lost, please try the following steps:
- Log out DriveHQ Online Backup. To logout, click on the Options tab and click on “Log Out” to logout DriveHQ Online Backup.
- Use DriveHQ FileManager or DriveHQ.com website, rename “BackupTasklist.xml” to “BackupTasklist_back.xml”. then rename “Copy_BackupTasklist.xml” to “BackupTasklist.xml”.
- Logon DriveHQ Online Backup again. This usually should fix the problem.
If the above solution does not solve your problem, you might have to re-create the backup task. Please note all your files / folders backed up to DriveHQ are not affected. You can restore your files using DriveHQ FileManager, FTP or DriveHQ.com website at any time. You don't need to upload all your files / folders again. You just need to re-create the same backup task (using the same backup task name and the same source folder). After you have finished re-creating the same backup task, it will try to backup all files / folders again. At this time, DriveHQ Online Backup will detect that the same files already exist in the backup destination folders. So it will skip uploading the same files again. Thus the “initial” backup will be much faster than the real “initial” backup (which needs to upload all files / folders and usually takes a long time).
- What to do if DriveHQ Online Backup fails to respond; reports “base service error”, “failed to connect DriveHQ online backup service process”; or takes a very long time doing something without any progress
e.g. displaying “Refreshing task list…”? If you click on the Cancel button, the “Refreshing task list” dialog is not closed. Instead, the “Cancel” button is disabled, so you cannot close the dialog.
- It is very rare that DriveHQ Online Backup locks up or the base online backup service process crashes. If so, it usually can detect such lock-up automatically, or restart the base backup service process automatically. So please be patient to wait for enough time (10 minutes).
If it is truly locked up, you can solve the problem using 2 ways:
- Method 1: Restart your computer. Restart your computer may also solve some other strange problems.
- Method 2:
(1) Open Windows Task Manager and end the DriveHQBackup.exe process (The GUI program);
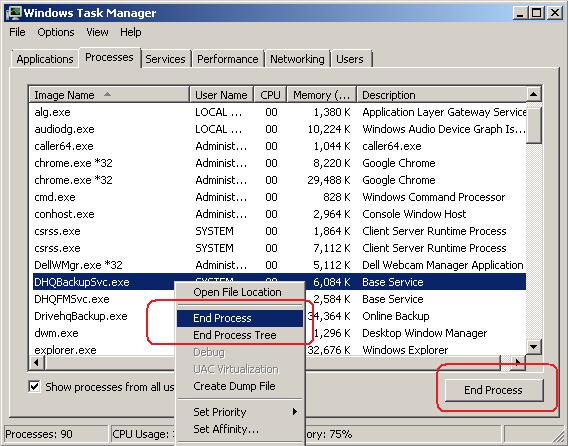
(2) You can right click on a process, and then click on “End Process”. You can also select a process and click on the “End Process” button at the bottom-right corner.
(3) Go to Control Panel--> Administrative Tools-->Services. Stop the service named “DriveHQ Backup service”. If it fails to stop, you can kill the process named “DHQBackupSvc.exe” process to stop the service;
(4) You can then restart “DriveHQ Backup service” from the Services dialog. After that, restart the DriveHQ Online Backup GUI program.
- Why it takes such a long time to backup my task?
If you backup a lot of files or a lot of data, it could take a long time for DriveHQ Online Backup to upload the files. The upload speed is dependent on many factors:
- Total amount of data;
Usually, the more data you upload, the longer time it takes.
- Total number of files or file sizes;
If you upload a lot of small files, the overhead will be very significant and thus the speed is much slower than uploading large files.
- Types of files;
When you upload an image file, DriveHQ server will create 1 thumbnail image and 1 preview image, thus it will be slower than uploading other file types.
DriveHQ Online Backup supports data compression to speed up file download / upload. If a file type is uncompressed, it can be uploaded faster than a compressed file type. Uncompressed file types incl. Text, HTML, MS Word, Excel, DLL, PDF, etc. Compressed file types incl. JPG, MP3, ZIP, RAR, PPT, and MPEG, etc.
- The upload speed from your computer to DriveHQ server:
Even if you have a very fast Internet connection, it won't guarantee the upload / download speed to a particular website. Note your ISP's Internet connection speed usually can only guarantee the speed from your computer to your ISP's data center. From your ISP's data center to DriveHQ.com data center, it will go through many hops on the Internet backbones. Most hops are shared by numerous Internet users. So it is very much like a high-way system. The slowest hop (link) determines the actual speed.
Your ISP might be able to optimize the connection speed for you by changing the routing.
Please note DriveHQ servers are extremely fast. We also have virtually unlimited network bandwidth. As mentioned above, that does not guarantee that you will get a very fast speed. However, if you need to use our service from multiple locations, (e.g.: if you have sub-users or clients in different locations), then the combined connection speed will be very fast.
DriveHQ technologies that speed up file upload / download:
DriveHQ has developed a lot of technologies to speed up file download / upload performance. The technologies include:
- Transparent data compression:
When you upload / download files using DriveHQ Online Backup, it can automatically compress data for fast uploading / downloading. If you upload / download compressible files, the speed will be many times faster.
- Local cache folder:
When you open / download a remote file using DriveHQ FileManager or DriveHQ Online Backup, the file is downloaded to your local cache folder. This way, it will not upload / download the same files again and again.
- Magic Upload:
In certain cases, when the same file has been uploaded to DriveHQ by any user, then backing up the file will be extremely fast as it can skip the upload / download.
- Automatic resuming and manual resuming:
When you upload a very large file, the network connection could become broken in the middle. DriveHQ Online Backup can automatically retry the network connection and resume upload (download). If upload fails for any reason, you can still manually re-start the backup and resume uploading from where it was interrupted.
- DriveHQ Online Backup worked very well, but suddenly something is wrong; it seems the backup tasks become corrupted. I have tried to uninstall DriveHQ Online Backup and reinstall it, still cannot fix the problem. How can I start it over from the scratch? Or How can I completely remove DriveHQ Online Backup from the computer and then reinstall it?
Uninstall and reinstall DriveHQ Online Backup may not fix all problems. When you uninstall DriveHQ Online Backup, it only removes the application files and registry settings created during the setup process. It doesn't delete any cached data files / folders; it also does not delete application settings in Windows registry. To completely remove DriveHQ Online Backup, firstly, please uninstall DriveHQ Online Backup from your computer; you can uninstall DriveHQ Online Backup from your Windows Control Panel --> Programs & Features (or Control Panel --> Add / Remove Programs).
(
- Quit DriveHQ Online Backup GUI program; (right click on the small icon in the system notification area, select Exit) - DONE
- Stop “DriveHQ Backup service process”; you can stop “DriveHQ Online Backup service process” from Administrative Tools Services. See the screenshot below: - DONE
)
- Delete all files / folders in your DriveHQ.com account. You can easily do so using DriveHQ FileManager client software. You can also do so using www.drivehq.com website. If you have a lot of files, it could take some time to finish deleting all files.
- Delete the following local cached folders and all subfolders (if they exist)
C:\Documents and Settings\Default User\Application Data\DriveHQ deleted
C:\Documents and Settings\WINDOWS_LOGON_USERNAME\Application Data\DriveHQ
(where WINDOWS_LOGON_USERNAME is the username which you use to logon the computer)
You can then reinstall DriveHQ Online Backup to backup files.
- I have a lot of data to backup, which takes a very long time. Can I ship a USB disk to DriveHQ? In case of emergency, can DriveHQ copy all my files to a USB disk and ship it back to me?
Yes. You can ship a USB disk to DriveHQ and we will upload the files from our data center, which is many times faster than you upload it directly. If you use our enterprise service, you can send up to 2 USB disks each year. We will upload the files for free.
If you use our regular premium service, you need to pay for the cost of handling the upload. It is very affordable if you have a lot of data.
DriveHQ can also copy all your files to a USB drive and ship it back to you upon request. There will additional cost involved in preparing the data and ship the disk. Please contact DriveHQ customer support for more details.
- I have a lot of data to backup (e.g. over 100GB). I have copied my files to a USB disk and shipped it to DriveHQ. Now DriveHQ has finished uploading my files. How can I create a new backup task without uploading the same files again?
Yes, you can create a new backup task without uploading the same files again. The main idea is: If the same file exists in the destination folder, then DriveHQ Online Backup (and FileManager) will skip uploading (or downloading) the same files again.
To avoid uploading the same files again, you just need to make sure that the same files exist in the backup destination folder. Please follow the following steps to create the new backup task (and avoid uploading the same files again).
Step 1: Understand where the backup destination folder is:
If you create a backup task that backs up a folder “Favorites” as follows:
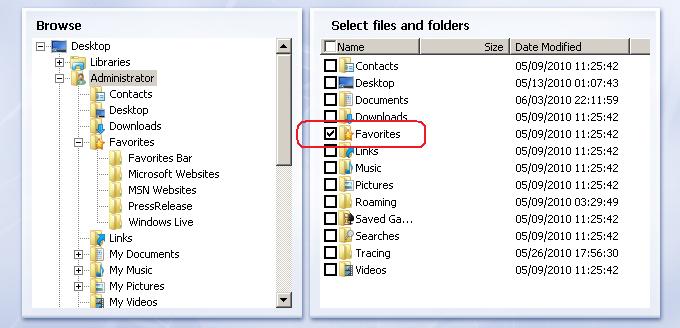
If you save the backup task name as “Backup3”, then the backup destination folder will be:
\DriveHQData\DriveHQ WWWBackup\Data\Backup3\Favorites
You can easily check the backup destination folder using DriveHQ FileManager or DriveHQ.com website.
Step 2: Move or Copy your files / folders already uploaded to DriveHQ account to the correct destination folder. If the destination folder has not been created yet, you can create it manually.
Step 3: Create the backup task using the right task name and source folder so that the task's destination folder matches what you have prepared in step 2.
Step 4: Run the backup task and open the Progress Window to monitor the progress. Make sure that file uploads are automatically skipped. If you see it is actually uploading a lot of files, then please double check if some files have been changed locally. If not, it means you have not prepared the destination folders correctly. You can check the folders . files in:
\DriveHQData\DriveHQ WWWBackup\Data\BACKUPNAME
And see where it is uploading files / folders to. Please note the above method works for non-encrypted backup tasks only. For encrypted backup tasks, it needs to be done differently. Please contact DriveHQ customer support for more info.