Table of Contents
1.1 About Cloud Storage Service Version 5.0
1.1.2 DriveHQ Service Advantages
2. DriveHQ.com web-based services and features
2.1 DriveHQ.com Website Features Summary
2.2.1 Trouble Shooting Account Activation Problem
3. DriveHQ.com Online Storage Features
3.3.1 Zip Download Multiple Files / Folders
3.5 Preview Files - the “Show File” page
3.5.1 Displaying a photo (with online photo editing features)
3.5.2 Preview Text / HTML Files:
3.5.3 Playing music files online
3.6 Direct Editing of remote MS Office Document files
3.7 Folders of image files (Photo Albums)
3.9 Customize Folder / Storage Options
3.9.1 Show / Hide Folder Tree:
3.9.2 Customize the “Show Folder” page
4. Online File / Folder Sharing
4.1.2 Share Change Notifications
4.1.3 About Share Notification Email
4.3 Share folders to contact groups
4.3.1 The benefits of sharing a folder to a contact group(s)
4.4. Edit / Manage Existing Shares
4.5 Accessing a shared folder by clicking on the “Share Link” without logon
4.5.1 Access a shared folder with Full-Access right
4.6 Comment / Rate a shared folder
5.1 What is Publish? (Create direct file links or publicly accessible websites)
5.1.1 Only Paid Users and Certain Authorized True Users can publish on DriveHQ.com
5.3 Manage / Modify / Delete an Existing Publish
5.3.1 The Publish URLs (direct links) for a published folder and files in it
5.4.1 Activate, disable and re-enable your website
5.4.2 Upload / edit your website files & the default home page file
5.4.3 Custom Domain Website Hosting Service
6. DriveHQ Group Account Service
6.1 Upgrade to a group account for free
6.2 The “Group Admin” features
6.2.2 Group storage allocation considerations
6.3 Group Folder Sharing and Permissions
6.6 Forcing Sub-users to only Use Folders Shared by Group Admin
6.7 Group Account Settings and Group Account Balance
6.8 Downgrade Group Account to a Standalone Account
7.1 Sign up a Free Account (or Account Registration)
7.2.3 Premium Account (or Paid Account)
7.2.4 Comparison of free service and premium service
7.3 View or Edit Account Details
7.3.1 Change password / username.
7.3.4 Website Customization – customized logo and logon page
7.4 DriveHQ Service Subscription
7.4.1 Order DriveHQ Storage Subscription or Group User Licenses
7.4.2 Monthly Subscription Service and Annual Subscription Service
7.4.3 Upgrade to a higher level service plan
7.4.4 Change monthly subscription to annual subscription
7.4.5 Service Cancelation or Downgrade
7.5 Service Billing, Payment and Deposit
7.5.1 Monthly service billing date
7.5.2 Partial-month service charge
7.5.3 Pay for the service due and payment methods
7.5.4 Work around Transaction Problems
7.5.6 Forgot to pay on time, past-due account
7.5.7 Automatic service payment
8. DriveHQ FTP Server Hosting Service
8.1. Introduction to DriveHQ FTP Server Hosting Service
8.1.2 DriveHQ FTP Server Name, Logon Info and Directory Info
8.1.3 FTP Service Restrictions
8.2 Connect DriveHQ FTP Server using Windows Explorer
8.3. Configure FTP client software to connect DriveHQ FTP server
8.4 Access Shared Folders through FTP
8.5 Create FTP sub-accounts and manage sub-accounts online:
8.7 Using MS Office with DriveHQ FTP
8.8 DriveHQ FTP Service usage scenarios
9.1 The Advantages of Offsite / Remote Backup over Local Backup
9.2 DriveHQ Online Backup main features
9.3 Get Started with DriveHQ Online Backup
9.3.1. Download DriveHQ Online Backup client software from the location:
9.3.2 Install DriveHQ Online Backup on your computer
9.3.3 Trouble shoot DriveHQ Online Backup installer problems
9.3.4 Start DriveHQ Online Backup
9.4.1. Create Multiple Backup Tasks
9.5. Create a backup task using Quick Backup
9.6. Create an Advanced Backup Task
9.6.1 What files / folders should you back up?
9.6.2 Set the backup schedule and save the backup task
9.6.3 Exclude certain files / folders from the backup source folder
9.6.4 Online Backup with Data Encryption
9.7 Manage Existing Backup Tasks
9.7.1 Manage Tasks – Display the backup task list
9.7.3 Edit / modify a backup task
9.7.4 Delete un-used files on server:
9.7.5 Show Backup Progress Window
9.9.1 Restore all files / folders
9.9.2 Restore the selected files / folders
9.9.3 Restore older version files
9.10 DriveHQ Online Backup Options
9.11. Advanced features and technical information
9.11.1. Run as Windows (NT) Service:
9.11.2. Backup Network-mapped Drives
9.11.3 Backup multiple computers using the same DriveHQ account
9.11.4 Migrate a Backup Task to a Different Computer
9.11.5 More efficient way of migrating a backup task
9.12 Group Backup for Businesses
9.13 Access / Restore Files backed up by DriveHQ Online Backup using DriveHQ.com website
9.14. DriveHQ Online Backup Trouble-shooting Guide
10.1. Advantages of DriveHQ FileManager
10.2. DriveHQ FileManager features:
10.3 Get Started with DriveHQ FileManager
10.3.1: Download DriveHQ FileManager installer from the URL
10.3.2. Install DriveHQ FileManager on your computer
10.3.3. Start DriveHQ FileManager
10.4. Using DriveHQ FileManager for Online Storage
1. Folder Synchronization among multiple PCs and Multiple DriveHQ users
11. DriveHQ Email Hosting Service
11.1 DriveHQ Email Service is better than other free email services
11.2 DriveHQ Email Server Hosting Service FAQ
11.3 Configure Outlook Express for DriveHQ Email Service
11.4 Configure Microsoft Outlook for DriveHQ Email Service
11.5 Configure Eudora for DriveHQ Email Service
11.6 Configure Lotus Notes for DriveHQ Email Service
11.7 Configure your private domain email addresses
11.10 DriveHQ Advanced Email Options
11.10.1. Background Info about Email Protocols
IMAP Service (Remote email folders).
11.11. DriveHQ Web-based Address Book / Contacts
11.11.1. Create Contact Groups
11.11.3. Batch creating contacts, importing contacts from Outlook / Gmail
12. DriveHQ Email Manager (Email Backup)
12.1 DriveHQ Email Manager Advantages
12.2 DriveHQ EmailManager (Email Backup Service) Pricing
12.3 Get started with DriveHQ EmailManager
12.3.1 Install DriveHQ EmailManager client software
12.3.2 Logon DriveHQ EmailManager
Show/Hide Task Management Pane for Email Transfer
12.4 Manage local emails and folders
1.Navigate through local emails and folders
2.Create new local email folders
4.Copy / Paste local emails and folders
5. Delete local emails and folders
8.Cut / copy & paste a sub folder
12.5 Manage online emails and folders
12.5.1 Your default DriveHQ email account
12.5.2 Manage Online Emails and Folders
1.Navigate through online emails and folders
2.Create new online email folders
4.Delete online emails and folders
12.6 Transferring emails, contacts and folders (mailboxes)
1.Upload emails, contacts and folders
2.Download emails, contacts and folders.
3.Monitor, stop, resume, and resume transfer tasks.
12.7.1 Create email backup task
12.7.2 Manage or Backup Multiple Email Accounts / Emails on Multiple PCs
12.7.3 Manage email backup task
12.7.3 Restore emails and email folders
12.8 DriveHQ EmailManager Settings, Options and Subscription
13. Support for Mac, incl. MacBook, iPad and iPhones, etc.
13.1. Services and features that work on both Mac and Windows
13.2 DriveHQ Online Backup software for Mac
13.3. DriveHQ FileManager Alternatives on Mac and other OS platforms
13.4 Support for other devices / OS platforms
15. Enterprise Service and Private Label Service
15.1 About DriveHQ Enterprise Service
15.2 Enterprise Service Pricing and Ordering
16. Information for IT Managers, IT Consultants, Resellers and Small Business owners
1. About
DriveHQ
Based in the Silicon Valley, Drive Headquarters is the leading provider of Online Storage, Backup, Sharing, Collaboration and FTP / Email / File Server Hosting services. Founded in 2003, DriveHQ is one of the first few companies offering cloud based services. Since then, DriveHQ has developed a broad range of high-end technologies, services and software applications designed to create value and save cost for small businesses and high-end users.
DriveHQ cloud system is now at version 5.0 with over 1 million registered customers, many of them business customers. With our service, business users can automatically backup data from anywhere without the need to carry a backup device; they can use DriveHQ online sharing and FTP service to share any size files / folders with people in different locations. Small businesses can host file servers, backup servers, FTP servers and email servers on DriveHQ.com. Consumers can use DriveHQ service to share photos, documents with friends or family members; automatically backup PC data; access files remotely, etc.
Tens of thousands of companies from many different countries have embraced DriveHQ Online Storage & Sharing, Online Backup, FTP / Email / File Server Hosting services as a cost-effective and reliable alternative to their in-house solutions. Among these customers are: tens of thousands of small businesses, professional content creators, accounting firms, law firms, small clinics and real estate / insurance agents; hundreds of educational institutes, NPOs, government offices; and a few giant multi-national corporations.
1.1 About Cloud Storage Service Version 5.0
DriveHQ offers a complete set of Online Storage Services / Cloud Server Hosting Services to businesses and consumers.
1.1.1 DriveHQ main services
· Online Storage Service with Group Account Support: Users can store files on DriveHQ.com and access them from anywhere, anytime. With DriveHQ FileManager, FTP client software or DriveHQ.com website, managing files on DriveHQ.com is a matter of drag and drop.
DriveHQ also supports groups and sub-groups; with 2-level group account service, DriveHQ service can easily scale to support companies with over 10,000 employees!
· Online Sharing and Group Collaboration Service: Users can easily share files on DriveHQ.com. Files can be shared with colleagues or clients; different permissions can be set for different shared folders. Folders shared to you by other users can be accessed with your own account logon.
· Online / Offsite Backup Service: Businesses and consumers can easily backup important documents to DriveHQ secure data center using DriveHQ Online Backup software. No need to purchase any expensive backup hardware and software. Real-time and scheduled backup is supported; encryption and version control are also supported.
· FTP Server Hosting Service: DriveHQ FTP service is seamlessly integrated with DriveHQ.com cloud storage service. It supports any FTP client software. You don’t need to buy FTP Server hardware and software; no need for a hosting service provider; our web-based system administration tool is straight-forward and requires no learning curve.
· Email Server Hosting Service: DriveHQ offers (private domain) email hosting service that is based on SMTP/POP3/IMAP/Webmail. It supports any email client applications. You don’t need to buy Email Server hardware and software; no need for a hosting service provider; our web-based system administration tool is straight-forward and requires no learning curve.
· Email Backup Service: DriveHQ EmailManager is the first application that allows drag & drop backup your Outlook emails / contacts. It is far more efficient than PST file based email backup. It only uploads the new / changed emails and contacts. You never need to upload / download a huge PST file to backup / restore emails or contacts.
1.1.2 DriveHQ Service Advantages
DriveHQ offers high-end cloud services & software to businesses:
- DriveHQ is your “one-stop shop” for all cloud storage related services;
- DriveHQ cloud service is extremely easy to use and easy to manage / maintain;
- Highly efficient with lots of advanced technologies;
- Ultimate security and privacy with high-end data center, SSL, encrypted folder and ACL-based access control system;
- Highly reliable data center and redundant infrastructure;
- State-of-the-art client software and powerful web-based features.
2. DriveHQ.com web-based services and features
DriveHQ services can be accessed with a web browser, DriveHQ client software or any FTP/email client software. For one-time users, DriveHQ website offers a convenient way to access almost all services and features. Drag and drop is supported via DriveHQ FTP service with Windows Explorer. It is not required to install DriveHQ client software. For long-term users, or for certain features such as automatic folder synchronization, automatic online file / email backup, upload / download very large files / folders, data encryption via encrypted folder, etc., DriveHQ client software offers far better user experience and is strongly recommended.
2.1 DriveHQ.com Website Features Summary
DriveHQ.com website has the following features: (no software required for these features)
- Online Storage.
o Upload / download / access / manage files;
o Batch file upload and zip download; drag and drop online files / folders;
o Advanced options such as detail view, thumbnail view; file version history, file preview in web browser and direct editing remote MS office files using MS office applications.
- Online Folder / File Sharing.
o Share a folder / file to other users using email addresses or DriveHQ usernames and set an access level.
o Share a folder to different users with different levels of access rights
o Access a shared folder by clicking on the link sent from the “Share Notification” email; or access a shared folder by logging on DriveHQ and visit the “DriveHQ Share” folder, which contains all folders shared to you.
- Online Folder / File Publishing:
o Publish a folder / file and create static URLs / Publish URLs that can be directly linked from other websites / web pages, such as eBay, Facebook, etc.
- Static Website Hosting:
o Upload static website files to the wwwhome folder. Your website can be accessed at:
http://USERNAME.firstcloudit.com/
- DriveHQ webmail feature:
o Host private domain business emails on DriveHQ. Emails can be accessed via SMTP/POP3/IMAP and webmail.
o Manage online address books. Can create group accounts and group shared address books.
- Drag and drop support without installing any client software:
o Using Windows Explorer, just enter:
ftp://USERNAME:PASSWORD@ftp.drivehq.com/
- Group Account Administration
o Upgrade to group account service for free;
o Order more user licenses and storage space;
o Create / add / edit / logon as / delete / disable sub-users; 4 types of sub-users are supported:
§ Group Administrators;
§ Sub-group administrators;
§ Regular group members;
§ Guest users.
o Allocate (divide) storage space and download bytes among group members;
o Create folders and then share different folders to different users / groups with different levels of access rights; share the same folder to different users / groups with different levels of access rights.
2.2 DriveHQ Service Sign-up
DriveHQ service can be setup immediately; it can be done using www.drivehq.com website or any DriveHQ client application.
Using the website, you can visit www.drivehq.com website, click on the “Sign up FREE” button. After you have entered the account info and click on “Free Sign Up”, your account is immediately created; however, usually the account needs to be activated. An automatic activation email is sent to the registered email address. After you receive the activation email, you can click on the “Activate” link to activate your account. The same DriveHQ account can be used for all DriveHQ services, features and software.
2.2.1 Trouble Shooting Account Activation Problem
If you don’t receive the activation email in 20 minutes:
- Please check if the email is filtered into your junk / bulk / trash mail folder.
- If still no activation email, then you need to check if your email server has filtered DriveHQ email. You can contact your system administrator in your company or your ISP not to block / filter DriveHQ emails; you can also try a different email address. Just try to logon with the un-activated username / password, you can resend the activation email, or change to a different email address.
- You can also email your username to DriveHQ support and we can manually activate your account. If a new account is not activated in 2 days, it will be automatically deleted. If so, you can easily sign up again
3. DriveHQ.com Online Storage Features
3.1 The “My Storage” page
Once you have a DriveHQ account, you can logon www.drivehq.com using your username and password. By default, it will go to the “My Storage” page, as shown below:
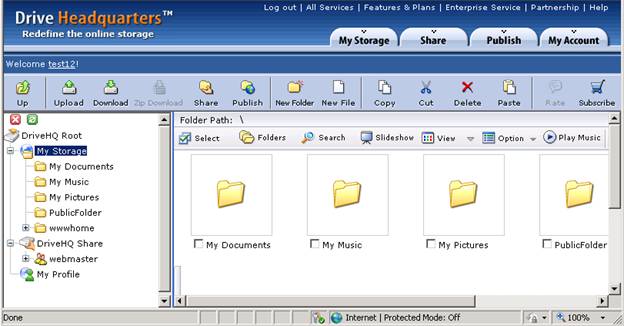
DriveHQ.com “My Storage” page
The “My Storage” page is very similar to Windows Explorer.
On the left-hand side, it displays the Folder Tree, which makes it very easy to navigate all folders in your account as well as access all folders shared to you by other users. The root folder “DriveHQ Root” is not a real folder. It is a virtual folder, which contains two other virtual folders: “My Storage” and “DriveHQ Share”. All folders / files in “My Storage” virtual folder belong to the current logon user account, which it always has full access.
The folders in “DriveHQ Share” virtual folder are folders shared to you by other DriveHQ members. Other users may share folders to you by entering your username / email address in the “Share-to” list. The shared folder permission is determined by the user who shared the folder to you. A folder can be shared to you with the following access rights:
- Thumbnail / List view only
- Download / Read Only
- Upload / Add
- Full Access
More detailed info about shared folder is available in the “DriveHQ Online File Sharing” section.
On the right-hand side, it displays the folder contents. You can edit folder / file name; click on a folder icon enter the folder; or click on a File icon to open the ShowFile page. You can also search a file by clicking on the Search button, change the folder view to “Detail View” or “Thumbnail View”, etc.
On top of the page below the main tabs, you can see a Toolbar.
The following features available in the Toolbar:
Up: Go to the up-level folder (i.e. parent folder);
Upload: Upload files to the folder;
Download:Download the selected file (can download files one by one only);
Zip Download*: Zip the selected multiple files / folders into a zip file and download it.
* Zip Download feature is available to DriveHQ Paid Members only.
Share: Share the selected folder / file to other users / groups;
Publish*: Publish the selected folder / file to create static links (or publish URLs);
* Publish feature is available to Paid Members or True Members only
New Folder: Create a new online folder in the current folder;
New File:Create a new online file in the current folder;
Copy: Copy the selected folders / files to DriveHQ.com clipboard; you can then enter a new folder and click on Paste to make a new copy of the folders / files.
Cut:Cut the selected folders / files to DriveHQ.com clipboard; you can then enter a new folder and click on Paste to move the folders / files to the new folder.
Delete:Delete the selected folders / files.
Paste:Copy / move the folders / files in DriveHQ.com clipboard to the current folder location.
Rate:You can comment or rate a published folder or a folder shared to you.
Subscribe:Click on it if you need to order DriveHQ paid subscription.
Drag and drop upload / download is not supported on DriveHQ.com website. You can use DriveHQ FileManager client software or other FTP client software, incl. Windows Explorer for drag and drop.
3.2. Upload Files
From “My Storage” page, navigate to the destination folder, or create a new folder where you want the files uploaded to. Then click on the “Upload” button in the Toolbar, it will pop up the “Upload Files” page as follows:
From the upload files page, users can upload local files to online storage by three ways.
l Batch Upload (using Flash): you can select and upload maximum 20 files or 2 GB at once.
l Basic Upload: you should select local files one by one and upload maximum 6 files at once. Dependent on your file size, it might take some time to finish uploading.
l Drag & Drop Upload (using software): By using DriveHQ FileManager client software, you (paid members) can drag & drop local files to remote file server without size, quantity, time limitations.
The web-based file upload is designed to upload only a few small files. It is very inefficient if you need to upload many files or need to upload folders. It is also less reliable if you need to upload a very large file.
DriveHQ FileManager, DriveHQ Online Backup or FTP client software should be used to upload many files, upload folders, or upload very large files.
You can find links to DriveHQ FileManager and DriveHQ Online Backup on the right-hand side.
3.3 Download Files
In the “My Storage” page, you can navigate to any folders, click on it to enter the ShowFolder page. Select the file (i.e. check the checkbox) you want to download, click on “Download” in the toolbar.
Please note web browsers can only download files one by one. So you should select one file only. You also should not check any folders. Folders cannot be downloaded by a web browser.
3.3.1 Zip Download Multiple Files / Folders
If you have a paid account, then you can use the “Zip Download” button to zip multiple files and folders into a single zip file and then download the zip file.
Zip Download is a very convenient way for you to download multiple files and folders at once. However, “Zip Download” requires a lot of server resources as the server must zip the files / folders on the fly. Therefore, zip download should only be used to download multiple small files / folders. If you need to download some very large files / folders (e.g. over 100MB), DriveHQ FileManager or DriveHQ FTP is always the best solution.
3.4 Change folder view type
In the “My Storage” page or “Show Folder” page, you can click on the View button to change folder view type. Please see the screenshot below:
By default, folders are displayed as Thumbnail View. You can change it to Detail View as follows:
You can see the folder / file name, size, create time and last modify time in the Detail View. You can also sort files / folders by clicking on the column name.
3.5 Preview Files - the “Show File” page
Clicking on a file in the “Show Folder” page or “My Storage” page, it goes to the “Show File” page. DriveHQ.com supports preview of image files, text / HTML files, music files, video files. Dependent on the browser type and availability of plug-ins, it might also support some other file types. Below are a few examples of DriveHQ “Show File page” displaying different file types.
3.5.1 Displaying a photo (with online photo editing features)
Below is the “Photo Preview” page. Please pay attention to the photo specific options: Rotate and Effects (and slideshow).
Preview a photo in DriveHQ.com website
Click on “Rotate” button, it will popup the “Rotate image” page:
Rotate image page
You can then select a rotation type and click on Rotate to finish rotating the image.
3.5.2 Preview Text / HTML Files:
Click on a text / HTML file, it will open the “Show File” page to preview the text file:
The “Show File” page displaying a text file
To edit the text / HTML file, click on the “Property” button, it will popup the edit text page:
3.5.3 Playing music files online
From the ShowFolder or My Storage page, click on a music file, dependent on the music file type and availability of music player plug-in, it will starts playing the music file.
3.6 Direct Editing of remote MS Office Document files
If you have MS Office installed on your PC, then you can directly edit remote MS office files on DriveHQ.com. From the “Show Folder” page, click on an MS Office file, e.g. a Word Document TestMSWord.docs, it goes to the “Show File” page as shown below.
Click on the “Launch MS Word to Edit Remote File Directly”, it will automatically open MS word to edit the file as shown below:
After finished, you can simply click on Save or Save As to save the changes.
The technology uses WebDAV and advanced scripting, which requires MS office to be installed on the local PC; also the web browser must be Microsoft Internet Explorer.
The technology has its inherent weakness and may not always work reliably. For better and more general “direct editing of remote files” support, please install DriveHQ FileManager client software. You can double click on a remote file in DriveHQ FileManager to open and edit it. After finished editing, just save the file and it will be saved in a local cache and then automatically synchronized to DriveHQ remote storage.
3.7 Folders of image files (Photo Albums)
When you have a folder containing mostly images files, you can click on the Slideshow button to play a slideshow of the images. See below.
.
It will open a slideshow window as shown below:
3.8 Search Folders and Files:
In the ShowFolder page, click on the Search button in the small toolbar as shown below:
It will open a search files / folders page as shown below.
Type in the search criteria, then click on Search, it will display the search result page:
3.9 Customize Folder / Storage Options
3.9.1 Show / Hide Folder Tree:
By default, the system displays the folder tree in My Storage page and ShowFolder pages. You can hide the Folder Tree easily as illustrated in the following screenshot:
About show / hide the Folder Tree
3.9.2 Customize the “Show Folder” page
In the small toolbar above Folder contents, click on Option à Folder Option as shown below:
It will go to the Account Options / Folder Options page as shown below:
You can set the following account preferences:
- Show / hide folder tree;
- Display “My Storage” and “Show Folder” pages using Detail View / Thumbnail View;
Set the maximum number of rows and columns in ShowFolder page.
- “Enable SSL for the whole website”: by default, DriveHQ uses SSL for account pages and transaction pages. For other pages, such as ShowFolder pages and ShowFile pages, it uses regular HTTP. In most cases, HTTP is secure enough for transferring regular files. Most of Internet traffic is HTTP anyway. However, for those users who need extra levels of security and privacy, you can set this option to make all pages use HTTPS/SSL. This option requires paid account.
- “Enable delete files to “Recycle Bin”: by default, when you delete a file, it is immediately deleted. You can set this option to keep the deleted files in the “Recycle Bin” folder. You can manually empty the “Recycle Bin” folder, or it will be automatically emptied within 2 weeks. If you accidentally deleted a file(s), you can recover it from the “Recycle Bin” folder.
- “Show hidden folders”: some folders / files are hidden, e.g. the old version files. You can configure it to display all hidden folders / files.
- “Enable file history / versioning”: When this option is set, if you upload a file and if the same-name file already exists in the destination folder, then the old file will be kept as the old version, and the new file is saved as the current version. This feature requires paid service subscription. You can set it to keep multiple file versions.
4. Online File / Folder Sharing
DriveHQ recommends to never share your username and password with other users. Doing so would give the user complete access to your account information and the ability to make changes without your permission. However, there are several other ways in which you can securely share files / folders on DriveHQ.com.
4.1 Regular File Sharing
From “My Storage” page or “Show Folder” page, select a folder (or file) and click on the Share button, see below:
Select a folder and share it
After clicking on the Share button, it goes to the “Set Permission” Page, as shown below:
Share and Set permission page
Users can enter email addresses or DriveHQ usernames in the “Share to” field. (Separated by semicolons). You can also change the default “Share Name”, “Description”, “Permission Level”.
In addition, there is another way to share your files / folders. From “Share” page, click on the Add button, see below:
Add a folder and share it
After clicking on the Add button, it will go to “Select One Folder” page. Select a folder and click on the Select button, or click on the New Folder button to create a new share folder, see below:
Select a folder and share it
Create a new folder and share it
After selecting a share folder, it will go to the “Share & Set permission” page, shown as below:
Share and Set Permission page
4.1.1 Share permission levels
There are a total of 4-6 permission levels:
- Large view Only (can display file / folder list, file icons or preview images, but cannot download original files)
- Original view only (read-only);
- View Comments & rate (Read-only and read comments to the share);
- Comment and rate (Read-only and comment the Share);
- Upload / Add (Can upload / add files / folders to the shared folder, but cannot delete / modify);
- Full Access.
4.1.2 Share Change Notifications
There is also a premium service option: “Send share change notification” (which is not available to free service users). When this option is checked, and if somebody uploaded a new file / changed a file in the shared folder, the system will prompt the user to send a “Share change notification email” to all users in the “Share-to” list.
Share and Set Permission page
After entering the share info, click on the Share button, it goes to the “Share Notify” page. Please note the share has been created at this step. However, the share notification email has not been sent yet. You need to click on the button “Launch Outlook / Email Client” to open your email client software and send the notification email.
4.1.3 About Share Notification Email
Note: DriveHQ no longer automatically sends share notification emails. Notification Emails sent from DriveHQ email server is more likely to be filtered by recipients spam filters; it is also more likely to be ignored by the recipients. Therefore, sending the “share notification” email using your own email server is more likely to be received and read by the recipients.
Share Notification email is not always needed.
If all share-to users are DriveHQ members, then the share notification email is not required. The “share-to” users can simply logon www.drivehq.com using their own username / password. The folders shared to them are automatically linked in the special virtual folder: “DriveHQ Share”.
The “Send share notification email” screen
4.2. Access a shared folder
Assume UserA shared a folder to UserB using UserB’s email address, if UserB is not a DriveHQ member, then UserB will receive a Share Notification email. In the Share Notification email, there are detailed instructions about how to access the Shared folder. The instructions are as follows:
1. If you are a DriveHQ member, please log on to your account and access these files in the “DriveHQ Share” folder.
2. If you are not a DriveHQ member yet, I recommend you to sign up now using this e-mail address. My files will automatically appear in your "DriveHQ Share" Folder.
3. You can also access these files through the following link (you will have read-only access).
4. https://www.drivehq.com/sharing/ShareLogon.aspx?password=*******/************
5.
You can share different folders to different users with different levels of access rights.
You can also share the same folder to different users with different levels of access rights.
Please note: Share Names must be unique. So when you share the same folder again, you must use a different share name. (See the screenshot about “Share and Set Permission page”).
4.3 Share folders to contact groups
You can share a folder to a contact group. A contact group is just a list of email addresses, which you can assign a name to the list. For example, you can create a contact group as “My classmates”, which can include email addresses of your classmates. More detailed info about “Contact Group” is available in the “DriveHQ Email Hosting Service” section.
Share a folder to contact group(s)
From the above screen, click on “Select from your contacts”, it pops up a window as below:
Select the “share-to” contacts / contact groups screen
From the Select contacts window, you can select a contact(s), or check the contact group name to select all contacts in the contact group. After you made the selection, click on the Submit button on top.
By default, the system automatically creates 2 contact groups: “Friends” and “Blocked”. The contact group can be used in DriveHQ webmail as a mailing list. In here, it is used to group users into multiple contact groups. You can manage Contact Groups in DriveHQ webmail section, which will be described later in the webmail section.
4.3.1 The benefits of sharing a folder to a contact group(s)
Sharing a folder to a contact group is equivalent to sharing it to all contacts in the contact group. However, it has some advantages:
- You can group different users into different contact groups so that it is more convenient to share folders with those contact groups;
- You can add more users to a contact group. The new users will automatically inherit any Shared folders shared to the contact group.
- You can remove a user from the contact group. The user can no longer access any folders shared to the contact group. There is no need to edit the existing share.
- If you need to share a folder to many users, e.g. more than 100 users, then the “Share-to” field might reach its maximum length. In this case, you can share it to a contact group.
4.4. Edit / Manage Existing Shares
If you share a folder, the new share is added to the “Shares” list. You can modify the share or delete the share later. To do so, you can logon www.drivehq.com, go to My Storage page, click on Share tab, then click on Manage Shares. It will display the Share List page:
The “Manage Shares” screen (Displaying list of Shares)
You
can select a share and click on the Delete button to delete it. To modify
(edit) an existing share, just click on the Share name. It will go to the same
Share & Set Permission page where you can change the Share name, change
“Share To” users, change the permission level, etc. After you have finished
editing the existing Share, click Save to save the changes; it will create a
share notification email template and let you send a new Share notification
email. Again, the share notification email will not be sent automatically. You
can easily launch Outlook or other email client to send the notification email.
A “Launch Outlook / Other Email Client” button is included for
quickly launching a new Outlook email Window.
From the Share List page, you can also copy the Share Link. The Share Link (or Share URL) is different from Publish Link (or Publish URL). If you open a new web browser and enter the Share URL, it will ask for email verification. You must enter the email address that’s included in the Share-to list of the Share. A Publish URL directly opens the published folder or file without any verification.
4.5 Accessing a shared folder by clicking on the “Share Link” without logon
If you shared a folder with a DriveHQ username instead of an email address, then the recipient user can enter its DriveHQ user’s registered email address, or the user’s DriveHQ email address (USERNAME@drivehq.com) in the Share Verify window.
The “Share Verify” page
If the email address is verified, then the user will be directed to the “Show Shared Folder” page as shown below:
Displaying a shared folder by clicking on the Share Link without logon
This sharing method is called Non-member Sharing Method, which can be used to share a folder to any non-DriveHQ member users.
4.5.1 Access a shared folder with Full-Access right
This non-member sharing method has one weakness. Although you can share a folder with “full access” or “upload / add” permission, a non-DriveHQ user can never upload files to a shared folder. To upload files / delete files in a shared folder, you must logon as a DriveHQ member. The non-DriveHQ user can sign up a new account on DriveHQ using the email address that’s included in the “Share-to” list within 10 days. After he / she logons on the new account, he / she can see the Shared folder(s) in the special folder:
\DriveHQ Share\SHARE_FROM_USERNAME\SHARE_NAME
If the folder is shared with proper access right, and if the Share-to user logs on his/her own DriveHQ account, then the user may upload / modify / delete in the shared folder:
A DriveHQ user accesses a folder shared to him / her with Full-Access right
As you can see from the above screenshot, the Share-to user “dhqtest” logged on and accesses the folder “My Pictures” shared by “test_drivehq”. As you look at the toolbar section, the Upload, download, New Folder, New File, Cut, Delete, Copy buttons are all enabled, meaning user“dhqtest” can create, upload, modify or delete files / folders in the shared folder.
4.6 Comment / Rate a shared folder
When a DriveHQ member accesses a shared folder, he/she can also comment or rate the folder.
Just scroll down to the bottom of the “Show Shared Folder” page, you can see comments and ratings by other users; also there is text box and drop down list for you to comment and rate the folder / files.
Comment and rate a shared folder
The user who shared the folder can read the comments and ratings from the “Share List” screen, then click on “View Received Comments” link. It will display the list of comments and ratings.
View comments and ratings
5. Publish Folders or Website
5.1 What is Publish? (Create direct file links or publicly accessible websites)
Publish means to make your files / folders / web pages / website accessible to anybody on the Internet, incl. those non-DriveHQ members.
If you publish a folder / file on DriveHQ, you can link to the folder or files in it with static URLs (i.e. Publish URLs). You can link to the file(s) / folder(s) from any other websites or web pages.
5.1.1 Only Paid Users and Certain Authorized True Users can publish on DriveHQ.com
Please note: by default, your DriveHQ folders and files are secure and private. Other users cannot access your files / folders unless you have shared your folders (files) or published your folders (files).
Only “True Members” or “Paid Members” can Publish Folder / File / Website. Free members can also publish. However, the Publish will expire in 20 minutes.
5.2 Publish Folders / Files
To publish a folder / file, you can logon www.drivehq.com, go to My Storage page, then select a folder / file to publish, click on Publish button in the toolbar, as shown below:
Publish a folder on DriveHQ.com
After you click on Publish, it will go to the “publish & set permission” page.
Publish & Set Permission page
It is usually recommended to only use alpha-numeric characters for the Publish Name (and file names / folder names). When you publish a folder / file, usually you want to create Publish URLs for linking to the folder and files in it. If you have special characters in your file name / folder name or share name, then the publish URL might also contain such characters, which might corrupt the URL.
In the “Publish & Set Permission” page, you can enter the publish name, description, choose one from 4 permission levels, then check the “Yes, I agree” check box, and finally click on Publish. It will publish the folder immediately, then redirect to the confirmation page as shown below:
In the Publish Confirmation page, you can find the Publish URL for the folder and the Publish URL(s) for the files in the published folder.
Note:
Publish URLs for files in a published folder may not work if the Publish permission is set to “Large view only” or “Original view only”. The permission of “Large view only” and “Original view only” prevent the original file(s) from being downloaded.
Publish a File:
You can also select only one file and publish it. The steps are pretty much the same. When you publish a file, the file is automatically copied to a new folder named My Share under the My storage folder path. The new folder is then published. This is done automatically by the system.
5.3 Manage / Modify / Delete an Existing Publish
After you have published a folder, you might want to modify / delete the existing Publish. To do so, logon www.drivehq.com and click on the Publish tab. You will see the main Publish Screen below:
Publish Main Page
On the left hand side, you can easily publish a new folder by clicking on “Publish a Folder” link. To manage existing Publishes, click on the link “Manage My Publishes”, it will go to the “List of Published Folders” page:
Publish List page
You can select a Publish to delete; or you can click on a Publish to modify it.
5.3.1 The Publish URLs (direct links) for a published folder and files in it
The publish list page also tells you how to get the Publish URLs. Published folders / files can be accessed from DriveHQ.com website using regular publish URLs in this format:
https://www.drivehq.com/file/df.aspx/publish/USERNAME/PUBLISHNAME/FILENAME
They can also be accessed using DriveHQ FTP URL, which is as follows:
ftp://ftp.drivehq.com/USERNAME/PUBLISHNAME/FILENAME
Published folders can also be accessed from DriveHQ FileManager client software. As shown above in the “Publish List page” screen, Logon DriveHQ FileManager, then type in the address:
\\USERNAME\PUBLISH_NAME
where USERNAME is the user who published the folder. Using DriveHQ FileManager or DriveHQ FTP, you can drag & drop download many folders / files in the published folder at once.
You can hide the username and sharename in the publish URL by using the “Safe Publish URLs”. You must use DriveHQ FileManager to right click on published files / folders. For more info, please read the section about DriveHQ FileManager.
5.3.2 Comment and Rate
When you publish a folder, you can set the permission to “Download & Comment”. This allows the other users to download your files and comment your files;.
You can view the “received comments” from the Publish List page, click on “Received Comments” link.
5.4 Publish Website
DriveHQ supports static web hosting service. To publish a static website (that doesn’t require server-side scripting & database) on DriveHQ is extremely easy. You only need to upload your website files to the wwwhome folder.
If you have a paid account, your website is automatically published. You can access your website in DriveHQ at:
http://USERNAME.firstcloudit.com
The default website file name is “home.htm”. If you use a different default website file, e.g. index.html or default.htm, you just need to delete the current Home.htm file, upload your index.html / default.htm file into the wwwhome folder, then make a copy of the home page file and rename the copy as home.htm.
If you have a free account, you cannot publish a website. You must upgrade to a paid account or True Account.
5.4.1 Activate, disable and re-enable your website
For a True Account, your website is not automatically activated. In fact, the current implementation requires a True Account to disable the website and then re-enable the website.
To disable and re-enable your website, from the Publish Main page, click on “Publish My Website”, it will go to the following page:
Publish website page
Click on Enable/Disable tab, then click on “Disable My Website” button to disable your website, then click on “Enable My Website” again to re-enable your website.
5.4.2 Upload / edit your website files & the default home page file
You can click on Edit Homepage to edit your homepage. However, a recommended method is to create your own home page files using other HTML authoring software, then drag and drop the website files to the wwwhome folder using DriveHQ FileManager or FTP client software.
Please note your default home page file is “home.htm”. When you enter:
http://USERNAME.firstcloudit.com/
this file will be displayed. If you use other file name as your home page file, you can delete “home.htm”, then make a copy of your own home page file and rename it to “home.htm”.
5.4.3 Custom Domain Website Hosting Service
DriveHQ web hosting service supports Custom Domain web hosting. For more info, click on “Custom Domain” tab in the “Publish Website” page. A lot of detailed support info is available in this page.
DriveHQ supports Custom Domain Web / FTP / Email Hosting; however, DriveHQ does not offer Domain Registration service. To use DriveHQ custom domain hosting service, you must have registered a domain from a domain registrar company, such as Network Solutions, Register.com or GoDaddy, etc.
If you have registered a domain, then you need to add a DNS A-Record. For most small businesses, you probably don’t have your own DNS server, which is fine. All (almost all?) domain registrar companies offer free DNS service if you order domain name through them.
To create a custom domain website, you need to add a DNS A-Record, such that
www.YOURDOMAIN resolves to 66.220.9.47
YOURDOMAIN is like xxx.com, xxx.biz or xxx.net, etc.
How to add a DNS A-Record is not covered in this document. Different domain registrars’ websites have different implementations. You need to search on your domain registrar’s website, or contact their support for more detailed info. You might be able to get a little more info on DriveHQ support forum; such info may not be up to date as your domain registrar company can change their web pages from time to time.
Once you have added a DNS A-Record, please wait for 12-24 hours. DNS changes usually take 12-24 hours to update. You can also check the status by typing in a command-line window:
Ping www.YOURDOMAIN
If it displays ping www.YOURDOMAIN [66.220.9.47]…, then your DNS A-Record has been successfully updated on your DNS server. (Please note DNS update needs to propagate to more DNS servers. It could take a few more hours before our DNS server receives the update. )
Once the DNS A-Record has been successfully updated, you can go back to the Custom Domain page, as shown below:
Custom Domain Website Publish page
You can enter your website domain name and email domain name at the same time. Leave empty if you don’t want to use custom domain service. Scroll down to the bottom of this page and click on Submit to save the info. Your custom domain website is now available online at:
You will still need to upload your website files to the wwwhome folder, if you have not already done so.
For more info about Custom Domain Email Hosting service, please read the DriveHQ Email Server Hosting Service section.
Custom domain FTP Server Hosting service is easier. You only need to add a DNS A-Record such that ftp.YOURDOMAIN resolves to 66.220.9.50
6. DriveHQ Group Account Service
DriveHQ offers the basic service for free. Moreover, you can upgrade to group account service for free, which also includes one free sub-user license!
DriveHQ group account is designed for businesses, organizations or a group of people who need to create multiple accounts, share and collaborate files, or centrally administer multiple accounts, etc.
6.1 Upgrade to a group account for free
Upgrading to a group account is very easy. Just logon www.drivehq.com, go to My Account page, and then click on Group Account, as shown in the screenshots below:
How to go to My Account page
From the My Account page, click on Group Account link, it displays the “Free upgrade to group account page”:
This page has a lot of useful information about Group Account service. So please take a moment to read the information. After you have finished reading the page, scroll down to the bottom and click on “Free Upgrade to Group Account”. It will display a confirmation window as shown below:
Read the Group Account Terms and Agreement, check the “Yes, I agree” check box, and then click on Upgrade, your account will be upgraded to a group account immediately.
Upgrade to Group Account confirmation page
6.2 The “Group Admin” features
So now you have become a group account, you immediately have access to the Group Admin tool. Click on the “Group Admin” link, it goes to the Group Admin main page:
Group Admin main page
There are a lot of functions in this page. On top, you can see the Toolbar:
Create: Create a new sub-user; no email confirmation is needed.
Add: Add an existing DriveHQ user to this group account. For security reason, the user will be sent a “Group Invitation email”. He must agree to be added to the group.
Import: If you need to create a lot of sub-users, you can prepare a list of user info in a Microsoft Excel file, then save it as a CSV file. DriveHQ can import the user info list and create all sub-user accounts in batch.
Edit: Edit a sub-user account info.
Save: Save the changes;
Delete: Delete the selected sub-user(s). You can delete the sub-user(s) completely, or you can remove them from the group account, but keep their accounts on DriveHQ.com as a regular / standalone account(s).
6.2.1 Create a new sub-user
Create Sub-user Page
From the toolbar, click on Create, it will open the above “Create sub-user” page. You need to enter the sub-user’s username, password, email address, user type and sub-group info. Other fields are optional. After you have input the data, click on the Save button to finish creating the sub-user.
Sub-user accounts don’t need to be activated. They are always automatically activated. Moreover, you don’t need to enter an email address when creating a sub-user account. You can simply check the check box “Use DriveHQ email”.
6.2.2 Group storage allocation considerations
You need to decide how much storage space and download bytes you will allocate to your sub-user. When you allocate storage space and download bytes to your sub-user, it reduces your own account max storage space and max monthly download bytes. You can re-allocate storage space and download bytes at any time using the “Group Admin” feature. You have two options in allocating storage space and download bytes.
- Divide your storage space and download bytes among all group members. Each sub-user will be allocated with certain amount of storage space. They can upload files to their own account. A sub-user cannot access folders / files in a different sub-user account. The group admin users can “Logon As” sub-users and gain full access to the sub-user accounts. The drawback of this solution is: you might have multiple group members, one sub-user could have used all his available storage space (or download bytes) while other users have enough free storage space and download bytes. In this case, you can upgrade to a higher level subscription, or use the “Group Admin” feature to re-allocate storage space / download bytes.
- You can create folders in your own account and then share different folders to different users with different levels of access rights. Each sub-user can logon and access the folder(s) you shared in the special folder:
\DriveHQ Share\YOUR_USERNAME\SHARE_NAME
A sub-user cannot access folders not shared to him / her.
When a sub-user uploads / downloads files in your shared folder, it uses your account storage space and download bytes. This way, all your group members can share the same storage space / download bytes. The drawback is: if one group member uses too much storage space / download bytes and reaches your max storage space / download bytes, then all group members will be affected!
6.2.3 Group User Types:
There are 5 types of group users:
- Group Owner
- Group Administrator
- Sub Group Administrator
- Regular Group Member
- Guest User
A group owner account is a special Group Administrator account that cannot be deleted. The Group Owner account username is usually the business name. It is the first user account in this group, which is responsible for the whole group, incl. creating / managing sub-users, allocating storage space, ordering premium services and paying for the service charges, etc. The group owner account cannot be deleted; its username cannot be changed using the group admin tool. DriveHQ customer support can help you change the group owner account username.
The group owner account can create more group member users, incl. group administrators.
A Group Administrator can add/create/edit/delete/disable a group member; assign storage space and monthly download bytes to group members; reset passwords or logon as sub-users. It can also help group members to create or share files / folders.
A sub-group administrator is similar to a group administrator, except it can only manage sub-user accounts that were created by it.
A group guest user is a special sub-user who cannot access any Group Shared folders. It cannot see any group account info, except accessing the folder(s) shared to it in the special folder:
\DriveHQ Share\
The free group account service allows for only 1 sub-user. For more sub-users, you need to order more user licenses.
6.2.4 Create Sub-groups
You don’t directly create sub-groups. Instead, you create sub-group administrators. A sub-group administrator can create more sub-users for his own sub-group; or a group administrator can also create a sub-user and assign it to a sub-group.
A subgroup administrator has full access to all his sub-users. It can edit / reset its sub-user info, allocate storage and download bytes from its own account storage space and download bytes.
The maximum number of sub-users that can be created by a sub-group administrator is the available user licenses of the whole group account. The maximum amount of storage space it can allocate to its sub-users is limited by its own account storage space (and download bytes).
6.3 Group Folder Sharing and Permissions
The group account service is extremely powerful in sharing different folders and setting different access rights for different users.
First of all, you can create a list of sub-users; based on the detailed user role, you can create group administrators, sub-group administrators, regular group members and guest accounts. E.g. you can create the user lists below:
Group Administration page
As shown above on the top-left corner (“Welcome dhqtest”), the user “dhqtest” is the group owner account. (Usually it should be a company name).
Dhqtest11 and dhqtest21 are two sub-group administrators. Dhqtest12 and dhqtest13 are sub-users of dhqtest11, dhqtest22, dhqtest23, dhqtest24 and dhqtest25 are sub-users of dhqtest21.
The group owner can create folders in its own account and share different folders to different users with different levels of access rights. The screenshot below shows the group owner has created folders and shared different folders to different sub-users.
“ShowFolder” page of a group owner account who shared folders to sub-users
When a sub-user “dhqtest11” logs on DriveHQ.com, it will display the “My Storage” page as follows:
“My Storage” page of a sub-user account
Note here “dhqtest” is the main group name (usually a company name);
Dhqtest11 is the folder shared to “dhqtest11” by “dhqtest” with full access right. There are two other default Group shared folders: “GroupRead” and “GroupWrite”, which are shared to all group members. You can edit or delete these shares from “Manage Shares” screen.
Also pay attention to the Upload / New Folder / Delete buttons. As you can see that the user “dhqtest11” can upload / create / delete files / folders in the shared folder.
Click on the “Sub Group Admin” link, it will display the following page:
Subgroup Administration page
The subgroup administrator user dhqtest11 can also create folders and share different folders to different sub-users with different levels of access rights.
When the sub-user “dhqtest12” logs on its own account, it will display the following “My storage” page:
As you can see, the sub-user “dhqtest12” can see folders shared to the whole group by the Group Owner user “dhqtest”. It can also see the folders shared to it by the sub-group admin user. But it cannot see folders shared to different sub-users.
As you can see, when the Guest user “guest1” logs on, it can only see the folder shared to him explicitly (in this case, Folder4Guest1”). The group shared folders such as GroupRead and GroupWrite are invisible.
6.4 Real Business Scenario
The group account service is very useful when you have a team of people using our services.
If you have a small team, then you only need one group owner account, which creates several normal group members. The group owner can either assign storage space to sub-users, or create folders in its own account and share different folders to different users with different levels of access rights. If you need to share files with external clients or vendors, then you can create guest user accounts for them so that they can only access folders you shared to him, but not other group shared folders.
If you have team of more than 10 people, then you might want to create another group administrator account, which can help manage the group account.
If you want to divide your team into multiple groups, then you can use the sub-group feature. You can create any number of sub-groups; you can also create any number of sub-users. With 2-level group account service, DriveHQ system can support 10,000s of group members.
The sub-group feature is especially useful if your company has multiple offices. The group owner account can create a sub-group administrator account for each office. The sub-group administrator can then create sub-users for his office.
A folder can be shared to the whole group, a sub-group, a contact group, or any individuals, or combinations of the above.
6.5 More Group Admin Features
After you have created some group member accounts, the Toolbar at the bottom of Group Admin page becomes more useful.
Reset Password: Change a sub-user password;
Set Storage: Change a sub-user max storage space and download bytes;
Enable / disable: Enable or disable the selected sub-user account;
View Account: View the sub-user account info;
Backup status: View the Online Backup task status of all group members;
Logon As: Logon as the selected sub-user and gain full access to the sub-account.
Batch User Creation and Management
-
Import: The import feature can be used to create a lot of
sub-users quickly. Click on the button in the group
admin page, it will provide more info. A template file is available online
showing how to create the user info list file.
- Batch user management:
From the group admin page, there is an Action menu. Click on it and it will pull down more sub menus. You can apply the action to all select users at once. You can also easily search sub-users account(s).
6.6 Forcing Sub-users to only Use Folders Shared by Group Admin
By default, each sub-user has its own account. Folders / files belonging to a sub-user account are secure and private. Different sub-users cannot see folders belong to each other. The group administrator user(s) can logon as other group members and gaining full access to other accounts. The sub-group administrators can also logon as sub-users belonging to the sub-group.
When a group administrator user creates a sub-user, it can allocate storage space and download bytes to the sub-user, which reduces the Group Owner users’ storage space and download bytes. Each sub-user is set with a storage and download bytes quota. If you (the group admin) would like to share all storage and download bytes among all group members, you can use shared folders. You can create folders in your own account and share different folders to different users with different levels of access rights.
To force a sub-user to only use folders shared by other user(s), you can delete all folders in the sub-user account. Then use the group admin tool, you can reset the sub-user’s max storage space to 0. When a sub-user has 0 storage space, he cannot create / upload files or folders into his own account.
6.7 Group Account Settings and Group Account Balance
From Group Admin page, you can access all group account settings and balances. The group account balance and options can be accessed from the bottom-left corner of the screen, as shown below:
Access group settings & balances info
Click on the “Group Account Balance” link, you can find the group account balances:
Group Account Balance page
Click on Group Backup List, you can find all backup tasks created by all group members.
Click on Group Options, it will display the Group Options page:
Group Options Page
You can set the following group options:
- Group member users cannot order subscription services.
This is the default option. The group owner account should take care of ordering subscription service and paying for the service charges.
- Group member users cannot see group member list.
You can set this option so that different sub-users don’t see each other. This is especially useful for Group Account Service Resellers where different sub-users are not affiliated and don’t work for the same company / organization.
- Group member users cannot create group-shared folders
You can set this option so that sub-users cannot create group shared folders. This is especially useful for Group Account Service Resellers where different sub-users are not affiliated and don’t work for the same company / organization.
- Don't create the default group-shared folders (GroupRead and GroupWrite)
Set this option to prevent creating the default “GroupRead” and “GroupWrite” folders. You can easily create your own Group Shared folders. (Just share a folder and check “Share to Your Group”.
- Group member users cannot see share list.
The group member users cannot see the “DriveHQ Share” folder and all folders shared to them.
- Group member default to Go to “Which Service Page” after logon:
After a group member user logs on DriveHQ.com website, the system redirects to one main service page. You can configure it to go to one of the following pages:
o My Storage page;
o DriveHQ Share page: ShowFolder page showing the “DriveHQ Share” folder;
o Group Share page: ShowFolder page showing the “DriveHQ Share\GroupOwnerUserName\” folder.
o Sub User Shared Folder page: ShowFolder page showing the “DriveHQ Share\GroupOwnerUserName\SubUserName” folder.
o Web Mail page: Go to DriveHQ Webmail main page.
The default setting is to go to group member’s “My Storage” page. Changing the default page might be useful in case some member users don’t know how to find the shared folders.
6.8 Downgrade Group Account to a Standalone Account
If you have a group account and would like to downgrade it to a standalone account, well usually you don’t need to. The group account service has more powerful features and it is free. If you still want to downgrade, you must first delete all sub-users using Group Admin tool. After that, go to the Group Admin main page, click on Group Account Balance. There is a Downgrade button in that page.
7. Account and Subscriptions
7.1 Sign up a Free Account (or Account Registration)
All DriveHQ services and features share the same backend database system. If you have a DriveHQ account, you can use the same account for all DriveHQ services and features.
To sign up a free account, you just need to visit www.drivehq.com, click on “Sign Up FREE” button or link, it will go to the Sign up page as shown below:
Free Sign-up Page
You only need to enter username, email address and password to sign up; you also need to check the checkbox “I accept Membership Agreement”. While it is not required, it is recommended that you enter additional optional information. To enter the optional info, please click on the “Optional Information” link.
It is recommended to only use alpha-numeric characters for the username. Username should not contain any special characters, incl. spaces. For better security, it is also recommended using strong passwords, e.g. passwords that contain at least 10 characters, incl. letters, digits and other special characters such as “_, &, !, #, @, -”, etc.
Since DriveHQ has more than 1 million registered users, a lot of popular usernames have already been taken. So it is recommended to use less popular usernames.
Please note passwords are case sensitive. So a password of “abcde12345” is different from “Abcde12345”.
The email address must be a real email address. If it has spam filters, please make sure your email server (or ISP) can receive emails from DriveHQ email server.
After you click on “Sign Up FREE” button, it will go to the “Account Created, Need Activation” page:
“Account created, need activation” page
Your account is created; dependent on your email address, DriveHQ usually automatically sends an “Account Activation” email to the email address you entered for registration. After you receive the Account Activation email, you must click on the Activation link to activate your account.
Certain email addresses require no activation; in this case, the system will tell that your account is created and no activation is required.
If you cannot receive DriveHQ email, then your account cannot be activated since you cannot receive the Account Activation email. It is very common that the Account Activation email could be filtered into Junk / Bulk / Trash mail folders. So please make sure you check such email folders. If you still don’t receive the activation email, please contact your Network Administrator, or your ISP not to block / filter DriveHQ emails. You can also send an email to DriveHQ customer support.
Please note if an account is not activated in 2 days, it will be deleted. If so, you can easily sign up again using the same email address or a different email address. Sign up is extremely easy; it takes no more than a couple minutes to do so. If you can receive our activation email, your account can be activated instantly.
7.2 Account Types
Not including group accounts, DriveHQ has 3 types of user accounts:
- Free Account
- True Account
- Premium Account
The group account user types are described in the Group Account Service section.
7.2.1 Free Account
A free service account registered with a free email address, or an ISP email address. In general, a free account (user) is an account (user) whose identity cannot be verified. In reality, a lot of free accounts are fake accounts or test accounts.
7.2.2 True Account
A free service account registered with a real (custom domain) business email address; a free account who has deposited at least $3 into its account. In general, a True Account is an account whose identity probably can be verified using the “custom domain email address” or “credit card transaction”.
A True Account is still a free service account.
7.2.3 Premium Account (or Paid Account)
Any user who has ordered a paid subscription service is considered a premium user. Their account is “premium account” or “paid account”. Also, a sub-account of a paid group account is also considered premium account.
7.2.4 Comparison of free service and premium service
DriveHQ offers 1GB storage space for free; it also offers the group account service for free. A free service user can upgrade to a group account and create 1 sub-user for free. It is recommended that users try the free basic service before ordering a paid subscription. The free service has almost all features of paid service with some restrictions. The main restrictions include:
|
|
Free Service |
Premium Service |
|
Basic online storage features |
Yes |
Yes |
|
Basic online sharing features |
Yes |
Yes |
|
Basic online backup features / software |
Yes |
Yes |
|
Basic email features |
Demo only |
Yes |
|
Basic FTP features |
Yes |
Yes |
|
Max storage space |
1GB |
2GB – 10TB, dependent on service plan |
|
Max monthly download bytes |
200MB/month initially; can get more download bytes by using more DriveHQ features or refer more users. Max 1GB free monthly download bytes |
4 times of subscribed storage amount. E.g. if you order 5GB storage space, you get 20GB download bytes/month, which is usually far more than enough. |
|
Usage restriction |
Personal use, casual use or evaluation use, not for business use |
Business or personal use |
|
Max continuous upload |
50MB; after 50MB, it will pause; you can click on OK button to resume. |
NO limit (or up to Max available storage space) |
|
Folder Synchronization |
Can create 2 synchronization tasks; only support one-way sync. |
Can create many synchronization tasks; supports 2-way sync. |
|
Online Backup |
Can create 2 backup tasks only |
Can create many backup tasks |
|
Zip Download |
No |
Can zip download folders and files using any web browser. |
|
File versioning |
No |
Yes |
|
Performance / Speed |
Might be a little slower |
Might be a little faster. (There is no guarantee as the speed is dependent on many factors) |
|
Email Server Hosting Service |
Free service is for demo only; limit to send no more than 5 emails / day. |
Most of email server features are supported. Can send a lot more emails / day. (Mass mailing and spamming are prohibited and automatically blocked. ) |
|
FTP Server Hosting Service |
Limit to 2 concurrent FTP connections only; limited to 10 logons per day. |
Allows more concurrent connections |
|
Web Publishing |
Free users: Webpages/links expire in 6 minutes True users: Same as free users, unless authorized |
Yes |
|
Folder / File Publishing |
Free users: No. True users: Can publish media files. |
Yes |
|
Group User licenses |
1 free sub-user license only |
Can order any number of user licenses at a low price. |
|
Custom domain FTP hosting |
No |
Yes |
|
Custom domain website hosting |
No |
Yes |
|
Custom domain email hosting |
No |
Yes |
|
Custom logo and landing page |
No |
Can order separately. |
7.3 View or Edit Account Details
Logon www.drivehq.com, click on “My Account” tab or click on your username as shown below:
It goes to Account Details page:
Account Details page
On this page, you can view or edit your account info. After finish editing, you can click on Submit button to save. If you change your email address, please note the system doesn’t immediately change your email address. Instead, it will send a confirmation email to your new email address. You must receive the confirmation email and click on the confirmation link to confirm the change.
7.3.1 Change password / username.
From the Account Details page, you can click on “Change my password” link to change your password.
You cannot change your username online. Username usually cannot be changed. If you do need to change your username, please send an email to DriveHQ customer support.
-
From the Account Details page, you can also find your referral link and a link to update your Alias / Icon. The Referral Link can be used to refer other people to sign up DriveHQ.com. You can get sales commissions if you can refer users who later order DriveHQ services. The Alias and Icon may be used in DriveHQ Forum / Customer Support forum to hide your real username.
7.3.2 View Account Balances
From My Account page, click on Account Balance, it will display the “Account Balance” page:
Account Balance Page
In the account balance page, you can find your account sign-up date, Member (User) Type, Max Storage Space, Used File Space, Total Number of Files, Total Logon Times, Last Logon Date, Users Referred, Max Download Bytes, Used Download Bytes, Total Number of Emails, Total Email Data Size;
Moreover, you can also find your Account Cash Balance, Service Coupon Balance and Total Points. Your referral link is also available in this page, which you can use to refer other people.
On top of the Account Balance page, there are 4 buttons:
- Deposit: i.e. make a payment. You can deposit (make a payment) in your account at any time. The paid amount can be automatically used for monthly service subscription fees.
- Transfer: If your account has enough cash balance, you can transfer the cash balance to other DriveHQ user accounts.
- Update Secure Password: To transfer your DriveHQ account cash balance, you need to enter your DriveHQ account password and another secure password. The default secure password is the same as your DriveHQ password. After you change your DriveHQ password, the secure password does not change. You can change your secure password by clicking on “Update Secure Password”.
- Refresh Account Balance: refreshes all saved / cached account balance info. This is very useful if your account balance has been changed from a different computer or different application. For example, you might have uploaded a file from a different computer, or somebody else might have uploaded / downloaded / deleted a file in a folder you shared to him/her; or you might have other application, such as DriveHQ FileManager, DriveHQ Online Backup or any FTP client software changed your files / folders. In this case, your account balance info might be outdated, click Refresh will being your account balance info up-to-date.. You can also logout and logon again to refresh your account balance.
7.3.3 Account Options Page
From My Account pages, click on Account Options, it opens the Account Options page. It has two parts: Folder Options and Email Options; the Folder Options have been described before. The Email Options will be described later.
7.3.4 Website Customization – customized logo and logon page
It will be described in the Enterprise Service section. The service itself is not related with the Enterprise service.
7.4 DriveHQ Service Subscription
7.4.1 Order DriveHQ Storage Subscription or Group User Licenses
From My Accounts page, you can click on Subscribe to order DriveHQ paid service. Dependent on your user type, if you have a group account, you will see two types of services:
- Storage space;
- Group user license.
If you have a regular (standalone) account, then you will only see Storage subscriptions. Sub-users of a group account will not see the Subscribe button.
If you have a regular account and would like to order additional user licenses, you can click on Group Account link from My Account pages, then upgrade to a group account for free. You can then order additional user licenses.
DriveHQ premium service offers more storage space, more download bytes, fewer restrictions. A comparison of free service and premium service is available in 7.2.4.
DriveHQ offers high-end online storage, online backup, online sharing and collaboration, FTP Server Hosting services at consumer level service price. We have bundled all storage related services in the same premium service package. (DriveHQ EmailManager / Email Backup service is sold separately) DriveHQ service can create a lot of value and save a lot of cost for businesses. You can install DriveHQ client software on any number of PCs for no extra cost; you can use DriveHQ service on any number of PCs. Multiple people can logon DriveHQ at the same time.
7.4.2 Monthly Subscription Service and Annual Subscription Service
DriveHQ offers subscription services. All subscription services automatically renew. You can cancel a subscription online at any time to stop future billing.
To decide on monthly or annual subscription, you need to consider the following:
- DriveHQ usually does not record your credit card info. So DriveHQ never automatically debits your credit card. You must pay the service fee online. If you order monthly service, you need to pay for the service monthly.
- If you make a payment (deposit) of less than $10, DriveHQ will apply a $0.5 transaction fee. The transaction fee is applied by credit card processor companies. When you order DriveHQ monthly service initially, the fee is waived. To avoid the transaction fee, you can pay several months at once to make your payment more than $10.
- To avoid the hassle of monthly payment and to avoid the transaction fee, it is recommended using our annual subscription. You also save 2 months of service fee by changing to annual service.
7.4.3 Upgrade to a higher level service plan
If you have ordered a subscription service and if you need more storage, more download bytes or more user licenses, you can upgrade to a higher level subscription service plan. Your account info and files / folders will remain intact.
There are several ways to upgrade:
- Order a new subscription. E.g. if you ordered 20GB storage space, and if you need 5GB more, then you can simply order a new 5GB subscription or 10GB subscription. The cost will be $19.99/month + 7.99/month = $27.98/month.
- If you ordered 20GB storage space, and if you need 20GB more storage space, then you can simply order a new 50GB subscription and cancel the current 20GB subscription. If your account has un-used service credit, do not worry, the remaining service credit will be kept.
- If you ordered 100GB service plan and you still need more storage space, then you can order more subscription services. For example, if you need 250GB storage space, then you can order two 100GB subscriptions and one 50GB subscription. You can also consider using DriveHQ Enterprise Service, which is described in the Enterprise Service section.
If you ordered an annual subscription and if you need to upgrade in less than 1 year, you will not lose un-used service credit. The service credit is automatically applied to your DriveHQ account. You can also make a payment of the difference amount and contact DriveHQ customer support. For example, if you ordered 10GB annual service, after 6 months, you want to upgrade to 20GB, then you only need to logon www.drivehq.com, go to My Account, then click on Deposit and make a payment of
$199.99 – 129.99/2 = $134.5.
You can find your account remaining credit online in the Account Balance page.
7.4.4 Change monthly subscription to annual subscription
If you ordered a monthly subscription and you would like to change to annual subscription, you can simply order a new annual subscription plan and then cancel the old monthly subscription. Your account info and files / folders will remain intact.
7.4.5 Service Cancelation or Downgrade
For free service users, there is no need to cancel the account. After all, it is free. Also DriveHQ never sends spam emails. If you still want to cancel a free account, you can delete all your files in your DriveHQ account and don’t logon again. Your account will be deleted in batch later.
For paid members:
All subscription services automatically renew, unless canceled. To cancel a subscription:
- You must delete your files, reduce storage and download bytes usage;
- If you have a group account, you must also delete all sub-user accounts.
After you have done so, you can logon www.drivehq.com, go to My Account pages, click on Subscribe, then click on Current Subscription as shown below:
Current Subscription(s) Page
You can then click on a subscription service to show the subscription’s detailed info:
View Order Item page and cancel a subscription
You can click on the “Cancel Subscription” button in the “View Order Item” page to cancel the subscription. If you have multiple subscriptions, you need to cancel your subscriptions one by one.
To downgrade your subscription, you will also need to reduce your storage usage / bandwidth usage / number of sub-users. You can then order a new lower level subscription service and cancel your current subscription(s).
7.5 Service Billing, Payment and Deposit
DriveHQ subscriptions always automatically renew unless canceled. Annual Subscription is treated as a “Prepaid Monthly Service with Discount of 2 months/year”.
7.5.1 Monthly service billing date
A user’s monthly billing date is the day of month when he / she signed up DriveHQ free service. You might wonder why the monthly billing date is not the day of month when you ordered the subscription. This is because a user can have multiple subscriptions ordered on different dates; a user can also cancel an old subscription and order a new subscription which causes the order date to change.. Instead of changing the user’s billing date, using the initial sign-up date is more consistent.
Monthly service billing date also applies to free service users. Free service users have a very limited “max monthly download bytes”. The “used download bytes” will reset to 0 on the monthly billing date.
7.5.2 Partial-month service charge
If a user doesn’t sign up the free service and order paid subscription on the same date, then a partial month service fee will be recorded. For example:
If a user signs up a free account on Apr. 10; on Apr. 20, he orders DriveHQ 20GB monthly subscription. Then the monthly billing date is 10th of each month. When the user ordered 20GB monthly subscription for $19.99/month, he will be charged for $19.99. However, the system automatically credits $6.66 (10 days) to the user’s DriveHQ account. The service credit is displayed in the Account Balance page. The user will receive a new invoice on May 10 for an amount of:
$19.99-6.66 = $13.33
The user can pay only $13.33 to get another month’s service; it is usually recommended to pay several months at once to avoid the hassle of monthly payment.
7.5.3 Pay for the service due and payment methods
DriveHQ system automatically sends a billing email to the user when its account balance becomes negative. In the billing email, there is a lot of info regarding service billing, upgrade, downgrade and cancelation.
To make a payment (deposit), you can logon www.drivehq.com, go to “My Account” page, then click on deposit.
Deposit (Make a Payment) Page
As you see, DriveHQ supports several payment methods. You can Pay by Credit Card, Pay by PayPal and Pay by Company Check / Bank Wire.
“Pay by Credit Card” and “Pay by PayPal” can both be processed instantly. Other payment methods, such as company checks or bank wire can take about 1 day to over 1 week to be processed.
7.5.4 Work around Transaction Problems
In order to fight fraudulent transactions, DriveHQ has required verification of all billing info. So please make sure you enter the correct credit card billing info. Unfortunately some credit cards don’t support address verification, in this case, Transaction will fail. When a transaction fails, please don’t retry too many times as it could cause your account being blocked by both your credit card company and DriveHQ.
You can retry using Pay by PayPal. PayPal is an eBay company, which is very secure and you can trust them. With Pay by PayPal, you don’t need to provide your credit card info to DriveHQ at all. PayPal seems to accept more credit cards, esp. oversea credit cards; moreover, PayPal supports e-Checks using your bank account.
PayPal account is not required for “Pay by PayPal”. So it is very easy to use Pay by PayPal.
You can also retry with a different credit card. If it still doesn’t work, you can use Pay by a Company Check or Bank Wire. Email DriveHQ customer support for more details.
When you pay by PayPal, please make sure you finish your transaction in 20 minutes. Otherwise, your transaction will time out. If so and if you have made a payment to DriveHQ, please contact DriveHQ customer support to credit your DriveHQ account.
7.5.5 Renew your subscription – Do not order a new subscription
When you renew your subscription, you only need to make a new payment / deposit. Do not order a new subscription.
If you order a new subscription, your payment is immediately used for the new subscription. Therefore, ordering a new subscription is different from a payment.
If you incorrectly ordered a new subscription, please contact DriveHQ customer to cancel the new subscription and credit your account.
7.5.6 Forgot to pay on time, past-due account
If you forgot to make a payment on time, DriveHQ offers 1 month grace period. You can make a payment within 1 month after you received the invoice. Please make sure you can receive DriveHQ billing emails. DriveHQ system automatically sends monthly invoices when your account has balance due. Not receiving the billing email is not an excuse of not paying for the service on time. You can check your account balance online at any time.
If you failed to pay the balance after 1 month, certain restrictions will be applied. You cannot download files, your FTP logon and email logon may also be restricted. You can still logon www.drivehq.com website, upload files, manage files and folders, view your account balance, make a payment online, etc.
DriveHQ doesn’t automatically cancel your subscription, nor does it automatically delete your files. Your account will be billed monthly unless you cancel your subscription(s) and delete your files. If you don’t pay the service charge for more than 3 months, DriveHQ reserves the right to take any actions, incl. apply late fees and interest charges, enforce the payment, or delete your account / files.
7.5.7 Automatic service payment
For security and privacy concerns, DriveHQ does not record your credit card info by default. Therefore, DriveHQ never automatically debits your credit card or PayPal or bank account without your explicit approval.
If your monthly service charge is over $30, DriveHQ supports automatic monthly payment. To setup automatic monthly payment, you need to download DriveHQ order form and fill in the form. In the form, you must provide your full name, DriveHQ username, credit card number, billing address, exp date, CVV code, monthly service charge. You must sign the form and authorize DriveHQ to debit your credit card monthly.
7.6 Transaction History
From My Account pages, click on “Transaction History”, you can access the following 5 reports:
“View Transaction List”, “View Order Item”, “View Sales History”, “View Statement List”, and “Current Subscription”.
Transaction History menu
“View Transaction List”: can be used to query transactions (payment / charge) of this user;
“View order list”: can be used to query order list;
“View sales history”: not used for now;
“View Statement list”: display the monthly statements;
“Current subscription”: display the subscription plan(s) ordered by this user.
7.6.1 Print Online Invoice
After you order a subscription service, you will receive an “Order Confirmation and Invoice” email, which can serve as the official invoice for accounting or reimbursement. If you don’t receive this email or cannot find this email, you can print your invoice online again. To do so, from “My Account” pages, click on “Transaction History”, then select “View Transaction List” or “View Order List”, it will display a list of transaction list or order list. You can click on the Transaction ID or Order ID to see the details; or select Print Invoice to display an online invoice. See the screenshot below:
Print Invoice Online
8. DriveHQ FTP Server Hosting Service
8.1. Introduction to DriveHQ FTP Server Hosting Service
DriveHQ is the leading FTP Server Hosting service provider. DriveHQ FTP Server is not only a standard FTP Server (you can use any FTP client on any OS platform incl. Mac and Linux), but also it has lots of other high-end features that are fully integrated with DriveHQ Cloud-based services:
- Create/manage FTP sub-accounts from a web browser;
- Access files (anonymously) with FTP/HTTP/SSL or web browser;
- Share files / folders and set different access permissions;
- Automatic folder synchronization among local and remote folders; among multiple Users and PCs;
- SSL and Encrypted folder for ultimate security and privacy.
- Custom domain FTP server and customized website logo (view sample).
No software installation is required for DriveHQ FTP. You can use any web browsers or any FTP client software. Windows Explorer can also be used as an FTP client, just enter:
ftp://USERNAME:PASSWORD@ftp.drivehq.com/
The detailed FTP Server Hosting service information is also available online at:
https://www.drivehq.com/FTPHosting/
Click on FAQ and Expand All.
8.1.2 DriveHQ FTP Server Name, Logon Info and Directory Info
The main DriveHQ FTP Server is:
ftp.drivehq.com
DriveHQ also has a premium FTP server at:
proFTP.drivehq.com
which is reserved for premium users only.
DriveHQ FTP Server Hosting Service is seamlessly integrated with DriveHQ.com online storage service. If you have a DriveHQ account, you can logon DriveHQ FTP server with the same username / password. If not, you can easily sign up a DriveHQ account.
Many other companies offer FTP storage where you are limited in one directory (folder) only; However, DriveHQ offers a virtual FTP server (and file server), FTP Hosting service plus great client software. You have access to your own root directory. So on your FTP client software, you don’t need to specify a remote directory. You can leave it empty, or use “/”, or use any directory you create in your DriveHQ.com account.
You can create multiple FTP accounts using DriveHQ group account service. You can share folders to different users (or sub-users) with different permissions. You can access your FTP storage space online, including your own files / folders, and the folders shared / published by other users.
8.1.3 FTP Service Restrictions
It is strictly forbidden that any users use our service for:
- Spread pirated contents;
- Spread “dirty” / “inappropriate” contents;
- Using automatic devices / software that keep logging on DriveHQ FTP server.
- In particular, KeyLoggers are forbidden. If there are any legitimate business reasons to use KeyLoggers with our service, you must contact DriveHQ support for approval. You must provide verifiable business info and order our paid service to be quoted by DriveHQ support.
- If you use IP cameras, DVRs or similar security software/device that automatically upload photos / videos, you must use CameraFTP Cloud Surveillance & Recording Service instead.
- Free FTP service is also limited with the following limitations: small amount of storage space and monthly download bytes; small max file size and max concurrent connections; slower upload/download speed; small max daily logon times.
8.2 Connect DriveHQ FTP Server using Windows Explorer
DriveHQ FTP Server is a standard FTP Server. You can use any FTP client software connecting to ftp.drivehq.com at the default port 21. There are a lot of great FTP client applications, such as FileZilla, Smart FTP, WS-FTP and CuteFTP, etc.
Windows Explorer can be used as a simple and convenient FTP Client, so no software installation is required to use DriveHQ FTP Service. (If you need to use the FTP Service heavily, it is recommended to install one of the above FTP clients, or DriveHQ FileManager).
To connect DriveHQ FTP server using Windows Explorer, just launch Windows Explorer (or My Computer), enter the following address:
ftp://USERNAME:PASSWORD@ftp.drivehq.com/
It will display the following FTP folder:
DriveHQ FTP Folder
You can also enter:
ftp://USERNAME@ftp.drivehq.com
It will open the FTP folder as follows. Since you have only provided the FTP username at this time, you have not logged on yet.
Open an FTP folder
To logon DriveHQ FTP in Windows Explorer, click on the File menu, then select Login As:
Logon DriveHQ FTP using Windows Explorer
You can also “Logon As” using mouse Right-click, e.g.:
Using mouse right click, you can also launch the logon dialog as shown below:
FTP logon screen using Windows Explorer
After you enter your DriveHQ username and password to logon, it will display the DriveHQ FTP Folder.
Using DriveHQ FTP Folder, you can easily drag and drop files between the FTP folder and any other local folders. You can create a sub-folder in the FTP folder; you can also double click on a file in the FTP folder and open the remote file.
For Mac users, please download (free) Mac FTP client software (e.g. FileZilla), which supports drag and drop. Mac Finder also supports FTP.
8.3. Configure FTP client software to connect DriveHQ FTP server
You can access your DriveHQ remote storage with any popular FTP clients, including Smart FTP, CuteFTP, WS FTP, FileZilla, etc. To configure your FTP client, please use the following info as needed:
FTP server: ftp.drivehq.com or proFTP.drivehq.com (for premium users only)
Port number: 21 (plain FTP, or FTP over TLS Explicit); 990 (FTP over TLS Implicit)
Username and password: your DriveHQ user name / password;
Remote directory (optional): Unlike other FTP services where you only get a User Account / Directory, DriveHQ gives you a virtual FTP server, so you can access the root folder. You can leave it blank or enter "/" as the root folder. You can also create your own folder on DriveHQ.com and use that folder as the remote directory.
Note: When accessing behind a NAT / firewall, please set FTP access mode to PASSIVE (PASV). Since Microsoft command-line FTP doesn't support passive mode, please use other GUI-based FTP clients mentioned above.
DriveHQ has recently launched a new proFTP.drivehq.com site dedicated for premium users, which has far better support on Active FTP. If you have a paid account, you probably can access the new FTP site using Microsoft command-line FTP client.
8.4 Access Shared Folders through FTP
If you have received a share notification e-mail from a DriveHQ user, you can access the shared folder through FTP. Please read the share notification e-mail carefully, you will find instructions there.
1. You can click on the share notification link, then verify your email address, which gives you read-only or download only access to the shared folder using a web browser.
2. Sign up a free DriveHQ account using the email address; then log on using your username and password. The shared files will appear in your account in a special folder:
\DriveHQ Share\OtherUserName\ShareName
To gain Write Access to the shared files / folders, you must use the second method and logon with any FTP client software. Otherwise, if you are not a DriveHQ member, you will have read-only access to a shared folder, even if the owner has authorized higher level access to you. To access at the authorized level, please sign up an account on DriveHQ.com.
If you are a DriveHQ member, and if another user shared a folder to you, you can logon DriveHQ FTP server using any FTP client and access the folders shared to you in the special virtual folder:
\DriveHQShare\OtherUSERNAME\SHARENAME
8.5 Create FTP sub-accounts and manage sub-accounts online:
You can logon www.drivehq.com, click on My Account and then click on Group Account to upgrade your account to a Group Account for free. (For more details, please read the group account section).
You can then create sub-accounts. As a group owner or administrator, you can create/add/edit/delete/disable sub-users; you can also allocate storage space and bandwidth to your sub-accounts. The same sub-users can also logon DriveHQ FTP server using any FTP client software.
8.6 Anonymous FTP logon
DriveHQ FTP Server supports anonymous FTP logon. To access a folder with anonymous FTP, the folder must have been published. You can publish a folder using DriveHQ.com website, or more easily using DriveHQ FileManager client software.
Published folders are accessible using "Publish URLs", which are usually HTTP URLs. If you want to access a published folder using FTP client software and if you know the publisher's username, e.g. "Mike", you can log on anonymously as follows:
Logon as the username "anonymous", enter your e-mail address as the password. Once connected, change the folder to "/Mike", and you will see all folders published by Mike.
Files in a published folder can also be accessed directly through a link (address) like:
ftp://ftp.drivehq.com/USERNAME/PUBLISHNAME/FILENAME
e.g.: ftp://ftp.drivehq.com/DriveHQ/DriveHQSoftware/DriveHQFileManager.exe
8.7 Using MS Office with DriveHQ FTP
Microsoft Office supports FTP Folder. So you can open an office file on DriveHQ FTP using MS Office, edit it and save it back to DriveHQ FTP. (DriveHQ FTP storage uses the same DriveHQ remote storage system.)
To use DriveHQ FTP with MS Office, first of all, you need to map an FTP Folder. To do so, click on the Start button, then right click on Computer menu, select “Map Network Drive”.
Map FTP Folder
It will open the map network drive window, as below. Click on the link at the bottom of the window:
Map network drive screen
It will then open a new dialog “Add Network Location” as shown below:
Add network location
Select “Choose a custom network location”, then click on Next button again, it displays this page:
Specify the location of your website
From the “Specify the location of your website” window, enter the following address:
ftp://USERNAME@proftp.drivehq.com/
then click on Next, it will create the FTP folder and prompt the following dialog:
Click Next, it will then confirm the creation of FTP folder.
Click Finish to open the FTP folder.
It will ask you the username and password. Just enter the information and click on the “Log On” button. (You might also want to check “Save password”.) After you logon, it will open the FTP folder as shown below:
FTP Folder example
You can then double click on a remote MS Office file (e.g. MS Word file) to open it. When you double click on it, it pops up a logon dialog as shown below:
Enter username, password and click on Log On, it will launch a web browser (e.g. Internet Explorer, then download and open the file. See below.
Click on Open, it will try to open the file; at this time, it will prompt you for the password again, as shown in the screenshot below.
Click on OK, it will open the file in MS Word.
You can then use MS Word to edit the file. After it is finished, you can try to save the file to the FTP Server again. Note you must navigate to the FTP folder and logon FTP account again. Please see the Save As dialog below to find where the FTP folder is located.
Save MS Office File to DriveHQ FTP Folder Directly
8.8 DriveHQ FTP Service usage scenarios
DriveHQ FTP service can be used for:
- Creating a corporate FTP Server (with multiple user accounts); or replacing your existing FTP Server;
- Transferring large files / a lot of files to a remote location, incl. to your client(s);
- Create FTP scripts to run at scheduled times;
- Store surveillance camera images – store surveillance camera images to an offsite FTP server is more reliable and secure. Even if the camera is damaged, the recorded info can be kept on DriveHQ.com
- Backup files to a remote FTP server;
Please note free service users are limited to a maximum of 10-50 FTP logon times / day. Using DriveHQ FTP service for spreading bad contents, hacking or spying is strictly prohibited.
9. DriveHQ Online Backup
DriveHQ has bundled the Online Backup service with all other storage related services. If you have a DriveHQ account, you can use the Online Backup service immediately; otherwise, you can sign up a DriveHQ account. You must install DriveHQ Online Backup client software to use the automatic online backup feature.
9.1 The Advantages of Offsite / Remote Backup over Local Backup
DriveHQ Online Backup has a lot of advantages over your local backup solutions:
- Online (Offsite) backup is the only secure backup solution that can protect your data against major disasters, such as earthquake, flood, fire, or virus / hacking, etc.
- No need to buy or setup any backup device. You can backup / restore your data online easily;
- Backup and restore files from anywhere. No need to carry any backup device or change backup media, etc.
- Business backup that supports group accounts, multiple computers or multiple users;
- Backup servers when nobody is logged on; backup laptops / PCs with un-reliable Internet connections;
- Access, share or collaborate files remotely online using DriveHQ Online Storage service.
- DriveHQ uses multiple levels of redundancy to protect your data, which is also usually more secure and reliable than your own backup;
- DriveHQ has a state-of-the-art data center, which is co-located with Hurricane Electric. The facility has 24x7 onsite security and surveillance cameras, virtually unlimited network bandwidth, redundant network connections and redundant power supply, etc.
- DriveHQ Online Backup has a much lower overall cost, when you consider the hardware, software, setup, maintenance and reliability factors.
9.2 DriveHQ Online Backup main features
- Supports scheduled backup;
- Supports real-time backup;
- Supports incremental backup;
o It only backs up files that are new or modified after last backup. Other files are automatically skipped.
- Supports Volume Shadow Copy, can backup open (locked) files (files that are being written to). This can be used to backup Outlook PST files or database files.
- Keep multiple file versions;
- Backup multiple PCs (for no extra licenses);
- Group Backup (backup multiple users’ PCs);
- Supports HTTPS/SSL
- Data encryption (save encrypted data on DriveHQ cloud storage);
- Data compression for faster upload / download;
- Data caching for faster upload / download;
- Supports MagicUpload for very fast Upload in certain cases.
- Integrated with DriveHQ online storage & sharing system, can access, share and collaborate files with multiple users remotely. Can use FTP to access files backed up to DriveHQ.
For more info about DriveHQ Online Backup, please visit:
https://www.drivehq.com/OnlineBackup/. You can click on the Live Demo link to see a flash live demo.
9.3 Get Started with DriveHQ Online Backup
9.3.1. Download DriveHQ Online Backup client software from the location:
https://www.drivehq.com/OnlineBackup/DownloadOnlineBackup.aspx
There are two versions of DriveHQ Online Backup: the 32-bit version and 64-bit version.
In general, you should install the 32-bit version on 32-bit operating system and 64-bit version on 64-bit version operating system. In fact, the 64-bit version cannot be installed on 32-bit version operating system; the 32-bit version can be installed on 64-bit version operating system, however, some minor features may not work.
- How to find which version of Online Backup to install?
You can use this page to find your OS type and then install the right version software. Just open Internet Explorer, copy and paste the following URL:
https://www.drivehq.com/downloads/FindOSVersion.aspx
9.3.2 Install DriveHQ Online Backup on your computer
After you have downloaded the software, please double click on the installer file to launch the setup. Follow the wizard step by step and it will install DriveHQ Online Backup on your computer.
Usually, it should be straight-forward to install DriveHQ Online Backup.
9.3.3 Trouble shoot DriveHQ Online Backup installer problems
On some computers, it might fail to install. In this case, please double check: (1) If you are installing the right version DriveHQ Online Backup. Read Step 1 more carefully. (2) Make sure you don’t have any anti-virus / security software that blocked DriveHQ installer. (3) Make sure you have the right to install software on your computer. Some companies / organizations may not allow employees / team members to install software on their computer. Public computers, such as those in a library, usually do not allow any users to install any software. (4) Some anti-virus / security software may allow you to download an EXE installer file; however, it might change the .exe file extension to a different extension. In this case, you need to change the file extension back to .exe before you double click on the installer file.
It is recommended to visit:
https://www.drivehq.com/OnlineBackup/
and click on the “Online Backup Live Demo” link to see how the backup works.
9.3.4 Start DriveHQ Online Backup
The first time you start DriveHQ Online Backup on a computer, it will display the following dialog. If you already have a DriveHQ account, please select “Already a member” and then proceed to logon. Otherwise, please enter your email address to create a temp account.
Run DriveHQ Online Backup for the 1st time
After enter your email address and click on Submit, the system will display the following dialog:
Temp account created screen
Click on the OK button, it will display the following dialog:
DriveHQ Online Backup logon screen
Note this is a temporary account only. The DriveHQ system will automatically send you a welcome email, where you can find your temporary username and password. Usually the email is delivered within 10 minutes. Sometimes, it could take up to half an hour.
After you receive the email, you must follow the instruction to logon www.drivehq.com, then change your username / password to your own permanent username / password.
If you don’t receive the welcome email, please make sure you check your junk / bulk / trash mail folders. Most likely your email server (or your ISP) has filtered / blocked DriveHQ email. If you still cannot receive the email, please contact your system administrator or ISP not to block DriveHQ emails, or try a different email address (using a different email server or different ISP).
After you logon DriveHQ Online Backup, it will display the DriveHQ Online Backup home page:
DriveHQ Online Backup software home page
9.4. Create Backup Task(s)
From DriveHQ Online Backup software home page, click on “Create a backup task”, you will see the Create screen as shown below:
DriveHQ create backup task screen
From the “Create backup task screen”, you can choose to create 3 types of backup tasks:
- Quick Backup (Real-time backup task)
When click on this button, it will create a new Real-time backup in just one step. This option is recommended for a small folder with not too many files. If a folder has huge number of files (e.g. over 10000 files), it is recommended using the second option to create a scheduled backup task.
- Advanced Backup
Create a scheduled backup task with advanced options. You can create scheduled or real-time backup task using this option. You can use this option to backup any size folders.
- Email / Database Backup
This option is designed to backup large “open files”. “Open files” are those files that are being open by other applications for writing. Such files are also referred as “locked”. Microsoft Outlook PST files are usually “open files” as Outlook is running all the time; some database files are also “open” as the database server software is always running and writing to the file. Usually you cannot copy / edit / delete an “open file” unless you close the application that opened the file.
This option not only can backup emails and database, but also can backup any folders that may contain “open files”, e.g. QuickBooks data files, log files, etc.
9.4.1. Create Multiple Backup Tasks
Please note DriveHQ Online Backup might work differently from some other backup software. Some other backup software can only create one backup task, or create a single archive file that contains all backup source folders and files. Such approach is less efficient and less flexible than DriveHQ Online Backup.
DriveHQ Online Backup allows a user to create multiple backup tasks. A user can group different source folders to different backup tasks. Users can add / delete a backup task at any time. This makes each backup task smaller, more independent and more reliable. It is also more flexible as you can add / edit / delete a backup without affecting other backup tasks. Because of this consideration, you can only select source folders and files in the same parent folder for each backup task.
DriveHQ Online Backup does not archive all source folders and files into a single giant archive file. This makes DriveHQ Online Backup very efficient in supporting incremental backup. If it archives all source folders / files into a single file, then each time a file changes, the backup software would have to upload a gigantic archive file again, which could take days or weeks. Instead, DriveHQ Online Backup only needs to upload the changed or new file(s) only, which is very fast.
9.5. Create a backup task using Quick Backup
From the “Create a backup task” screen, click on Quick Backup button to create a simple Real-time backup task. You just need to select a backup source folder. Navigate the Windows Folder tree as shown below:
Select a backup source folder for Quick Backup
Click on the Finish button after you have selected the source folder. It will prompt you with the following message:
Click on OK to start the backup task, and then it starts backing up the file. At the end, you will see the following screen:
Finished creating the first Quick Backup task
9.6. Create an Advanced Backup Task
From the “Create a backup task” screen, click on “Advanced Backup” button, it will start a wizard to guide you through creating a regular backup task. The first step is the same as Quick Backup; you need to select the source folder(s)/File(s).
Select source folder(s) / file(s) for Advanced Backup
Again, please make sure you select the real physical folders / files. Certain folders are virtual folders and cannot be selected as source folders. (Network / My Network Place, etc.).
If you are not sure which folder to backup, you can also click on “Help Me Select Files” button at the bottom-left corner.
9.6.1 What files / folders should you back up?
DriveHQ recommends backup your documents files and multimedia files. In general, you should backup your “My Documents” folder and any other folders where you save your personal data or business data. Those files are most previous to you. If your computer (disk) crashes, you may lose your data permanently.
Unlike some other online backup software where you backup any files on your computer, DriveHQ does not recommend backing up the following files:
- Windows Operating System files;
- Files / folders in the “Program Files” folder;
- All system and application temporarily files;
- Files / folders in the Recycle Bin folder;
- System page files and hibernation files;
You don’t need to backup Windows Operating System files because you can recover your operating system using your computer’s recovery CD, or you can reinstall your operating system. DriveHQ Online Backup and any other Online Backup software cannot restore your operating system directly as they cannot run without a running operating system.
You usually don’t need to backup your “Program Files” because you can more easily reinstall such software if there is any problem. DriveHQ Online Backup (and other Online Backup software) can backup files in the “Program Files” folders. However, restoring the files may not restore the software. A lot of programs require the software being installed on the computer using the Installer. Thus, restoring the software files may not work in this case. If your software does not require installation, then using DriveHQ Online Backup to backup (and restore) it will work fine.
DriveHQ’s approach can save you a lot of storage space, so you don’t need to order a lot of storage space on DriveHQ. This can keep your cost lower. Also, by reducing the amount of data to backup, your backup takes less time than other online backup software.
9.6.2 Set the backup schedule and save the backup task
After you select the source folder, click on Next to set the backup schedule as shown below:
DriveHQ Online Backup Set Schedule screen
As you can see from the above screenshot, in Step 2, you can select real-time backup or scheduled backup; in Step 3, you can configure the task to run one-time only, or run it daily or weekly. If you run it weekly, you can also choose a day of week to run the backup task. In Step 4, you can choose the backup task start time. The valid time format is from: 00:00 to 23:59. The time uses your PC’s local time.
Click on Next button in the Set Schedule screen, you will see the following screen:
Input task name screen
In the “Input Task Name” screen, you can enter the Task name and Task description. It is recommended using only alpha numeric characters in the task name. (a-b, A-B, 0-9).
9.6.3 Exclude certain files / folders from the backup source folder
In this screen, you can also set some advanced options, e.g.:
Exclude these files:
You can enter the file name filter. You can enter multiple filters separated by “|”.
e.g.: you can enter:
*.bak | tmp?.* | ~*.*
Or you can even include the file path info:
Temp\*.* | log\personal\*.log
Files whose names matching these criteria will not be backed up to DriveHQ.
Exclude these folders:
You can enter the folder name filter. You can enter multiple filters separated by “|”, e.g. you can enter:
temp | tmp* | logs\personal | backup\old*
The task is valid from__ to __: enter the backup task valid time.
9.6.4 Online Backup with Data Encryption
In the “Input task name” screen, you check the checkbox “with encryption”. If so, the backup task will encrypt data locally before upload the files to DriveHQ server. You must setup an encryption key first. If you have not done so, it will prompt you to enter an encryption key when it starts backing up your files.
Please note this feature uses DriveHQ’s encrypted folder feature. When you upload a file to DriveHQ encrypted folder using DriveHQ FileManager or DriveHQ Online Backup, your files will be encrypted locally before they are uploaded to DriveHQ server. Your files remain encrypted on DriveHQ server. Thus it is extremely secure – more secure than SSL.
Note the encryption key is never sent to DriveHQ server. Therefore, if you lose your encryption key, even DriveHQ support team cannot restore files for you. So you must remember your encryption key. Also, if you change your encryption key, it will only affect files uploaded later. Files already uploaded will remain to be encrypted with old encryption key. Why is so? Because files were encrypted locally by your own computer, DriveHQ server cannot decrypt files already uploaded, nor can it encrypt those files using the new encryption key.
9.6.4 Maximum number of file versions to keep
DriveHQ Online Backup can keep multiple versions of your file(s). By default, the maximum number of versions to keep is set to 10. This means if you backup a file, and if the file is changed, it will save the current file as an old version, and then upload the updated file. It can save up to 10 versions (or more versions as you like) of the same file. This protects you from accidentally overwriting a file.
Keep multiple file versions may increase your storage usage. However, in most cases, it will only increase your storage usage by 10%-25%. The reasons are:
(1) Most files are never changed. In this case, only one version of the files is saved. For example, most images files, exe files, pdf files, music files, video files are never changed.
(2) Files that you change frequently are usually small files, such as text files, HTML files, MS Word files, Excel files. Even if you keep 10 versions of these files, it will not use a lot more storage space.
In certain special cases, the storage usage could be x times more if you keep a maximum of x versions. For example, if you backup only one big Outlook PST file of 500MB. Because the PST file is changed every time you receive a new email, delete an email or send an email, etc. So when the backup task runs again, it will upload a newer version and save the older version, thus, it could use x times more storage space than if you only keep one version. In this case, we recommend keeping only 2 versions. Keeping only one version is not recommended as it is not safe enough.
Click on Finish, it will create the backup task and saves the backup task list info to DriveHQ server. After it is finishes, it displays the Manage Tasks screen:
Manage Tasks screen
The newly-created backup task is listed at the bottom. You can see the “Last Backup” column displays as “Not backed up yet”. The task will run at the scheduled time. You can manually start the backup task by selecting it in the task list and clicking on the Start button.
9.7 Manage Existing Backup Tasks
9.7.1 Manage Tasks – Display the backup task list
You can easily manage your backup tasks using DriveHQ Online Backup. Just logon the backup client software, click on Manage Tasks tab, you will see the task list as shown above. The column “Remote Size” displays the backup set size. The remote size might be bigger than your total file size because:
(1) You might have deleted some source files, which are not automatically deleted on DriveHQ server.
(2) DriveHQ Online Backup can keep multiple versions of your files, which could use some extra storage space.
Last Backup
The task’s last backup date: if the task is a real-time backup task and if no file(s) was changed in the backup source folder, then the backup date will not be updated.
Backup Status:
Displays the info about whether a task is ready, running or canceled.
The Refresh Button:
If the info is not up to date, you can click on the “Refresh” button.
--------------
You can select a task and click on Delete / Edit / Start button.
9.7.2 Delete a Backup Task
From the Manage Tasks screen, select a task and click on Delete, it will pop up a dialog as follows:
Please make sure you read the message carefully before you click on “Yes” or “No”. If you check the “Delete Backup-sets on Server”, then files already backed up to DriveHQ.com online storage will also be deleted. If you un-check the checkbox, then it will only delete the backup task info, but it will not delete files already backed up on DriveHQ server.
If you don’t delete the backup sets on server, you can still delete the files using DriveHQ.com website or DriveHQ FileManager later. You will need to find where the files were backed up to and delete them from DriveHQ Online Storage.
9.7.3 Edit / modify a backup task
From Manage Tasks screen, select a task and click on Edit, it will open the edit task screen:
Edit backup task screen
You can change the backup task name, description, backup type, backup schedule, backup start time, valid period, max number of versions to keep, the exclude files / folders filters;
You cannot change the “Encryption” setting of an existing backup task; i.e. if a backup task was created without encryption; it cannot be changed to “with encryption” using this screen. This is because: Encryption is performed locally by your local computer using your own encryption key. If the files were already uploaded to DriveHQ, then it cannot be decrypted / encrypted by the server. To change the encryption setting, it would require you to delete files on server and upload them again. To avoid this confusion, you cannot change the encryption setting of an existing backup task. You can more easily delete the existing task and the backup sets on Server, then re-create a new backup task with encryption.
You can remove files / folders from the backup source folder; however, if you need to change the backup source (root / parent) folder, you must create a new backup task and delete this backup task. DriveHQ Online Backup is designed to group multiple source (root) folders in multiple backup tasks. You cannot select multiple folders / files from different source parent / root folders.
9.7.4 Delete un-used files on server:
After you have backed up your data, if you delete a file(s) in your backup source folder, a lot of other online backup programs would delete the file(s) in the destination folder after a few days, which defeats the purpose of backup. DriveHQ Online Backup is safer on this. It never automatically deletes files backed up on Server. This offers far better protection than other backup solutions.
Without deleting those files on server, you might lose some storage space. You can manually purge these files and reclaim the wasted storage space. Just click on the “Delete un-used files on server” button, it will then delete those files on DriveHQ server whose corresponding source files have been deleted.
9.7.5 Show Backup Progress Window
When you have a backup task running, the Show Progress button will be enabled. A small progress bar will also display in the Task List.
Manage Tasks screen when a task is running
You can select the running backup task and click on “Show Progress” button to display the detailed Progress Window.
Detailed Backup Progress Window
In the detailed progress Window, you can see the total amount of data to upload; estimated time left and estimated total backup time; the transfer rate in KB/sec. Note 1KB/sec = 8Kbps. It also describes the detailed backup actions being performed, and which file is being uploaded.
The upload file list displays all files that will be (or are being) uploaded to DriveHQ server. The progress window is not only useful in providing detailed progress info, but also it can be used in trouble shooting any possible upload problems. If a backup task started fine and successfully uploaded some files, but fails later for unknown reason, then the Progress Window can provide more detailed info about which file(s) failed to upload. You can manually restart the backup task from the Manage Tasks window. If it fails again at the same file(s), then the particular file might have caused the upload problem. You can provide the detailed info to DriveHQ support staff for more trouble-shooting.
From the Progress Window, you can also pause the backup task. If you pause a task, then no other task(s) can run until you resume the task.
9.8 Email / Database Backup
In the “Create” main screen, click on the “Email / Database Backup” button, it pops up the following dialog:
Email / Database Backup screen
Please read the message carefully. If you just want to backup your Outlook / Outlook Express emails, you can use DriveHQ EmailManager, which is more efficient than DriveHQ Online Backup in backing up many emails. Now if you want to Continue, just click on the Continue button; otherwise, click on More Info.
Click on the Continue button, it will go to the following screen:
As you can see, the software can automatically locate your Outlook data folder. So you don’t need to click the Browse button.
If you want to backup other email client or database, you can click on the drop-down box and select “Other email client or database”. You will need to click on Browse button to manually select the source folder.
The recommended backup schedule for this type of backup tasks is weekly and keeps only 2 versions to save storage space. The reasons are:
- Outlook PST files tend to be very large, so as any database files. Backing up a very large file could take a very long time; it could take more than 24 hours to upload a big PST or database file.
- DriveHQ Online Backup supports incremental file backup; it also supports resuming. However, in the case of Outlook or database backup, incremental backup is almost impossible and inherently more risky. Your PST file or database file can be changed dramatically. It can be changed at any place within your file. E.g. if you receive a new email, delete an old email, move emails from one mailbox to another mailbox, create a new contact, auto archive your emails, send a new email, compact your mailboxes. A lot of such actions will dramatically change your PST files, making it not suitable for incremental backup. Similarly, a database file can also be changed dramatically. Inserting, deleting, updating records will all cause the database file being changed dramatically as it affects the data storage and indexes.
Therefore, each backup will be a full backup. If you need to backup your Outlook every day, please use DriveHQ EmailManager, which is more efficient in this case. If you need to backup your database every day, then you can backup your database locally everyday using some incremental backup tool. E.g. Microsoft SQL Server has a native tool to backup data incrementally. You can then backup the “incremental backup data” to DriveHQ every day.
- DriveHQ can keep multiple old versions. However, it will use more storage space. When you backup regular files, most files will never be changed. So even if you set to keep a max of 10 versions, most files will have only one version. So it will not use a lot more storage space. However, in Outlook and Database backup case, it could use x times more storage if you keep x versions.
After you click on Next, it will display the following screen:
You can select a backup schedule. Note the Real-time option is not available as described above. Click on Finish to create and save the new backup task. So click on Finish, it will pop up an information dialog as below:
Email / Database backup information dialog
Click on OK to close the dialog and finish saving the backup task.
9.9 Restore Files / Folders
After you have created a backup task and successfully run the backup task once, you can restore your files / folders. DriveHQ offers many ways / options for you to restore files:
- You can restore your files / folders to the original location, or you can specify a different location to restore.
- You can restore files / folders to the same computer or any other computer.
- You can restore the whole backup task, or you can restore a single file / folder or multiple files / folders.
- You can restore an older version file;
- You can restore the whole backup task to a time before certain time.
In addition, you can restore files using DriveHQ.com website, DriveHQ FileManager client software or any FTP client software.
To restore files, you can simply logon DriveHQ Online Backup client software, click on the Restore tab; you will see the following screen:
DriveHQ Online Backup Restore screen
From the Restore screen, you can see the task list in the left-hand side. On the right-hand side, you can see the list of files and folders backed up by the selected backup task.
9.9.1 Restore all files / folders
If you want to restore all files / folders backed up by a backup task, then select the backup task in the left-hand side, right click on the task name, it will pop up a menu as shown on the screenshot below:
Restore the whole backup task screen
Click on the popup menu item “Restore to the original location” or “Restore to a new location”, you can restore the whole task. If you select “Restore to the original location”, it will pop up a new dialog as below:
Restore the whole backup task version
From the above screen, you can restore the latest version files, or you can restore an older version of all files before certain time. The file time uses your local time. Click on OK, it will start restoring the files. Dependent on your task size, it could take a very long time to restore. Once it finishes, it displays the following screen:
Restore finished confirmation screen
If you select “Restore to a new location”, it will ask you to browse a new local folder; the rest is the same as restore to the original location.
9.9.2 Restore the selected files / folders
From
the Restore tab, on the right-hand side, you can see files / folders backed up
to DriveHQ. You can double click on a folder name to navigate to the
sub-folders and files in it. To go back to the parent level folder, just double
click on .
Once you locate the file(s) / folder(s) you want to restore, you can select the file(s)/folder(s). You can hold down the Ctrl key or Shift key to select multiple files and folders.
After you have selected the files / folders to restore, you can either right click on the folder(s)/file(s), or click on the button “Restore to Original Location” or “Restore to New Location”.
9.9.3 Restore older version files
You can use DriveHQ Online Backup to restore old version files. To do so, from the Restore tab, click on the task name, then navigate the folders and locate the file that you want to restore. Click on the filename to select the file. Note if you want to restore an older version, then you can only select one file. After you select one file, the “Show History” button at the bottom left corner will become enabled as shown below.
Restore old version files
You can click on the Show History button or right click on the file and click on the “History” menu. It will open a “File version history dialog” as shown below.
File version history screen
You can then select a version to restore or to delete.
Note, if you want to restore an older version of all files in the backup task, then you must select the whole backup task to restore. Please read the previous section for more details.
9.10 DriveHQ Online Backup Options
The “Options” tab on DriveHQ Online Backup client software has the following functions:
- My Profile: Show / Edit User profile info. You can also show / edit user profile on DriveHQ.com website.
- Account Balance:
o Check your DriveHQ account balance;
o You can also click on Refresh button to refresh your account balance.
o You can also click on Deposit to make a service payment or deposit money into your DriveHQ account for annual or future service charges;
- Change password: You can change your DriveHQ account password. You cannot change your username. If you are a sub-user of a group account, then the group admin user(s) can change your username. Otherwise, you cannot change your username directly. You can contact DriveHQ customer support to change your username.
- My Options: You can configure:
o Remember logon info. If checked, you don't need to enter your username / password to logon again. It must be checked for automatic backup;
o Automatically sign in: If checked, it will automatically logon DriveHQ.com once the application (service) is started. It must be checked for automatic backup;
o Enable Volume Shadow Copy:
§ It must be checked to backup open files (locked files, or files being written to)
o You can also configure a task to re-start automatically if it didn’t run at the scheduled time.
o Caching: You can set the maximum cache folder size. By default, it is set to 1GB. You can change the cache size and cache folder location.
My Options screen
At the bottom of the “My Options” screen, you can see 3 buttons: “Save Change”, “View Cache Files”, “Clear All Cache Files”.
The cache folder is used to speed up download and upload speed; if the same file has been uploaded / downloaded, it will not download / upload again. It is also needed to save the “shadow copy files”. When you backup a file that is being written to, DriveHQ Online Backup will create a shadow copy, i.e. a snapshot of the file at the time. It saves the file in the cache folder and then backup the file from the cache folder to DriveHQ server.
Subscription:
DriveHQ has bundled all storage related services into the same premium service packages. So you will get Online Backup, Online Storage, sharing and Collaboration, FTP Server Hosting, Files / Static Website Hosting, Folder Synchronization services and features for no extra charge.
You can click on the Subscribe button to order DriveHQ paid services online.
For more info about service subscriptions, please visit the DriveHQ.com website manual.
Encrypted Folder:
Click on Encrypted Folder, you will see the screen as shown below.
Encrypted Folder screen
DriveHQ Encrypted Folder is an advanced feature. Please note DriveHQ online service is already very secure by supporting HTTPS/SSL or FTP over SSL. Moreover, DriveHQ Online Backup and DriveHQ FileManager supports “Encrypted Folder”. Once you turn it on, you must also enter a secure encryption key. This key is extremely important so you must keep it safely and not lose it. Note when you upload files to DriveHQ encrypted folder:
\My Documents\My Encrypted Data
Your files are encrypted locally using your secure private encryption key. The encryption key is never sent to DriveHQ server. So your files will remain encrypted on DriveHQ system. This way, it is extremely secure. But be careful: if you lose your encryption key, nobody can help you decrypt your files.
The encryption key is automatically cached in your local PC. So if you upload files / download files using DriveHQ client software, the files will be transparently encrypted and decrypted. You don’t need to enter the encryption key again and again.
Another thing to notice is: once a file is uploaded to DriveHQ encrypted folder, the file is encrypted with the current encryption key. If you change your encryption, it will not affect files already uploaded to DriveHQ.com. To change the encryption key for these files, you must delete them and upload them again. If you don’t do so, please make sure to remember / keep all encryption keys.
System Options:
- “Automatically run when I logon Windows”: this option can be used to turn it on / off.
- Show hidden files / folders: this option allows DriveHQ Online Backup to display the hidden files. You must check it to backup hidden files.
- Automatically start minimized: after you reboot Windows, the DriveHQ Online Backup GUI software will start as minimized. DriveHQ Online Backup is designed to set and forget. So run minimized will not affect your other work.
- Use SSL: turn this option on to upload / download files using HTTPS/SSL
- Register Shell Menu: This will add DriveHQ Online Backup menu to Windows Explorer.
Event Log:
This function is very useful to monitor your Backup tasks. See the screenshot below:
Event Log screen
As shown in the screenshot, you can configure it to:
- Send backup status report. It can send to any email address, or multiple email addresses separated by “;”.
- Configure which info to log and when to log.
This feature allows users to receive daily backup status report. This is particularly useful if you use DriveHQ Online Backup to backup servers where nobody is logged on the computer. (so nobody will see if it is working properly.)
Group Account:
If your DriveHQ account is not a group account, you will see the following screen:
Group Account Screen for Non-group Admin User
You can click on Free Upgrade to Group Account to upgrade your account to be a group account. A free group admin user only can create one sub-user.
If you are a group administrator, you will see the following screen:
Group Account Screen for Group Admin User
You can view your group backup status and manager your group members through the DriveHQ web.
9.11. Advanced features and technical information
DriveHQ Online Backup has many advanced features; it is also integrated with DriveHQ Online Storage & Sharing, FTP Server Hosting services, offering far more features and services.
DriveHQ Online Backup advanced features incl.:
- Run as Windows (NT) service; it can backup your computers, incl. server computers, even if nobody is logged on;
- Can backup network-mapped drives / network shared folders;
- Can backup multiple computers using the same DriveHQ account;
- Support group account service; can backup multiple computers of a group of users;
- Files backed up on DriveHQ.com can be accessed using DriveHQ.com website, DriveHQ FileManager and FTP.
9.11.1. Run as Windows (NT) Service:
- DriveHQ Online Backup has two processes: DriveHQBackup.exe and DHQBackupSvc.exe.
DriveHQBackup is the GUI program, which is used to create / manage / monitor backup tasks, check or update user account info and order service subscription, etc. Once the user account is setup and backup tasks are created, the GUI program is not needed to run the backup task.
DHQBackupSvc is the backend service program, which is used to schedule and actually run the backup tasks. Once the GUI program has created the backup tasks, this service program is responsible to run the backup tasks at the scheduled times.
By separating the backup software into two programs, DriveHQ Online Backup can backup a computer even if nobody is logged on. The DHQBackupSvc.exe service program can automatically start before anybody logs on.
When you start DriveHQ Online Backup GUI program, it will try to connect to DHQBackupSvc.exe process. If it fails to connect, then backup cannot be performed. You must check if the backup service has been started. To locate DriveHQ Online Backup service, please go to Administrative Tools à Services. See the screenshot below:
DriveHQ Online Backup service
When you install DriveHQ Online Backup client software, this service will also be installed. It will start automatically.
By default, this service runs as the “local system” account, which has access to all local files / folders, but it cannot access remote folders / files. Also this account is different from the current Windows logon user.
9.11.2. Backup Network-mapped Drives
As mentioned above, by default, DriveHQ Online Backup service program logs on as the “local system” account, which cannot access a network folder. You can easily change the service logon username to a user who has the right access to the shared folder(s). (usually your own account).
To change the service logon username, please double click on “DriveHQ Backup Service” in the Services window. It will open the properties dialog, click on the “Log On” tab, it will display the following dialog:
Change the Service Logon username
From this screen, you can check “This account” radio button, and then enter a username and password to logon. Note this username is your Windows username, not DriveHQ username. You need to make sure this username can access the network shared folder / drive.
After you’ve finished, click on Ok to save the changes. Then you need to stop the service and restart it to refresh the change.
9.11.3 Backup multiple computers using the same DriveHQ account
You can backup multiple computers using the same DriveHQ account. Even if you backup the same folders on Computer1 and Computer2 to the same DriveHQ account, the backup tasks won’t overwrite each other. In fact, each backup task is associated with a computer. If you create a backup task Task1 on Computer1 and a task2 on Computer2, then on Computer 1, you will see two backup tasks:
- Task1;
- Computer2.Task2
See the screenshot below, the task “W2008-SVR64.Backup2” is a task created on a different computer with computer name “W2008-SVR64” and task name “backup2”. When you select this task on this computer, you cannot start the task, nor can you edit the task. But you can view or migrate the task.
Manage Tasks screen showing a task created on a different computer
Click on the “View” button, it opens the following dialog:
View a backup task created on a different computer
Note you cannot edit the task because the task is created on a different computer.
9.11.4 Migrate a Backup Task to a Different Computer
To migrate a backup task created on a different computer to this computer, there are several ways. The easiest way is to use the “Migrate” feature. From Manage Tasks screen, select the task created on a different computer, then click on “Migrate” button. DriveHQ Online Backup will display the following dialog:
Please read the message on this screen carefully:
(1) The latest backup set on DriveHQ server will be restored to the current computer;
(2) After it finishes migration, the task on the old computer will no longer be valid and should not be started.
(3) The migrated backup task will only backup the new backup source folder(s).
Click on “Migrate to current computer” button, it will starts restoring the backup set to your new backup source folder(s). After it finishes, the task is successfully migrated. The confirmation message might be a little different as shown below:
Just click on OK to finish it.
9.11.5 More efficient way of migrating a backup task
If you have backed up a lot of data with the backup task, then it could take a long time to restore all files. A more efficient method is to Copy your old backup source folder(s)/files(s) to the new backup source location on the new computer. You can copy the files/folders using network mapped drive, or using a USB external drive. It is usually much faster than downloading all files from DriveHQ.com.
Once you have put the latest backup source files / folders to the new backup location, then you can start migrating the task. DriveHQ Online Backup (and DriveHQ FileManager) can automatically skip file uploading / downloading if the same file has existed in the destination folder. This can save you a lot of time in restoring the backup task.
9.12 Group Backup for Businesses
DriveHQ services are designed for high-end users and businesses. A high percentage of our paying users are business users. Many businesses find our Group Account service is extremely useful and affordable. The group account service is free, which offers 1 free sub-user license. To become a group account, you can logon www.drivehq.com, go to My Account page and click on Group Account, then upgrade to a group account for free. If you need more user accounts, you can order more user licenses online. The price is very low starting from $4/user/month.
DriveHQ group account service can be used to backup multiple user accounts; each user account can also backup multiple computers. The benefits of group account service include:
- The group owner account (and / or group administrator accounts) can centrally create and manage all sub-user accounts;
- Only one user – the group account owner, needs to order DriveHQ subscription services; all sub-users are also automatically considered as premium users;
- The whole group can either divide the storage space among group members; or all group members can share the same storage space by using folders shared by the group owner account.
- For companies have multiple locations or divisions, DriveHQ group account service also supports Sub-groups; each location or divisions can be assigned with a sub-group.
- The group owner user can logon as any sub-user and gain full access to any sub-user account. It can also delete / edit sub-user accounts, change username / password, or disable sub-user accounts. A sub-user account can also be assigned to a different user later.
- A guest account can be created for external clients.
For a very small company that only needs to backup a few computers, you can backup all computers to the same DriveHQ account. No additional software license is needed for that.
If you need to backup a lot of computers, esp. if you need to backup multiple users’ computers, and that each user should not see folders / files backed up by other users, then you can assign a sub-user account to each user. Each user can backup his computer(s) to his own account.
The group administrator user can check the group backup status online. To check group backup status, the group owner / administrator user can logon DriveHQ Online Backup, go to Options tab, in the Group Account page, you can see a link “View Group Backup Status”. See the screenshot below.
Check group backup status
If you don’t have DriveHQ Online Backup client software installed on the computer, you can also check backup status online. To do so, just logon www.drivehq.com, and then click on the link “All Services” and select “DriveHQ Online Backup” in the pull-down menu, as shown in the screenshot:
After you click on “DriveHQ Online Backup”, it will go to the Backup Service main web page:
https://www.drivehq.com/OnlineBackup/
The backup service main web page has a lot of info about DriveHQ Online Backup, it is recommended to visit the page; you can find a link to “Online Backup Live Demo”. It is recommended to look at the live demo to get an initial idea about DriveHQ online backup service.
From the backup main web page, click on “My Backup” tab, as shown in the following screenshot:
You will find the list of backup tasks created by your own account, see the screenshot below:
My Backup page on DriveHQ.com
From “My Backup” page, click on “View group backup task status”, it will display the group backup task status page as show below:
Group backup status page
As you can see, this page also displays backup tasks created by sub-users. In the above screenshot, user “SubFreeDrivehq” is a sub-user of “FreeDrivehq”.
9.13 Access / Restore Files backed up by DriveHQ Online Backup using DriveHQ.com website
DriveHQ Online Backup is fully integrated with DriveHQ Online Storage, Online Sharing & Collaboration, FTP Server Hosting system. Files backed up to DriveHQ system can be accessed using DriveHQ.com website, DriveHQ FileManager or FTP.
To access files using DriveHQ.com website, you can logon DriveHQ Online Backup client software, click on Options tab, then from “My Profile” page, and click on “View Files on DriveHQ.com”.
You can also directly logon www.drivehq.com, go to Online Storage section. The files backed up DriveHQ Online Backup are usually stored in this folder:
\DriveHQData\DriveHQ WWWBackup\Data\TASKNAME
You can navigate to the file that you want to download and download it directly online. You can also use the Zip Download feature to download multiple files / folders at once.
Using DriveHQ FileManager client software or FTP client software, you can easily drag and drop files / folders from the online storage to your local storage.
If you created any encrypted backup, the files are backed up to the following folder:
\My documents\My Encrypted Data\TASKNAME
You cannot use web browser or FTP to restore / access encrypted files. You must use DriveHQ Online Backup or DriveHQ FileManager to download encrypted files.
9.14. DriveHQ Online Backup Trouble-shooting Guide
DriveHQ Online Backup 5.0 enterprise edition has proven to be very reliable. However, under different environment, users may still experience some problems.
(1) Cannot download DriveHQ Online Backup software or the downloaded file cannot run; or the setup experience some error.
You can download DriveHQ Online Backup online from DriveHQ’s software download page:
https://www.drivehq.com/downloads/downloadonlinebackup.aspx
Make sure you download the right version (32-bit or 64-bit) for your operating system. You can find your OS version using Internet Explorer and access the following page:
https://www.drivehq.com/downloads/FindOSVersion.aspx
A lot of anti-virus software or network security software could interfere with the download of DriveHQ Online Backup installer file.
On Windows 2008 server, downloading files using Internet Explorer is not allowed by default. You must change the option to allow file download. You can use Firefox or Chrome to download the file.
Some anti-virus / security software automatically renames EXE files to other file type. In this case, after you finished downloading the file, you need to change the file extension back to .EXE.
If you still cannot install DriveHQ Online Backup, please make sure your Windows logon account can install software. Using a Windows System Administrator account is recommended.
You might also want to turn off (disable) all firewall software / security software / anti-virus software briefly to check if the problem is fixed.
(2) I have installed the software. When I try to create the first backup task, it crashes.
Again, this is most likely to be caused by anti-virus software / network security software. Please make sure you don’t have any such software blocking DriveHQ Online Backup GUI process and the DHQBackupSvc.exe process. You can turn off / disable such software briefly to check if it caused DriveHQ problem.
Due to too many anti-virus / network security software types and versions, DriveHQ cannot offer more detailed help. However, you can definitely solve the problem as we have a huge number of users, and our users can almost always solve this problem by themselves.
(3) The software failed to connect to DriveHQ.com. It keeps retrying connecting to DriveHQ.com, but never succeeds.
First of all, please open Internet Explorer (Must use Internet Explorer for this purpose; cannot be any other web browser), try to logon www.drivehq.com. If it doesn’t work, then you have an Internet connection problem. You need to fix this problem first.
If you can logon www.drivehq.com using Internet Explorer, then the DriveHQ Online Backup client software should be able to connect DriveHQ.com. The problem could be caused by your anti-virus software, network security software blocking DriveHQ Online Backup.
- If you use a proxy server to connect to the Internet, then you need to change the Windows service DHQBackupSvc.exe’s logon account. A proxy server setting usually only applies to the current Windows logon account. However, by default DriveHQ Online Backup service process (DHQBackupSvc.exe) runs as the LocalSystem account, which lacks the proxy server setting. In this case, you need to change the DriveHQ Online Backup service process’s logon name. To change the Windows service logon name, please refer to the Backup network folders section within the online help of DriveHQ Online Backup.
- Certain cache servers might also interfere with DriveHQ Online Backup’s connection to DriveHQ.com system. A lot of cache servers cannot cache SSL contents. So you can configure DriveHQ Online Backup to use SSL. You can do so from DriveHQ Online Backup client software, click on Options à System Options, then check “Use SSL”.
(4) DriveHQ Online Backup lost my backup task(s), what to do?
It is very rare that DriveHQ Online Backup loses the backup task list file. It was reported in the 3.x versions. The problem could happen when you create backup tasks on two different computers at about the same time. Also it could happen when the software is uploading a new version backup task list file and the network suddenly becomes unavailable.
If this happens, usually you can restore an older version backup task list file using DriveHQ FileManager. The backup task list file is stored in this remote folder:
\DriveHQData\DriveHQ WWWBackup\Info
The backup task list file name is: BackupTasklist.xml.
A backup copy of the task list file name is saved as “Copy_BackupTasklist.xml”; if the Backup Task list is lost, please try the following steps:
- Log out DriveHQ Online Backup. To logout, click on the Options tab and click on “Log Out” to logout DriveHQ Online Backup.
- Use DriveHQ FileManager or DriveHQ.com website, rename “BackupTasklist.xml” to “BackupTasklist_back.xml”. Then rename “Copy_BackupTasklist.xml” to “BackupTasklist.xml”.
- Logon DriveHQ Online Backup again. This usually should fix the problem.
If the above solution does not solve your problem, you might have to re-create the backup task. Please note all your files / folders backed up to DriveHQ are not affected. You can restore your files using DriveHQ FileManager, FTP or DriveHQ.com website at any time. You don’t need to upload all your files / folders again. You just need to re-create the same backup task (using the same backup task name and the same source folder). After you have finished re-creating the same backup task, it will try to backup all files / folders again. At this time, DriveHQ Online Backup will detect that the same files already exist in the backup destination folders. So it will skip uploading the same files again. Thus the “initial” backup will be much faster than the real “initial” backup (which needs to upload all files / folders and usually takes a long time).
(5) What to do if DriveHQ Online Backup fails to respond; takes a very long time doing something without any progress; e.g. displaying “Refreshing task list…”? If you click on the Cancel button, the “Refreshing task list” dialog is not closed. Instead, the “Cancel” button is disabled, so you cannot close the dialog.
- It is very rare for DriveHQ Online Backup to lock up. If so, it usually can detect such lock-up automatically. So please be patient to wait for enough time (10 minutes).
If it is truly locked up, you can solve the problem using 2 ways:
o Method 1: Restart your computer. Restart your computer may also solve some other strange problems.
o Method 2:
§ Open Windows Task Manager and end the DriveHQBackup.exe process;
End a process using Windows Task Manager.
You can right click on a process, and then click on “End Process”. You can also select a process and click on the “End Process” button at the bottom-right corner.
§ Go to Control Panel à Administrative Tools à Services. Stop the service named “DriveHQ Backup service”. If it fails to stop, you can kill the process named “DHQBackupSvc.exe” process to stop the service;
§ You can then restart “DriveHQ Backup service” from the Services dialog. After that, restart the DriveHQ Online Backup GUI program.
(6) Why it takes such a long time to backup my task?
If you backup a lot of files or a lot of data, it could take a long time for DriveHQ Online Backup to upload the files. The upload speed is dependent on many factors:
o Total amount of data;
§ Usually, the more data you upload, the longer time it takes.
o Total number of files or file sizes;
§ If you upload a lot of small files, the overhead will be very significant and thus the speed is much slower than uploading large files.
o Types of files;
§ When you upload an image file, DriveHQ server will create 1 thumbnail image and 1 preview image, thus it will be slower than uploading other file types.
§ DriveHQ Online Backup supports data compression to speed up file download / upload. If a file type is uncompressed, it can be uploaded faster than a compressed file type. Uncompressed file types incl. Text, HTML, MS Word, Excel, DLL, PDF, etc. Compressed file types incl. JPG, MP3, ZIP, RAR, PPT, and MPEG, etc.
o The upload speed from your computer to DriveHQ server:
§ Even if you have a very fast Internet connection, it won’t guarantee the upload / download speed to a particular website. Note your ISP’s Internet connection speed usually can only guarantee the speed from your computer to your ISP’s data center. From your ISP’s data center to DriveHQ.com data center, it will go through many hops on the Internet backbones. Most hops are shared by numerous Internet users. So it is very much like a high-way system. The slowest hop (link) determines the actual speed.
§ Your ISP might be able to optimize the connection speed for you by changing the routing.
Please note DriveHQ servers are extremely fast. We also have virtually unlimited network bandwidth. As mentioned above, that does not guarantee that you will get a very fast speed. However, if you need to use our service from multiple locations, (e.g.: if you have sub-users or clients in different locations), then the combined connection speed will be very fast.
DriveHQ technologies that speed up file upload / download:
DriveHQ has developed a lot of technologies to speed up file download / upload performance. The technologies include:
o Transparent data compression:
§ When you upload / download files using DriveHQ Online Backup, it can automatically compress data for fast uploading / downloading. If you upload / download compressible files, the speed will be many times faster.
o Local cache folder:
§ When you open / download a remote file using DriveHQ FileManager or DriveHQ Online Backup, the file is downloaded to your local cache folder. This way, it will not upload / download the same files again and again.
o Magic Upload:
§ In certain cases, when the same file has been uploaded to DriveHQ by any user, then backing up the file will be extremely fast as it can skip the upload / download.
o Automatic resuming and manual resuming:
§ When you upload a very large file, the network connection could become broken in the middle. DriveHQ Online Backup can automatically retry the network connection and resume upload (download). If upload fails for any reason, you can still manually re-start the backup and resume uploading from where it was interrupted.
(7) DriveHQ Online Backup worked very well, but suddenly something is wrong; it seems the backup tasks become corrupted. I have tried to uninstall DriveHQ Online Backup and reinstall it, still cannot fix the problem. How can I start it over from the scratch? Or How can I completely remove DriveHQ Online Backup from the computer and then reinstall it?
Uninstall and reinstall DriveHQ Online Backup may not fix all problems. When you uninstall DriveHQ Online Backup, it only removes the application files and registry settings created during the setup process. It doesn’t delete any cached data files / folders; it also does not delete application settings in Windows registry. To completely remove DriveHQ Online Backup, firstly, please uninstall DriveHQ Online Backup from your computer; you can uninstall DriveHQ Online Backup from your Windows Control Panel à Programs & Features (or Control Panel à Add / Remove Programs).
(
o Quit DriveHQ Online Backup GUI program; (right click on the small icon in the system notification area, select Exit) - DONE
o Stop “DriveHQ Backup service process”; you can stop “DriveHQ Online Backup service process” from Administrative Tools Services. See the screenshot below: - DONE
)
o Delete all files / folders in your DriveHQ.com account. You can easily do so using DriveHQ FileManager 5.0 client software. You can also do so using www.drivehq.com website. If you have a lot of files, it could take some time to finish deleting all files.
o Delete the following local cached folders and all subfolders (if they exist)
C:\Documents and Settings\Default User\Application Data\DriveHQ deleted
C:\Documents and Settings\WINDOWS_LOGON_USERNAME\Application Data\DriveHQ
(where WINDOWS_LOGON_USERNAME is the username which you use to logon the computer)
You can then reinstall DriveHQ Online Backup to backup files.
(8) I have a lot of data to backup, which takes a very long time. Can I ship a USB disk to DriveHQ? In case of emergency, can DriveHQ copy all my files to a USB disk and ship it back to me?
Yes. You can ship a USB disk to DriveHQ and we will upload the files from our data center, which is many times faster than you upload it directly. If you use our enterprise service, you can send up to 2 USB disks each year. We will upload the files for free.
If you use our regular premium service, you need to pay for the cost of handling the upload. It is very affordable if you have a lot of data.
DriveHQ can also copy all your files to a USB drive and ship it back to you upon request. There will additional cost involved in preparing the data and ship the disk. Please contact DriveHQ customer support for more details.
(9) I have a lot of data to backup (e.g. over 100GB). I have copied my files to a USB disk and shipped it to DriveHQ. Now DriveHQ has finished uploading my files. How can I create a new backup task without uploading the same files again?
Yes, you can create a new backup task without uploading the same files again. The main idea is: If the same file exists in the destination folder, then DriveHQ Online Backup (and FileManager) will skip uploading (or downloading) the same files again.
To avoid uploading the same files again, you just need to make sure that the same files exist in the backup destination folder. Please follow the following steps to create the new backup task (and avoid uploading the same files again).
Step 1: Understand where the backup destination folder is:
If you create a backup task that backs up a folder “Favorites” as follows:
If you save the backup task name as “Backup3”, then the backup destination folder will be:
\DriveHQData\DriveHQ WWWBackup\Data\Backup3\Favorites
You can easily check the backup destination folder using DriveHQ FileManager or DriveHQ.com website.
Step 2: Move or Copy your files / folders already uploaded to DriveHQ account to the correct destination folder. If the destination folder has not been created yet, you can create it manually.
Step 3: Create the backup task using the right task name and source folder so that the task’s destination folder matches what you have prepared in step 2.
Step 4: Run the backup task and open the Progress Window to monitor the progress. Make sure that file uploads are automatically skipped. If you see it is actually uploading a lot of files, then please double check if some files have been changed locally. If not, it means you have not prepared the destination folders correctly. You can check the folders . files in:
\DriveHQData\DriveHQ WWWBackup\Data\BACKUPNAME
And see where it is uploading files / folders to. Please note the above method works for non-encrypted backup tasks only. For encrypted backup tasks, it needs to be done differently. Please contact DriveHQ customer support for more info.
10. DriveHQ FileManager
DriveHQ FileManager is the flagship software for DriveHQ Online Storage, Sharing, Publishing, Collaboration and Automatic Folder Synchronization. It is strongly recommended to install DriveHQ FileManager.
10.1. Advantages of DriveHQ FileManager
DriveHQ FileManager works like Windows Explorer (or My Computer); it supports a Windows Explorer Interface, but can display both the local files and the cloud files. It seamlessly integrates the local files and remote files, making it extremely easy to drag and drop files / folders between local folders and remote folders.
Compared with local storage, DriveHQ FileManager offers cloud-based file server service, which has the following benefits:
- You can access your files / folders from anywhere without carrying a portable storage device;
- DriveHQ has multiple levels of redundancies in protecting your files, it is usually much more reliable than your own local storage;
- You can easily share files with people in remote locations, incl. colleagues and clients;
- You can easily create and manage sub-user accounts for your employees or clients.
There are a lot more advantages, which will be described later in the features sections.
10.2. DriveHQ FileManager features:
DriveHQ FileManager has a lot of great features, incl.:
- The easy and familiar user Interface:
o Supports Windows Explorer interface and FTP interface. You can easily drag and drop files / folders between your local storage and cloud storage;
- Folder / File Sharing:
o You can easily select a folder / file and share it with other people, incl. non-DriveHQ members.
- Share different folders to different users with different permissions:
o You can share different folders to different users and set different levels of access rights.
- Folder / File Publishing
o You can easily select a folder / file and publish it, which will create a static link(s) to the folder and file (and files in the published folder). The static link(s) can be used by any users, any websites, web pages to link to the folder / file(s). User logon is not needed.
- Folder Synchronization:
o You can select a folder and click on the Synchronize button to sync a local folder with a remote folder; you can synchronize multiple PCs by syncing to the same remote folder.
o By using DriveHQ shared folders, you can synchronize folders belong to different user accounts, hence sync-ing folders on multiple computers that belong to different users.
o You can set one-way or two way folder synchronization tasks; you can set synchronization schedules.
- Group Sharing and Collaborations:
o You can share folders / files to a group, a sub-group or a contact group. You can share different folders to different group(s) with different levels of access rights.
- Encrypted Folder
o You can turn on the Encrypted Folder feature, setup an encryption key, and then upload files / folders to the encrypted folder. Files uploaded to the encrypted folder are transparently encrypted by DriveHQ FileManager client software. Files remain encrypted on DriveHQ server. The encryption key is never sent to DriveHQ server. So it is extremely secure.
- Data Compression for faster upload / download.
o DriveHQ FileManager (and Online Backup) can automatically compress data for faster upload / download.
- Supports automatic / manual resuming, can upload / download any size files reliably
o When you upload / download very large files, it is possible that the network connection gets dropped in the middle. This can be caused by your network device, your computer problem, your ISP, or Wi-Fi signal being too weak, or other temporary network issues. When this happens, DriveHQ FileManager (and Online Backup) can automatically retry the connection. Moreover, the current upload / download status is recorded, so you never need to upload / download from the scratch again.
- Magic Upload:
o In certain special cases, if a file has been uploaded by any user before, DriveHQ FileManager can automatic detect it and skip the uploading. This can dramatically increase the upload speed.
- Speed Limit:
o When you upload a lot of files, DriveHQ FileManager may use a big percentage of network bandwidth. To avoid DriveHQ FileManager from using too much download bandwidth, you can set the speed limit for DriveHQ FileManager so that you can better utilize other web applications.
10.3 Get Started with DriveHQ FileManager
10.3.1: Download DriveHQ FileManager installer from the URL
https://www.drivehq.com/help/solution/software.aspx
There are two versions of DriveHQ FileManager: the 32-bit version and 64-bit version.
In general, you should install the 32-bit version on 32-bit operating system and 64-bit version on 64-bit version operating system. In fact, the 64-bit version cannot be installed on 32-bit version operating system; the 32-bit version can be installed on 64-bit version operating system, however, some minor features may not work.
- How to find which version of DriveHQ FileManager to install?
You can use this page to find your OS type and then install the right version software. Just open Internet Explorer, copy and paste the following URL:
https://www.drivehq.com/downloads/FindOSVersion.aspx
10.3.2. Install DriveHQ FileManager on your computer
After you have downloaded the software, please double click on the installer file to launch the setup. Follow the wizard step by step and it will install DriveHQ FileManager on your computer.
Usually, it should be straight-forward to install DriveHQ FileManager.
Trouble shoot installer problems:
On some computers, it might fail to install. In this case, please double check:
(1) If you are installing the right version DriveHQ Online Backup. Read Step 1 more carefully.
(2) Make sure you don’t have any anti-virus / security software that blocked DriveHQ installer.
(3) Make sure you have the right to install software on your computer. Some companies / organizations may not allow employees to install software on their computers. Public computers, such as those in a library, usually do not allow any users to install any software.
(4) Some anti-virus / security software may allow you to download an EXE installer file; however, it might change the .exe file extension to a different extension. In this case, you need to change the file extension back to .exe before you double click on the installer file.
10.3.3. Start DriveHQ FileManager
It is recommended to visit:
https://www.drivehq.com/help/solution/software.aspx
and click on “View FileManager Live Demo” link to see how FileManager works.
The first time you start DriveHQ FileManager on a computer, it will display the following dialog.
Run DriveHQ FileManager for the 1st time
If you don’t have an account on DriveHQ.com, then please enter your email address to create a temp account. Once you enter your email address and click Submit, it will display the following dialog. Click on the OK button, it will automatically logon as the newly created temp user account.
“Temp account created” confirmation dialog
Note this is a temporary account only. DriveHQ system will automatically send you a welcome email, where you can find your temporary username and password. Usually the email is delivered within 10 minutes. Sometimes, it could take up to half an hour.
After you receive the email, you must follow the instruction to logon www.drivehq.com, then change your username / password to your own permanent username / password.
If you don’t receive the welcome email, please make sure you check your junk / bulk / trash mail folders. Most likely your email server (or your ISP) has filtered / blocked DriveHQ email. If you still cannot receive the email, please contact your system administrator or ISP not to block DriveHQ emails, or try a different email address (using a different email server or different ISP).
If you already have a DriveHQ account, please select “Already a member” and then proceed to logon.
DriveHQ FileManager initial logon screen
After you logon, it will display the main screen of DriveHQ FileManager, as shown below:
DriveHQ FileManager main screen
On top of the screen, you can see the main menu and toolbar; on the left-hand side, it displays remote files / folders in your DriveHQ account; on the right-hand side, it displays your local files / folders. At the bottom of the screen, it displays the “upload / download tasks” list.
10.4. Using DriveHQ FileManager for Online Storage
First, please launch DriveHQ FileManager from Windows Start menu or from the desktop icon. Logon the software; it will display the Main Screen as shown above.
The default user interface displays the remote files on the left-hand side and local files on the right-hand side; this is like a lot of FTP client software. You can click on the display button to change the layout.
Click on the display button to change the layout
After you click on the display button, you it will display a pull-down menu:
- Show DriveHQ.com files only;
- Show local and DriveHQ.com files; (the default display);
- Show local files only
If you select “Show DriveHQ.com files only”, it will display the following dialog:
Show DriveHQ.com files with the Progress pane hidden
When showing DriveHQ.com files only, it displays the remote folder tree on the left-hand side; on the right-hand side, it displays the selected folder contents.
As you can see in the left-hand side, the root folder is “DriveHQ Root”, which is not a real folder. It is a virtual folder containing 3 more folders:
“My Storage” folder: It is also not a real folder. It is a virtual folder that contains all folders and files of this user account.
All folders / files inside of “My Storage” virtual folder are real folders / files. These folders / files are owned by this user. By default, folders and files are secure and private, unless shared to other user(s) or published for anybody to access. Users have full access to files / folders in their own “My Storage” folder, incl. create folders, upload files, edit / delete / download files / folders, share / publish folders and files, etc.
“DriveHQ Share” folder: This folder is a virtual folder, which contains all folders / files shard to this user by other DriveHQ members. On the above screenshot, you can find 2 folders in “DriveHQ Share” folder:
“FreeDrivehq”, “webmaster”. .
These are still not real folders. These are the usernames (and virtual folders) who shared folders to this user.
As you expand the username “FreeDrivehq”, you can see two folders:
“GroupRead” and “GroupWrite”
These are still not real folders. They are “Shares” created by the user “FreeDrivehq”.
So the folders in “DriveHQ Share” has the format of:
[\DriveHQ Share]\USER_NAME\SHARE_NAME\FOLDER_NAME\...
Or \\USER_NAME\SHARE_NAME\FOLDER_NAME\...
Where “DriveHQ Share”, “USER_NAME” and “SHARE_NAME” are all virtual folders. Virtual folders cannot be deleted or renamed. So when you right click on a virtual folder, most of the popup menu items are disabled.
Usually you cannot upload files to a “virtual folder”, except the “My Storage” virtual folder and share names like \\USER_NAME\SHARE_NAME\.
Right click on a real folder in a Shared folder
As shown in the screen above, the “Project” folder is a real folder. When you right click on “Project”, it pops up a menu, where you can see options to “Cut”, “Copy”, “Delete”, “Rename” and “Download” the folder.
Please note Folders in a shared folder cannot be shared or published by this user. Only folders’ (or files’) owner can share the folders / files.
There is a shared folder sample from the Webmaster user:
This share is used as an example; it also includes the instructions about folder sharing.
10.4.1 Detail View and Thumbnail / Icon View
DriveHQ FileManager can display folders using Thumbnail / Icon / Detail Views. By default, it displays folders in detail view. You can change it to other view by clicking in the toolbar, as shown below:
Change folder view to thumbnail, icon or detail view
10.4.2 View File Properties and Edit File / Folder Caption & Description
From DriveHQ FileManager, select a remote file, and then click on the Properties button in the small toolbar, as shown below:
File / Folder properties button
It will pop up a Properties dialog, as shown below:
File / Folder Properties and Edit Caption / Descriptions dialog
You can see the file size, server path, size, create time, modify time, caption and description. You can also edit the caption and description field and click on Apply to save the change. This feature might be quite useful if you need to caption a lot of files / pictures.
10.4.3 DriveHQ Control Panel
Click on DriveHQ control panel, you can see the following screen:
DriveHQ FileManager Control Panel screen
DriveHQ Control Panel is not a real folder. It is a virtual folder linking to all tools for setting up your account options and managing the share and publish lists. The same functions can also be accessed from the Tools menu. For more detailed info, please visit the “Share Files/Folders”, “Publish Files/Folders”, “Synchronize Folder”, and “Account Setting and Options” chapters from the Online Help of DriveHQ FileManager.
10.4.4 Upload / download / manage files / folders
It is very easy to upload / download / manage files using DriveHQ FileManager. You can easily drag and drop files / folders from Windows Explorer to any folders in “My Storage” folder.
You can also drag and drop files / folders to a real folder in “DriveHQ Share”, if the folder is shared to you with “Upload / Add” or “Full Access” right. For more info, please visit the “Online Sharing” section.
You can also more easily drag and drop files / folders using DriveHQ FileManager only. To do so, use the default FileManager main screen. (Click on the “Display” button and select “Show local and DriveHQ.com files”).
Drag and drop files / folders using DriveHQ FileManager
Other than drag and drop, there are 3 more ways to upload / download / copy / move files / folders:
- You can use the standard Windows short-cut key combinations, such as: “Ctrl + C” for copy; “Ctrl + V” for paste; “Ctrl + X” for Cut.
- You can select a folder(s) / file(s), then click on the Edit menu, and select “Cut”, “Copy” and “Paste”.
- You can right click on the selected File(s) / Folder(s) and select from the popup menu “Cut”, “Copy”, “Paste”, “Delete” and “Rename”, etc.
Access DriveHQ actions menu by right clicking on the select files & folders.
After you drag and drop or copy / paste multiple files / folders, it will start uploading / downloading immediately. The files are added to the upload / download task list at the bottom of the screen. See the screenshot below:
FileManager uploading multiple files / folders
As you can see from the above screenshot, when dragging multiple files / folders from the local storage to the remote storage, files are added to the transfer task list. You can see the progress of each file as well as the overall progress of all files. You can also find the local (source) file paths and remote (destination) file paths, the transfer speed and remaining time. Please note the uploading / downloading speed changes from time to time; it is dependent on many factors, such as file size, file type, whether the file has been uploaded by any other users, etc. It is also dependent on the network routing, so the actual speed varies from time to time and location to location. The estimated time could have a very big error.
DriveHQ does not limit upload speed. DriveHQ has virtually unlimited network bandwidth. However, the actual upload speed is limited by the particular routing. Even if you have a very fast Internet connection, such speed is usually the speed from your computer to your ISP’s data center. However, the connection from your ISP to DriveHQ data center will need to go through many Internet hops; at each hop it is shared by many Internet users. The slowest link will determine the actual speed. If you connect from a different country, usually the connection speed is slower.
DriveHQ FileManager has used multiple technologies to improve the upload / download speed. This is designed to make upload / download faster.
If during uploading / downloading, the network connection is dropped briefly, it can automatically retry and resume (or manual resume) when the connection is re-established. You can also manually click on the Stop button to stop (pause) uploading / downloading. You can resume the transfer later, or delete the un-finished transfer tasks by clicking on the “Delete” button.
You can also drag and drop files / folders between 2 remote folders or 2 local folders. (Please make sure you use real folders and not virtual folders.)
10.5. Sharing Files and Folders
Using DriveHQ FileManager, it is extremely easy to share folders / files online. Just logon DriveHQ FileManager, select a folder and click on the Share button.
10.5.1 Share a remote folder
As shown below, you can select a remote folder and click on Share button to share a folder.
Share a folder by selecting a remote folder and click on the Share button
After you click on Share, it will pop up a new dialog:
Share a folder and set permission screen
By default, the Share Name is the same as the folder name, you can change the Share Name and Share Description, select a permission level from the following levels:
- View file list / icon only
- Read / download file only
- Add / upload files
- Full access
In the Share-to field, please enter the email addresses or DriveHQ username of the persons who you want to share the folder to. If the person does not have a DriveHQ account, or if you don’t know the person’s DriveHQ username, you can just use the person’s email address. You can enter multiple usernames / email addresses separated by “,” or “;”.
If you have a group account, then you can check the checkbox “Share to group”, which shares the folder to all members in the group. You can also click on “Select Group Members” button to add some group members into the Share-to list.
“Select Contacts” button: click on this button will let you select users from your contact lists. You can create a contact list from DriveHQ Webmail section.
The “If any file changes, send share change notification email” checkbox is only available for paid users.
After you click on Ok, the Share is created and a confirmation dialog pops up:
Share created confirmation dialog
The remote folder “\My Documents” has been shared to the users: SubFreeDrivehq. If all Share-to users are DriveHQ members, then it is not necessary to send the share notification email. The “share-to” users can logon www.drivehq.com or DriveHQ FileManager, go to the virtual folder:
\DriveHQ Share\YOUR_USERNAME\SHARE_NAME
In the case of this demo, it is:
\DriveHQ Share\FreeDrivehq\My Documents
If you also share the folder to a non-DriveHQ member using his / her email address, then you need to click on “Send Share Notification” button, which will open your email client software, e.g. Outlook. See the screenshot below:
Launch Outlook (or other default email client) to send “Share notification” email
Note, you must send the Share notification email using your own email account and your own email client software. DriveHQ emails are more likely to be filled / blocked, so sending from your own email server tends to be more reliable.
In the share notification email template, you can find the “Share URL”.
10.5.2 Share a local folder
From DriveHQ FileManager main screen, you can also select a local folder and then click on the “Share” button. It will pop up the following dialog:
Select a remote folder
Basically, you need to upload the files to DriveHQ storage first. Then it will share the uploaded folder online. This sharing method is far better than other local-network based folder sharing methods:
- You can share folders / files to remote users, incl. co-workers, friends, customers or guests.
- Your computer can be turned off, which will not affect the shared folder.
10.5.3 Accessing a shared folder:
After you have shared a folder using DriveHQ FileManager, the folder can be accessed by the “Share-to” users online. Whether you share a folder using DriveHQ FileManager or DriveHQ.com website, the result is completely the same. You can share a folder using DriveHQ FileManager or DriveHQ.com website; you can also access a shared folder using DriveHQ FileManager or DriveHQ.com website. There is no difference, except using DriveHQ FileManager is more efficient in uploading / downloading files / folders. Using DriveHQ.com website is more convenient if you (or a non-DriveHQ member) don’t have DriveHQ FileManager installed.
Accessing a shared folder online using DriveHQ.com website is covered in “Online File / Folder Sharing” section. In this section, it only covers accessing shared folders using DriveHQ FileManager.
If another DriveHQ user shares a folder to you, he usually sends a “Share notification email”, which has the detailed instructions about how to access the shared folder, e.g. a typical share notification email includes the following info
------------------------------
There are three ways to access these files:
1. If you are a DriveHQ member, please log on to your account and access these files in the DriveHQShare folder.
2. If you are not a DriveHQ member yet, I recommend you to sign up now using this e-mail address. My files will automatically appear in your "DriveHQ Share" Folder.
3. You can also access these files by clicking on the Share link in the notification email; you will have read-only access. In the “Share Verify” page, enter your email to access the Share.
Please install DriveHQ FileManager to download all files. It works like Windows Explorer or FTP, supports drag-n-drop.
It can download / upload any size files reliably. Please download it at:
https://www.drivehq.com/downloads/downloads.aspx
-----------------------
Using DriveHQ FileManager to access a shared folder, you must have a DriveHQ account. If you are not a DriveHQ member, you can sign up a DriveHQ account using the email address that received the share notification email.
If your DriveHQ username or your registered email address is in the “Share-to” list when the other user shared the folder, then you can logon DriveHQ FileManager. The folder(s) shared to you is automatically linked to the special virtual folder:
\DriveHQ Share\FOLDEROWNER_USERNAME\SHARE_NAME
Dependent on the permission of the share, (which is set by the user who shared the folder to you), you might be able to access the folder with “Read-only”, “Add / Upload” or “Full Access” right, etc.
As an example, user FreeDrivehq shared a folder My Documents to user SubFreeDrivehq with full-access right. FreeDrivehq also shared GroupRead to the whole group with Read-only access; GroupWrite with full-acess right. The screenshot below shows when the user SubFreeDrivehq logs on his own account, he can see the shared folders in the virtual folder:
\DriveHQ Share\FreeDrivehq\
Since the folder My Documents was shared with full-access right, he can right click on a blank area to create files / folders in it. He can also drag and drop files / folders into this shared folder.
Accessing a shared folder (with full access right)
In the above screen, if the folder is shared with read-only access, then the menu item “New” will be disabled and you cannot upload files into the shared folder.
10.6 Publish Files / Folders
By default, files in your DriveHQ account are secure and private. You cannot link files from other websites / web pages. Even if you share a folder, that will still not create static links to your files / folders.
To create links to your files / folders, you must use the Publish feature, which is described in “DriveHQ.com web-based services and features”.
Whether you publish a folder using DriveHQ.com website or using DriveHQ FileManager, the result is exactly the same. DriveHQ FileManager is more efficient in uploading files and publishing folders; DriveHQ.com is more convenient, esp. if you don’t have FileManager installed.
Publishing a folder using DriveHQ FileManager is extremely easy. You just select a folder and click on Publish button.
Select a server folder and then click on the Publish button
It will pop up a “Publish a server folder” dialog, as shown below.
Publish a server folder dialog
From the above dialog, enter your Publish name, description and permission, check the “Yes, I agree” checkbox, then click on Ok, the folder is published and you can see the confirmation dialog with Publish URL info:
Publish confirmation dialog with Publish URL
You can click on Copy URL to copy the folder’s publish URL to the clipboard, which you can paste into other application, e.g. Notepad, Word, or any HTML editor. Click Cancel to close the dialog.
You can more efficiently get multiple file / folder publish URLs. Just visit any published folder, select files / folders in it, then right click on the files / folders, select Show Publish URLs. It will open a new dialog as follows:
Get files / folders’ publish URLs (static links)
To get the publish URLs, please right click on the selected folders / files, then click on Show Publish URL. It pops up a dialog as shown below:
Show Publish URLs dialog
You can copy the publish URLs into your Windows clipboard and paste them into other applications, such as Notepad, Word or any HTML editors.
The above publish URLs has a pattern of:
https://www.drivehq.com/file/df.aspx/publish/OWNER_USERNAME/PUBLISH_NAME/FILENAME
If you want to hide your username and folder name, you can click on the “Show safe URL(s)” button, which will change the Publish URLs into a new format as shown below:
Show Safe Publish URL
The safe Publish URLs hide the username, publish name, folder name and filename info. So the URL is more secure; moreover, Safe URLs are guaranteed not to have any special characters that might affect the validity of a URL. On the other hand, a regular Publish URLs may not work if it has special characters in the folder name / file name, etc.
Please note when other users visit your published (or shared) folder(s), they will be using your account download bytes. So if you expect a lot of users will access your published folder, please make sure your account has enough download bytes.
10.7 Access Folders Published by Other Users
You can use Publish URLs to access published folders and files. Just open a web browser and enter the Publish URL(s).
If you need to download published files, using web browser, you can only download files one by one. A much more efficient method is using DriveHQ FileManager. To download multiple published files / folders using DriveHQ FileManager, you just need to logon DriveHQ FileManager (DriveHQ account is required), then enter the following address:
\\USERNAME\PUBLISHNAME
Enter a publish path in the server address bar to access a published folder
After you enter the Publish Address in the server address bar, click on “Go” to open the folder. The published folder works just like a regular folder, except you cannot delete it (and the files in it). You can drag and drop to download the files / folders to your local storage or to your own DriveHQ storage.
10.8 Folder Synchronization
DriveHQ FileManager can synchronize a local folder with a remote folder. Synchronization can be done in real-time or at scheduled times.
DriveHQ FileManager can synchronize multiple computers to the same online folder, thus it can be used to synchronize 2 computers indirectly.
By using Group Shared folder(s), or folders shared to multiple users, DriveHQ FileManager can synchronize folders in multiple user accounts!
10.8.1 Create a Synchronization task
From DriveHQ FileManager, select a local or remote folder and then click on Synchronize. It will pop up the following dialog:
Click on OK to continue, it will let you select the other synchronized folder:
If you want to synchronize it with a new folder, you can click on “New Folder” button, which creates a new folder to be sync-ed with the selected folder. Once you have selected the Sync target folder, click on Next, it will pop up the following dialog:
Setup folder synchronization dialog
There are a lot of options / features in this page. Please read the detailed explanations below:
Synchronization Direction: There are three directions for you to choose: Both Directions, Server to local only and Local to server only. Please read more details below.
Overwrite Direction: There are four options for you to choose: Show Message Box, Overwrite Local, Overwrite Remote and Overwrite Older.
Synchronization Frequency: There are two general modes for you to choose: Real-time and Scheduled.
In scheduled mode, there are four options for you to choose:
- One time only: you can set the starting time for the synchronization that will be finished for one time.
- Periodically: you can set the interval for periodically synchronization task;
- Daily: you can set the starting time for daily synchronization task;
- Weekly: you can select one day of week.
Time Delay in Real-time Folder Synchronization
Once you have created a real-time synchronization task, it will automatically sync local files to the remote folder in real-time as any change occurs. Synchronizing files from the remote folder to the local folder may take a little longer time. When a file is changed (or added) in the remote folder, DriveHQ FileManager cannot immediately detect such changes. It checks file changes in the remote folder periodically. Usually between 5 minutes to half an hour. When it detects such changes, it will sync the changes to the local folder.
About One-Way Synchronization
It could be quite confusing about one-way synchronization. Different implementations handle it differently. Please make sure you understand it very well, otherwise it could cause files being deleted accidentally.
The most important thing to know is: whether one-way or two-way synchronization, when the two folders are (manually) synchronized, the folder contents must be exactly the same.
For example a server folder S is configured to sync to a local folder C in a one-way synchronization, assume S and C are already sync-ed, and now think about these cases:
(1) If you add a file to S, the file will be sync-ed to C, which is as expected; if you add a file in C, the new file is deleted from folder C when next synchronization happens.
(2) If you change a file in S, it will be sync-ed to C; but if you change a file in C, it will be overwritten;
(3) If you delete a file in S, it will be deleted in C; but if you delete a file in C, it will be added back.
In short, if you have a one-way synchronization from A to B, then no matter what happens, after it finishes synchronizing, B will become the same as A.
Exclude these file types: Define the files or file types to be excluded from the synchronization task. Multiple file extensions, file names or file wildcards can be entered (separated by a comma or semicolon).
Note: After the Synchronization Task has been set, if you delete or modify a file in one folder, the change will be automatically applied to the other synchronized folder. You can uncheck "Don't ask for deleting files in a synchronized folder" to avoid unexpected file deletion. Moreover, you can check "Save a backup copy of automatically deleted files" so that you recover your data in case of automatic file deletion.
After you have finished all above, click on "OK", it will show the task progress dialog to begin transferring files and folders to the target folder.
10.8.2 Edit a Synchronization Task
Click on "Tools"-->"Manage Synchronization", the "Manage Folder Synchronization" screen shows up, you can Disable/Enable, manual synchronize, edit or delete the Synchronize task, as shown below:
Folder Synchronization among multiple PCs and Multiple
DriveHQ users
You can install DriveHQ FileManager on multiple PCs; on each PC, you can synchronize a local folder with the same remote folder. This will synchronize the folders on all PCs.
To synchronize folders among multiple DriveHQ users, e.g., if UserA wants to synchronize two folders: FolderA of UserA and FolderB of UserB, then UserB must share FolderB to UserA (usually with Full-Access right). When UserA logs on DriveHQ FileManager, he can see FolderB in "\DriveHQ Share\UserB\FolderB". He can synchronize the shared folder with his local folder.
10.9 DriveHQ FileManager Options
DriveHQ FileManager has a lot of features; you can configure it to work better for you. From DriveHQ FileManager main screen, click on the Options button, it will open the Options dialog:
DriveHQ Options screen – My Options tab
As you can see from the Options dialog, it has the following features / options:
- My Profile: Click on it and it will display your account info; you can change it;
- Account Balance: You can find your account balance, incl. cash balance, service coupon balance, max storage, used storage space, download bytes and used download bytes, etc. Please make sure to check if your account balance is correct. If it does not match what you ordered, you might have allocated storage space / download bytes to your sub-user(s).
- Change Password: You can easily change your password online; you need to verify your current password before you can change your current password.
- My Options: As shown above, you can set the following options in this dialog:
o Remember my logo info: If you checked this checkbox, you don’t need to enter username / password each time.
o Automatically sign in: When you start FileManager, it can automatically sign in FileManager.
o Directly edit and save remote files: You can edit and save files on the server side directly.
o Allow synchronizing locked files: Locked files are the same as open files, or files that are being written to. DriveHQ FileManager supports “Volume Shadow Copy”, so it can synchronize files even if it is being written to. You just need to check this checkbox.
o Maximum cache file size: DriveHQ FileManager caches the most recently accessed files in a local cache folder. The first time you access (open/view/read/modify) a file, it is downloaded to a local cache folder. Thus, the subsequent accessing to the same file(s) will be many times faster. By default, the software sets the maximum cache file size to 1GB.
o Location of the local cache folder: the folder location where you saves the cached files. By default, the location is like:
C:\Users\Administrator\AppData\Roaming\DriveHQ\cacheDir\CUSTOMER_ID
You can change the local cache folder location if needed.
o View Cache Files: click on this button to see the cached file(s).
o Clear All Cache Files: click on this button will delete all files in the cache folder.
o Subscription: you can upgrade to a paid service plan.
- Encrypted Folder: click on encrypted folder, you will see this screen. Please make sure to read the information carefully.
Encrypted Folder Option
As you read the information on this screen, you can see that encrypted folder is extremely secure. It is more secure than regular SSL. When using SSL, it encrypts data for upload / download. The files uploaded to DriveHQ are no longer encrypted, which is usually secure as DriveHQ takes all efforts to make sure our system is secure and reliable. If you need extra level of security and privacy, you can use the encrypted folder feature. You can enter an encryption key in the above screen. Please make sure you enter a long key so that other people cannot guess the key. After you save the key, it will create a folder in you’re my Documents folder:
\My Documents\My Encrypted Data\
When you upload files to this folder using DriveHQ client software, e.g DriveHQ FileManager or DriveHQ Online Backup, your files will be encrypted locally by DriveHQ client software using your encryption key. The encrypted files are uploaded to DriveHQ server. The files will remain encrypted on server. DriveHQ uses industry strength encryption algorithm with proprietary customization; without the encryption key, it is extremely hard to decrypt the files.
When you download the encrypted files on the same computer, DriveHQ client software will automatically decrypt the files. So encryption and decryption are very easy; no user action is required.
Please note:
After you have uploaded some encrypted files, if you change the encryption key in FileManager, it will not update the encryption key of those files that have already been uploaded. The new encryption key will be used when you upload new files. This is because your files are encrypted locally; your encryption key is never sent to the server, so the server cannot decrypt your files already uploaded, nor can it encrypt them again using your new encryption key. What this means is: you must remember all your encryption keys; or you must delete all previously uploaded files and re-upload them.
System Options: Please see the screenshot below:
You can set the following options:
- Whether to automatically start DriveHQ FileManager after you logon Windows; uncheck it to stop it from automatically run;
- Show Hidden files and folders: by default FileManager hides certain files and folders (usually system folders), which are also hidden in Windows Explorer. If you need to display such folders, just check the checkbox and save it.
- Automatically start minimized: When you turn on your PC and logon Windows, DriveHQ FileManager will automatically start (which you can disable it); to avoid it from opening the application Window, you can set this option. The benefits are:
o You can avoid opening too many Windows right after logon;
o When you need to use FileManager, you can open it right away as it has already logged on.
- Use SSL: check this checkbox to transfer data in HTTPS/SSL. This is usually recommended if you need to transfer some very important documents that require high security.
- Display remote storage on left / Display local storage on left: by default, FileManager displays the remote storage on left-hand side; you can change it to the right-hand side.
Speed Limits: this can be used to set the maximum upload / download speed. When you
Use DriveHQ FileManager to upload / download files, by default, it could use up to 90% of your maximum bandwidth. If you also have other applications that need to access the Internet, they might compete for the bandwidth. To avoid DriveHQ FileManager from using too much bandwidth and making your other applications too slow, you can limit the upload / download speed.
Configure Speed Limit (Bandwidth Throttling)
DriveHQ does not limit upload speed. The download speed is limited to about 200KB/sec for free service users. For paid members, the download speed limit is much higher, at least 400KB/sec to 2MB/sec dependent on your account max storage space.
Even if the speed limit is very big, it does not mean you can reach the speed limit. Please understand that the actually connection speed is dependent on many factors:
- File sizes and file types: small files tend to have a lot of overhead; compressible files such as text files, document files, HTML files can be transparently compressed and thus is much faster to upload;
- Uploading image files tend to be slower as DriveHQ server creates a thumbnail file and a preview file for each image uploaded.
- Your local Internet connection speed: Many Internet connections are asymmetric, e.g.: ADSL and Cable Modem connections. The download speed tends to be much faster than upload speed.
- The particular routing from your ISP’s data center to DriveHQ data center. The connection may go through many hops. The slowest hop determines the final speed.
- If you connect to DriveHQ servers from another country, then the speed is usually dependent on the connection speed between your country and USA.
Folder Options:
You can set remote folder options described as above in the web of DriveHQ by clicking on the lick.
Group Acccount:
If you are not a group administrator, the Group Account screenshot will display as follows:
Group Account Screenshot for Non Group Admin User
You can upgrade your account to be a group account by clicking Free Upgrade to Group Account button. Then you will be guided to DriveHQ web to finish the steps for account upgrade.
If your account is a Group Admin account, then you will see the following Group Account screenshot:
Group Account Screenshot for Group Admin User
It lists some features applied for group admin users. Click on Launch Group Admin Tool button, you will be guided to DriveHQ web to do so.
The “Portable or No-install Version” DriveHQ FileManager
For users who use public computers, such as those in an “Internet café” or library, you may not be able to install any client software, incl. DriveHQ FileManager; in addition, many big organizations may not allow employees to install any software on company computers. In this case, users can use DriveHQ.com web-based service, or DriveHQ FTP service (if FTP is allowed). Windows Explorer can be used as a simple FTP client. You can simply enter the following address:
ftp://USERNAME:PASSWORD@ftp.drivehq.com/
For more info, please visit the DriveHQ FTP Server Hosting Service section.
There is another good alternative solution: DriveHQ has a special version DriveHQ FileManager “Portable or No-install” Edition, which does not require installation. You can simply download it and unzip the files into a folder; you can also copy the files to a USB drive, or burn a CD/DVD. You can then double click on the file DriveHQFileManager.exe, it will launch DriveHQ FileManager. The “portable” edition might be a little less efficient, but it requires no cache folder.
The “portable or no-install” edition works just like the regular edition, except:
- It requires no installation; you can copy and remove the application folder to “install / uninstall” the software;
- It does not require a cache folder;
- It doesn’t integrate with Windows Explorer. It doesn’t add the “right click” menus to Windows Explorer; moreover, you cannot drag and drop files / folders from Windows Explorer to DriveHQ FileManager.
- You should not save your account info;
- When you logout, it will prompt you to delete any cached files / folders.
- It does not add a small icon in the system notification area.
11. DriveHQ Email Hosting Service
DriveHQ Email Hosting service is unlike any other free email services. It is designed for businesses, not as yet another free email service.
DriveHQ email service is a real SMTP/POP3/IMAP email service compatible with almost all email client software, including Outlook and Outlook Express. You can host multiple email accounts on DriveHQ for your business.
When you register a new account on DriveHQ.com and order a service, you automatically get an email account:
YourUserName@firstcloudit.com.
You can create more email accounts by upgrading to the Group Account. Company private domain email addresses are also supported. The maximum mailbox size is combined with your file storage size. Also, the webmail service is integrated with DriveHQ Online Storage service, so you can easily attach server files or save email attachments to your DriveHQ online folders.
11.1 DriveHQ Email Service is better than other free email services
- You can access your emails online using the webmail interface from anywhere.
- You can access your emails using any email client software, incl. Outlook and Outlook Express.
- You can access your emails offline using any email client software! (Webmail won't work if you are offline.)
- You can access your emails from different computers using Outlook or Outlook Express.
- You can create multiple email accounts for your business; you can group users into a group account or sub-group accounts; you can also create contact groups.
DriveHQ can host your company private domain emails for a lot cheaper than Microsoft Exchange or Lotus Notes! Plus, it is easy, reliable and hassle free!
11.2 DriveHQ Email Server Hosting Service FAQ
1. How do I get started with DriveHQ email?
If you are not a DriveHQ member, you need to sign up now. Once you become a member and order a service, then you have an email account: USERNAME@firstcloudit.com. Please visit our online help pages about how to configure for Microsoft Outlook and Outlook Express . For all other email client software, please choose the default SMTP/POP3/IMAP port setting. The SMTP, POP3 and IMAP server is mail.firstcloudit.com. Please note all out-going emails require logon.
2. What is the maximum email box size and what is the maximum email size?
DriveHQ offers 1GB free email box size; if you use Outlook or Outlook Express, then you can get unlimited email box sizes by downloading emails to local. The maximum email size is 10MB for non-members; 20MB for premium members. It is strongly recommended that you upgrade to premium service for Outlook email access as otherwise, there will be many restrictions.
3. Is it possible to email a very large file, say a 200MB file?
While it is possible for DriveHQ email to support such big email attachments, other email servers generally can only handle less than 10MB emails. So in this case, please use DriveHQ Online Storage and Sharing service. You can share any size files, or many files very easily with DriveHQ FileManager or any FTP client software.
4. I have a small business with 10 employees. Can I get 10 email addresses?
Yes, you can use DriveHQ Group Account service. You can easily upgrade to a group account for free, which includes one sub-user license for free. You can then create sub-accounts. Group Account service gives more flexibility. You can manage sub-accounts and sub-groups yourself. All sub-users of a paid group account are also considered as premium users.
Cost-wise, group account service is a lot cheaper than buying services individually.
5. What are the most frequent problems our users experience?
(1) When setting up DriveHQ email account, please make sure that “Out-going emails require logon” is checked and the logon credentials should be the same as the POP3 settings (the same as DriveHQ account logon info).
(2) Some spam-filters might incorrectly filter DriveHQ emails. In this case: check your junk/bulk mail folder and contact your other email service provider to not filter DriveHQ emails.
6. Can I use DriveHQ email service for sending spam emails, or sending bulk emails to a big mailing list?
Spamming is strictly prohibited. Your account will be disabled immediately should you engage in any spamming activities. As a prevention for such abuse, each user can send a limited number of emails per day. Therefore, sending bulk emails, even if legitimate emails, is not allowed.
7. Can I access DriveHQ email from multiple computers (using Outlook)?
Obviously, you can access DriveHQ Email using webmail from any number of computers. For Outlook access from multiple computers, please make sure you keep emails on server for a few days before you delete them. It is recommended to keep your emails on server for 5 days. For more info, please click here.
8. How can I create my own domain email accounts?
You must be a premium user to use private domain email feature. First of all, you must own a domain name. If not, you need to register a domain with any domain registrar company, e.g. Godaddy.com, network solutions or Register.com, etc. Once you have a domain, please add a DNS MX record using their web interface. The MX record should point to the email server mail.firstcloudit.com: 66.220.9.46. If you have any questions, please contact your domain registrar's customer support.
9. Do I need to install any specific email client software to access DriveHQ email?
No, you can access DriveHQ email from the webmail interface; or you can use any email client software, such as Outlook and Outlook Express, etc.
10. Can I set email rules and email filters?
Yes, using Microsoft Outlook or Outlook Express, you can setup any email rules or filters. For more info, please read DriveHQ Advanced Email Options section.
11. How are free accounts different from paid accounts?
Due to a lot of spammers, and also to avoid competing with other free email service providers, DriveHQ free email hosting service has a lot of restrictions and is for demo purpose only. If you use our email hosting service for business, you must upgrade to a paid account.
Free accounts have less amount of storage space. If you keep a lot of files / emails on server, you could easily run out of storage space.
For SMTP, Free Service Users can send a maximum of 25 emails/day (for True Accounts, 25/day; for Free Accounts, 5/day); the maximum attachment file size is 2MB.
Premium Users can send a lot more emails/day dependent on the max storage space. Spamming is strictly prohibited. DriveHQ has automatic monitoring software that detects any spamming / scamming activities and automatically disables bad user accounts immediately without any warning. If you need to send more emails / day, please contact support@drivehq.com and explain why you need to send so many emails / day. The maximum attachment size for premium users is 20MB.
Free service users can create only one sub email account. You can upgrade to a group account and order more group user licenses.
12. Can I change account usernames?
If you have a standalone account, you cannot change your username online. DriveHQ customer support can help you change it.
If you have a group account, you cannot change your primary account username online; DriveHQ customer support can help you change it.
For other group members, the group administrator(s) can help change the username. Sub-group administrators can also help change the username of a sub-user belonging to the sub-group.
13. How can I administer my group / business email accounts?
Administering your Email Accounts is very easy. First of all, you must upgrade your account to Group Account. Please logon www.drivehq.com, click on My Account, then click on Group Account. Once you are a group account, you will have access to the Group Admin feature, where you can create sub-accounts, add or delete sub-accounts, allocate storage space and download bytes, etc.
14. Can I import / create a lot of email accounts at once?
Yes, you can. Using the Group Admin tool, you can import many user accounts at once. You just need to create a .CSV file.
DriveHQ supports SMTP / POP3 / IMAP, so you can use any email client software to access DriveHQ Email Service. SMTP/POP3/IMAP based email is much easier to use than any web-based email services. Many email client applications offer powerful features such as message rules, advanced editing, filtering and searching, etc. You also can configure multiple email accounts in one email client. More importantly, you can easily download emails to your local computers, so that emails will be available offline; and by downloading (and deleting) emails on server, you get virtually unlimited mailbox size!
11.3 Configure Outlook Express for DriveHQ Email Service
1. Launch Outlook Express, in the Tools menu, click on Accounts.
2. In the Internet Accounts dialog box, click on Add , then select Mail to open the Internet Connection Wizard. Enter your Display name:
3. Enter your DriveHQ.com email address, which is in this format:
YourUserName@firstcloudit.com.
4. Click Next, then enter E-mail Server Names. Both POP3/IMAP and SMTP servers are: mail.firstcloudit.com.
(IMAP is also supported).
5. Click Next button, it goes to the Internet Mail Logon screen. Enter your DriveHQ username and password in the required boxes. If you select Remember password option, you do not need to enter your account info again the next time you launch Outlook Express.
6. Click Next button, you are almost done configuring your DriveHQ email. Click Finish to finish the wizard.
7. In order to fight spamming, DriveHQ outgoing SMTP server requires authentication, so you must configure the outgoing server. Firstly, in Tools menu, click on Accounts; in Internet Accounts page, click the Mail tab, and then click Properties button, shown as below:
Click the Servers tab, check the checkbox of “My Server requires authentication”. Click OK and close the dialog. You are ready to use DriveHQ email.
11.4 Configure Microsoft Outlook for DriveHQ Email Service
1. Launch Outlook, in the Tools menu, click E-mail Accounts.
2. In the E-mail Accounts dialog box, select Add a new email account, then click Next button,
3. In the Server Type page, select POP3 option (IMAP is also supported), then click Next button, it goes to the Internet E-mail Settings screen,
3. Enter all information in the required fields. Firstly, enter your name and DriveHQ.com E-mail address, which is like: YourUserName@firstcloudit.com. Then enter your user name and password in Logon Information fields. If you select Remember password option, you do not need to enter your account info again the next time you launch Outlook.
Finally, in the Server Information fields. Enter the POP3/IMAP4 server and SMTP server name provided by DriveHQ, both POP3/IMAP4 and SMTP servers are mail.firstcloudit.com.
5. Click Next button, you are almost done configuring your DriveHQ email account. Click Finish button to finish the configuration process.
6. DriveHQ outgoing server requires authentication, so you must configure the outgoing server. Firstly, in the Tools menu, click E-mail Accounts, then click Next button to turn to Internet E-mail Settings page. In this page, click More Setting button, select Outgoing Server tab, and select "My outgoing server (SMTP) requires authentication" as shown below. Click OK to close the dialog. You are ready to use DriveHQ email.
11.5 Configure Eudora for DriveHQ Email Service
1. Open Eudora and go to the Tools menu. Select Personalities.
2. Right-click on the newly opened sub window, and choose New.
3. Choose Create a brand new email account.
4. In the Accounts Wizard dialog box, enter all information in the required fields. Firstly, enter your name and DriveHQ.com E-mail address, which is YourUserName@firstcloudit.com in Email Address fields as shown below:
5. Incoming Server - mail.firstcloudit.com. Server type is POP or IMAP.
6. Outgoing mail server (SMTP server): mail.firstcloudit.com
Please select the Allow authentication option.
7. Now right-click on the newly created account and choose Properties.
8. Please set the Secure sockets when sending to Never.
Secure sockets when receiving should also be set to Never.
9. You are done!
11.6 Configure Lotus Notes for DriveHQ Email Service
1. Launch Lotus Notes, choose File - Preferences - Client Reconfiguration Wizard. Select Internet mail servers, and then click on Next.
2. Enter all information in the required boxes. Firstly, enter your DriveHQ E-mail address, which is YourUserName@firstcloudit.com. Then enter DriveHQ domain: firstcloudit.com.
3. Enter the POP3/IMAP4 server name provided by DriveHQ.com: mail.firstcloudit.com.
4. Enter your DriveHQ user name and password in Account Information boxes.
5. Enter the SMTP server name provided by DriveHQ.com: mail.firstcloudit.com. You are ready to use DriveHQ email. Click Next button to finish the configuration process.
11.7 Configure your private domain email addresses
To configure private domain email addresses on DriveHQ.com, you must have a domain name; if you don’t have a domain name yet, you can register your own domain name through any domain registrar companies, such as GoDaddy.com, Network Solutions or Register.com, etc.
You can then add a “DNS A Record”, i.e. add a server name: mail.YOURDOMAIN (e.g. mail.drivehq.com) to 69.220.9.46;
If you represent a big company with its own DNS servers, then you can add the “DNS A Record” from your own domain name server;
If you are a small business, you probably don’t have your own DNS server. In this case, you can use your domain registrar’s DNS server directly. Logon your domain registrar’s website, you can manage your domain(s), and add DNS A-Record, etc.
If your domain name is currently registered with Register.com and if you use Register.com's Domain Name System Servers (DNS Servers), then you can modify this information online by signing into Account Manager, and selecting the domain name you wish to make the changes to from the main menu.
Click on the link "Edit IP Address (A Record)" from the ADVANCED TECHNICAL SETTINGS menu. This will open a page on which there will be an editable list of all of the IP Addresses (A Records) associated with the domain name, shown as below:
To host you private domain email address, you need to add an A-Record of 'mail" that resolves to the email server mail.firstcloudit.com: 66.220.9.46. After you have made the necessary changes, click Continue to apply the changes.
You also need to add an "MX Record" to your DNS server. Below is an example of adding an MX record using register.com website.
Click Continue again to confirm the changes. Please note it takes about 24hours for a DNS name to be updated on the Internet.
Once you have finished the process above, you should go back to the page of DriveHQ Email Options, shown as below:
Type in your email domain name in the Custom Email Domain Field. Click on Check DNS MX Record for the Domain to check the result. Then click Submit.
11.9 DriveHQ Webmail
DriveHQ webmail is built with HTTP/HTTPS. It offers convenient access to your emails and contacts. Moreover, it offers comprehensive email management, group management, contact management functions and more advanced options and features.
To access DriveHQ Webmail, you can visit www.drivehq.com, click on “Logon” link in the top-right corner, it goes to the logon page where you can select go to “Email Hosting” as shown in the screenshot below:
Enter your username / password to logon; it will go to the DriveHQ Email Hosting Service homepage as shown below. Alternatively if you have already logged on, you can click on “All Services” link, then select “Email Hosting Service” as shown below:
Accessing other DriveHQ email service by clicking on “All services” link
DriveHQ Email Hosting service home page
DriveHQ webmail works just like other web-based email hosting services. You can compose new emails, reply, forward, delete and search emails; you can also move emails between different email folders.
11.10 DriveHQ Advanced Email Options
From DriveHQ Email Hosting Service home page, click on Email Options as highlighted above, it will go to the email options page:
DriveHQ Email Options screen
As you can see from the screenshot, DriveHQ email service has a lot of advanced options.
Primary Email Address: If you registered a DriveHQ account using an external email address, your account is associated with two email accounts: one is USERNAME@firstcloudit.com, the other one is your external email account. This option sets whether to use your DriveHQ email address or your external email address as the primary email address.
Custom Domain Email: You can use your private email domain for your email address(es). Note you must have a domain before you can use private domain email address. You also need to add a DNS MX Record such that your email server for the domain is: mail.firstcloudit.com, or mail.YOURDOMAINNAME if you also add a DNS A-Record such that mail.YOURDOMAINNAME resolves to 66.220.9.46.
Email Alias: If you have a custom domain, your email address is like: USERNAME@YOURDOMAIN, USERNAME@firstcloudit.com also works. Because DriveHQ system has over two million registered users, so your preferred username might have been taken. In this case, you can create an alias email address as: ALIASNAME@YOURDOMAINNAME
Group Email Addresses: You can manage custom email addresses, email aliases, manage mailing lists and creating new email accounts (new sub-user).
Email Auto Forward: You can automatically forward emails sent to your DriveHQ email account to a different email address. You can keep the email in your DriveHQ account or delete the email after forward.
Email Auto Reply: You can send an automatic reply email when you receive a new email. You can customize the automatic reply email template.
Email Signature: You can append an automatic email signature at the end of each email sent to other users.
Safe and blocked senders: you can customize DriveHQ’s email filter feature by adding safe and blocked email lists. See the screenshot below.
Bulk Control: controls how to treat bulk emails.
Bulk email control screen
You can configure the filter level of bulk email control feature. You can also configure when to delete those filtered bulk emails.
Email Rules: If you use other email client software such as Outlook, you can configure email rules using Outlook. If you use DriveHQ webmail mostly, then you can configure your email rules.
DriveHQ Email Rules screen
You can configure the system to automatically route certain emails to certain folders.
11.10.1. Background Info about Email Protocols
DriveHQ Email hosting service supports SMTP, POP3, IMAP
POP3 Email Service (Receiving emails)
Post Office Protocol version 3 (POP3) is a standard mail protocol used to receive emails from a remote server to a local email client. POP3 allows you to download email messages on your local computer and read them even when you are offline. A lot of Email Clients, such as Outlook and Outlook Express can keep emails on DriveHQ Email Server. Thus, you can access DriveHQ Email account from different computers using Outlook. Both computers can receive the same incoming emails. All outgoing emails are saved in your local email box, which is not synchronized with DriveHQ webmail and is also not synchronized among multiple computers.
SMTP Service (sending emails)
Simple Mail Transfer Protocol (SMTP) is the standard protocol for sending emails across the Internet. SMTP uses TCP port 25. Sometimes you can have problems sending emails if your ISP has blocked port 25 for controlling spamming emails. To determine the SMTP server for a given domain name, the MX (Mail eXchange) DNS record is used.
IMAP Service (Remote email folders)
The Internet Message Access Protocol (IMAP) is one of the two most prevalent email protocols for e-mail retrieval. The current version of IMAP is 4.0
There are some advantages and disadvantages of IMAP4 over POP3. A detailed comparison is beyond the scope of this document.
The main advantages of IMAP over POP3 are: IMAP can keep multiple mail boxes on server; e.g. you can keep your “inbox” and “sent” boxes on DriveHQ email server. This way, you can configure IMAP email accounts on multiple computers and all computers can access the same mail boxes; in particular, if you sent an email on Computer A, you can find the same email on Computer B in the same “sent” mail box.
11.11. DriveHQ Web-based Address Book / Contacts
From DriveHQ Webmail homepage, click on “Contact” link in the left-hand side, it will go to the Contact main page, as shown below:
DriveHQ Contact main page
On the left-hand side, you can see the “contact folder tree”. Contacts are divided into 2 parts:
- My Contacts: those contacts are created by me and remain private;
- Group Contacts: those contacts shared by other DriveHQ group users.
You can also click on “Manage Contact Group” or “Import Contacts” links to create / add / edit contact lists.
11.11.1. Create Contact Groups
Before you create a contact, you must create a contact group first. The system automatically creates a contact group named “Friends”. You can create more contact groups. To create a contact group, click on Contact Root, then click on the Add button, it will go to the “Create contact group” page:
Create a contact group screen
In the above screen, you can enter a contact group name, description, and then select the “Share” and “mailing list” properties.
You can select the following options for “Share to the group” property:
- Not shared: this is a private contact group. No other user can see it.Read-only: this contact group is shared all group members with read-only access.
- Update access: this contact group is shared to all group members with update access;
- Full access: this contact group is shared to all group members with full access right.
For the “mailing list type” property, you can choose from the following options:
- Not a mailing list: It is just a contact group, (i.e. a contact folder) and cannot be used as a mailing list;
- Private mailing list: This contact group can only be used by myself as a mailing list.
- Domain mailing list: Only people in this group account can send emails to this mailing list;
- Public mailing list: anybody on the Internet can send emails to this mailing list;
To fight spammers, a mailing list cannot have more than 100 email addresses. DriveHQ has added a lot of other technologies to fight spammers. Spamming is automatically monitored and strictly prohibited. Spammer accounts are automatically disabled in real-time without any warnings.
To create a mailing list, you must be a premium user. Free users and group member users cannot create mailing lists.
A contact group is also used in group file sharing and collaborations. You can share different folders to different contact groups and set different levels of access rights. Once you have shared a folder to a contact group, you can add a contact in the contact group to give the new person access to the shared folder. If you want to stop sharing the folder to one user, you can remove it from the contact group.
11.11.2. Create contacts
Click on a contact group name in the left-hand side of contact main page, then click on “New” and select “Contact”, it will go to “Create contact page”.
Create a contact page
In the “Create contact” page, you can enter all info; or you must enter first name, last name, and email fields. If the contact is a DriveHQ member, you can enter his/her registered email address, or enter his/her DriveHQ email address (USERNAME@drivehq.com).
11.11.3. Batch creating contacts, importing contacts from Outlook / Gmail
For companies with a lot of employees, or for users with lots of contacts, creating contacts one by one is tedious and could take a long time. DriveHQ offers advanced tools to batch create / import a lot of contacts at once.
To import contacts, please click on the “Import Contacts” link in the left-hand side. It will display the following screen:
Import contacts from Gmail or from a CSV file
You can import contacts from gmail account, or you can import contacts from a .CSV file. CSV means “comma separated values”. Basically it is just a text file like:
Name, Phone, Fax, email
John Doe, 123-456-7890, 123-456-7891, johndoe@drivehq.com
A lot of applications support CSV files, e.g. Microsoft Excel can save a spreadsheet as a CSV file. Microsoft Office Outlook can also export contacts as a CSV file. Just click on Contacts, then select from Outlook’s File menu, and select “Import and Export”, then choose “Export to a file”, it will display the following dialog:
Export Outlook contacts as a CSV file
12. DriveHQ Email Manager (Email Backup)
DriveHQ Email Manager is the first email backup program that can manage your emails and contacts like files, drag-&-drop or automatically backup your Outlook / Outlook Express / Windows Mail in real-time or scheduled times.
DriveHQ Email Manager is designed to be very similar to DriveHQ FileManager, which has been downloaded by more than 500K users. The default dual-pane interface allows users to easily drag and drop emails, contacts and mailboxes from their local PC to DriveHQ online email system. Users can change the interface to only show local emails or DriveHQ emails.
The latest version 2.0 build 70 has added support for Windows 7, Windows 2008 and 64-bit operating systems.
12.1 DriveHQ Email Manager Advantages
- The most important feature of DriveHQ EmailManager is it can backup and restore emails one by one. Almost all other email backup software can only backup / restore Outlook .pst files, you cannot backup / restore a single email. Because .pst files are very large and always locked by Outlook, it can take a very long time to backup or restore your emails; if backup fails in the middle, you might have to start all over again. With DriveHQ Email Manager, you can easily backup your emails / contacts using drag and drop.
- You can set real-time or scheduled backup tasks to automatically backup your emails & address book even when Outlook is running!
- Because DriveHQ Email Manager can backup emails one-by-one, and it can automatically resume interrupted uploads / downloads, it is extremely reliable and efficient.
- You can access backed-up emails / contacts from anywhere using DriveHQ webmail.
- You can easily migrate your emails from one computer to another computer using drag and drop..
12.2 DriveHQ EmailManager (Email Backup Service) Pricing
DriveHQ Email Manager is powered by DriveHQ's advanced email hosting system. You can backup your Outlook, Outlook Express or Windows Mail emails to DriveHQ Email Hosting system using DriveHQ EmailManager. The basic service is free, but with a lot of restrictions and is designed for personal and casual use only. DriveHQ EmailManager is not included in the DriveHQ Email Hosting service.
12.3 Get started with DriveHQ EmailManager
12.3.1 Install DriveHQ EmailManager client software
You can download DriveHQ EmailManager software installer online from the DriveHQ software download page:
https://www.drivehq.com/downloads/DownloadEmailManager.aspx
Currently DriveHQ EmailManager only has 32-bit version, which also works on 64-bit operating systems. Before you download, please make sure you have Microsoft Office installed, or you use Outlook Express for your emails.
After you have downloaded the installer, you can double click on it to launch the setup. Just follow the wizard and it should be easy to install the software. After you have finished installing the software, you can launch it at the end of setup wizard. By default, DriveHQ EmailManager automatically starts after the user logs on Windows. You can disable “auto start” from the “Options” menu, click on System Options, then uncheck the check box “Automatically run when I logon Windows”, then click on “Save Change” to apply the change(s).
12.3.2 Logon DriveHQ EmailManager
Launch DriveHQ EmailManager and Logon (it could take 1-2 minutes dependent on the number of emails in your account.), you will see the Application’s Main Screen. (See the screenshot below). DriveHQ Email Manager's main screen consists of three panes:
- The remote email pane;
- The local email pane;
- The email upload / download task management pane, which shows the list of emails being transferred and their progress info.
DriveHQ EmailManager main screen
Show/Hide Email Panes:
You can click on the "View" button on the toolbar to select:
- show DriveHQ.com remote emails only;
- show both local and DriveHQ.com emails;
- show local emails only
Show/Hide Task Management Pane for Email Transfer
You
can show / hide the pane by clicking on the button.
12.4 Manage local emails and folders
In the local emails pane, you can manage local emails and folders (mailboxes) in the same way as in Windows Explorer (or DriveHQ FileManager). In specific, you can
1.Navigate through local emails and folders (mailboxes)
2.Create new local email folders
4. Copy / paste local emails and folders
5. Delete local emails and folders
8. Cut / copy & paste a sub folder
1. Navigate through local emails and folders
· Select the destination folder from the dropdown list on the top right corner;
· Enter a folder by double-clicking it in the local pane;
·
Click to go to the folder
visited previously;
·
Click to go to the folder
visited next;
·
Click to go to the parent
folder.
2.Create new local email folders
· First, please make sure you navigate to a location where you see real email folders, such as “inbox”.
·
Click on button to
create a new email folder, and specify the folder name; or right-click on a
blank area in the local emails pane, select “New” from the
popup menu.
3.Rename local email folders
Click the email folder to rename, click again or right-click and select “Rename” from the popup menu; once the name edit box is shown, enter the new name.
4.Copy / Paste local emails and folders
Right-click on the emails / folders to copy, and select Copy from the popup menu; Navigate to the destination email folder; right-click on a blank area in the local emails pane, select Paste from the popup menu.
5.Delete local emails and folders
Select the emails / folders
to delete, click on Button or press “Delete”
key; Select “Yes” on the confirmation message box if you want
to delete.
6.Create a new sub folder
·
Select the folder, and then click on button to create a new
sub folder, and specify the new folder name;
Navigate to a location where it displays mail box list
Select a destination folder and then click on the new folder icon.
Right click on the target folder, then click on “New” from the popup menu to create a new folder
Created a new folder; waiting to change the folder name
7.Rename a new sub folder
Right click on the target sub folder and select “Rename” option from the popup menu; once the name edit box is shown, enter the new name,
8.Cut / copy & paste a sub folder
Right click on the sub folder, then select "Cut/Copy" from the popup menu; navigate to the target folder; right click the local emails, select "Paste" from the popup menu.
Right click on a subfolder to copy (or cut)
Right click on a destination folder to paste
Finished copying an email folder
9.Delete a sub folder
Select the sub folder to
delete, click on Button or select “Delete”
option from the right-click menu; Select “Yes” on the
confirmation message box if you want to delete.
10.Drag / drop a sub folder
Select the target sub folder (make sure it is a real mail box), then drag & drop this folder to the destination local folder. This is the same as cut-paste a sub folder.
Drag & drop a local email folder
The selected email folder has been drag & dropped (moved) to the Outbox folder
12.5 Manage online emails and folders
12.5.1 Your default DriveHQ email account
When you register a new user account on DriveHQ.com and order a service, you automatically receive an email account. The email address is YourUserName@firstcloudit.com (or custom domain email is also supported). You can manage your DriveHQ emails from the Online Emails Pane. By default, your DriveHQ email account has five email folders: Inbox, Sent, Draft, Trash and Bulk; it also has two contact groups: Friends and Blocked.
DriveHQ account default email folders and contact groups
12.5.2 Manage Online Emails and Folders
In the remote emails pane, you can manage your online emails and folders in the same way as in Windows Explorer. In specific, you can
1. Navigate through online emails and folders
· Select the destination folder from the dropdown list on the top right corner;
· Enter a folder by double-clicking it in the online pane;
·
Click to go to the folder
visited previously;
·
Click to go to the folder
visited next;
·
Click to go to the parent
folder.
2.Create new online email folders
·
Click on button to
create a new folder, and specify the folder name;
· Or, right-click on a blank area in the remote emails pane, select “New” from the popup menu.
3. Rename online email folders
Click the email folder to rename, click again or right-click and select “Rename” from the popup menu; enter the new name in the name edit box.
4.Delete online emails and folders
Select the emails / folder
to delete, click on Button or press “Delete”
key; select “Yes” on the confirmation message box if you want
to delete.
5.Browse emails online
DriveHQ server supports browsing emails online. Right click on an email and select the "View online" option from the right-click menu to open it in DriveHQ webmail.
12.6 Transferring emails, contacts and folders (mailboxes)
DriveHQ Email Manager enables convenient and powerful email transferring between your local email client software (Outlook, Outlook Express or Windows Mail) and DriveHQ online email system.
- You can transfer one or many emails / mailboxes / contacts using Drag-n-Drop;
- You can easily monitor / manage transfer tasks in the task management pane for email / contacts transfers.
- If transfer is interrupted, you can resume from where it was left;
- DriveHQ EmailManager supports data compression, so the upload / download speed usually is much faster than Outlook sends / receives emails.
- DriveHQ EmailManager supports increment upload / download. If the same email exists in the destination folder, the upload / download will be skipped.
1.Upload emails, contacts and folders
· On the local emails pane, select emails and folders to be uploaded (multiple selection using clicks combined with ctrl/shift key is supported)
·
On the remote emails pane, select the
destination folder; click the arrow in the middle of the
two panes to upload emails.
· Or, you can drag & drop the selection in the local pane to the destination folder in the remote pane.
· All the selected emails will be added to the emails transfer task pane, and the first email starts to be transferred.
2.Download emails, contacts and folders.
· On the remote pane, select emails and folders to be downloaded (multiple selection using clicks combined with ctrl/shift key is supported) .
·
On the local pane, select the
destination folder; Click the arrow in the middle of the
two panes to download emails.
· Or, you can drag & drop the selection in the remote pane to the destination folder in the local pane.
· All the selected emails will be added to the emails transfer task pane, and the first emails starts to be transferred.
3.Monitor, stop, resume, and resume transfer tasks.
The transfer task pane shows the progress information of the pending transfer tasks, including name, source and destination, current transfer progress and transfer speed, and estimated time left.
- Click the “Delete” button to delete a single or all the email transfers from the task list;
- Click the “Stop” button to stop a single or all the email transfers in the task list;
- Click the “Resume” button to resume a single or all the stopped email transfer tasks.
Note: DriveHQ EmailManager only supports upload / download normal emails and contacts. Other types of content, e.g. meeting request emails, system undeliverable emails, will be ignored.
12.7 Automatic email backup
DriveHQ EmailManager supports automatic email backup. It doesn’t support automatically backup contacts or contact groups. This is because contacts are usually not changed frequently. Users can easily drag and drop contacts to backup online.
Creating an email backup task is very easy. The current version Email Manager only allows one backup task. It supports both real-time backup and scheduled backup. If you want your emails to be backed up as changes occur, then choose Real-time Backup. This might slightly affect your system performance if the amount of data is very large or if it contains a lot of emails. To avoid the problem issue, you can choose Scheduled Backup. Your email folders will be backed up at the scheduled time.
12.7.1 Create email backup task
Launch DriveHQ EmailManager and click the "Backup" button. It displays the backup task screen, shown as below:
Select the email folders to backup – uncheck junk / spam / trash / bulk folders
Select the email folders you want to backup which will be backed up to DriveHQ webmail on www.DriveHQ.com/EmailHosting/. Usually, you don’t need to select trash, deleted, junk, trash, bulk mail folders. After finished, please click on "Next". It goes to the “set backup type and schedule” screen as shown below:
Set backup type and schedule screen
You can select real-time backup or scheduled backup.
Real-time: If you select Real-time, the task will backup local email folders to remote email folders on https://www.drivehq.com/EmailHosting/ as changes occur.
Scheduled Backup: You can set a recurring backup schedule for the backup task. The task can run one-time, daily, weekly or monthly. You must set a schedule if you selected “Scheduled backup”. You cannot set a schedule if you selected real-time backup.
If you want to backup your email account setting and email routing rules, you can click on Backup Account Setting and Rules button. It will pop up a screenshot as below:
Click on OK to start the account settings and email rules backup. It will pop up a message box after finishing the backup, shown as below:
Click on OK to confirm it.
Finally, click on Finish button to finish creating the backup task.
12.7.2 Manage or Backup Multiple Email Accounts / Emails on Multiple PCs
DriveHQ EmailManager can manage or backup multiple email accounts configured in your Outlook, Outlook Express or Windows Mail. It can also manage and backup emails on multiple computers. This feature is often used to move emails from one computer to another computer or from one email account to another email account.
Emails and folders are grouped by email accounts and PCs so that they won’t overwrite or mix with each other, even if you have the same name email folders on different PCs or different email accounts.
12.7.3 Manage email backup task
After you have successfully created the email backup task, you can click on "Backup" button to edit the task, delete the task or manually start the backup task (or stop the backup task if it is already running).
Manage email backup task screen
You can add / delete email folders in the backup source; change the backup type / backup schedule. After you have finished editing, Click the "Save Changes" button, the changes will be saved.
12.7.3 Restore emails and email folders
Emails backed up online are stored in your DriveHQ webmail account. From DriveHQ EmailManager, you can find them in the remote emails pane. You can also easily access them online at: https://www.drivehq.com/EmailHosting/.
The screen showing “backed-up emails & folders”
To restore your emails and email folders on the same computer, it is extremely easy. Just click on the "Restore" button to restore the whole backup task to the original location. You can also restore a few email folders only. Just uncheck those email folders that you don’t want to restore. See the screenshot below for more details.
The Restore screen – restore all email folders, or select a few folders only
You also can manually restore your backup task using drag and drop.
If you need to restore emails / folders to a different computer, or if you need to restore emails after you have reinstalled your operating system, then you cannot use the “Restore” button to restore your emails. In this case, you must use “drag and drop” feature to restore your emails / folders.
12.8 DriveHQ EmailManager Settings, Options and Subscription
From DriveHQ EmailManager main screen, click on the “Option” button in the toolbar, and the screen “DriveHQ Email Manager - My Options” will pop up:
DriveHQ Email Manager “My Options” screen
By default, Email Manager remembers user logon info and automatically signs in. This makes it very convenient for users.
Other settings include:
- My Profile: you can view or edit your DriveHQ account profile;
- Account Balance: check your DriveHQ account balance; incl. cash balance, max emails allowed and number of emails in your account;
- Change Password: change your DriveHQ account password.
- Subscription: you can order DriveHQ email backup service from here.
As of June, 2010, DriveHQ Email Backup Service (using DriveHQ EmailManager 3.0) is the only service not included in the main storage subscription service. Group user license is also not included in the storage subscription service. (This could change in the future, so please visit DriveHQ.com for the latest products and services info.)
DriveHQ EmailManager free email backup service is designed for demo purpose only. It can backup 1000 emails and 50 contacts only. If you need to backup more emails or contacts, you must order a paid Email Backup service plan. For more info, please visit this web page:
https://www.drivehq.com/EmailHosting/BackupPricing.aspx
- System Options: You can disable the application from automatically start when you logon Windows; you can configure it to use SSL for data transfer; you can also configure it to minimize the window (i.e. hide) after automatic start.
13. Support for Mac, incl. MacBook, iPad and iPhones, etc.
13.1. Services and features that work on both Mac and Windows
DriveHQ.com offers a lot of cloud-based services and features. Most of the features and services are available on Mac. For example:
- DriveHQ.com web-based Online File Storage, Online Sharing, Remote Collaboration, Group Account Admin, etc.
- DriveHQ.com FTP Server Hosting Service;
- DriveHQ.com Email Server Hosting Service;
- DriveHQ Online Backup for Mac.
All web browser based features, FTP Server Hosting service, Email Server Hosting service and Web / File Hosting services work exactly the same as on Windows PC.
13.2 DriveHQ Online Backup software for Mac
DriveHQ has a different version of Online Backup software for Mac: DriveHQ Online Backup for Mac 1.6, which is newer than the Windows version software. However, it also has a lot of power features. The main features include:
- Easy setup scheduled backup tasks;
- Supports multiple backup tasks to backup different folders;
- Supports incremental backup to minimize data transfer and improve backup performance;
- Can keep multiple file versions;
- Backup multiple computers with one account or with group accounts
- Easy and reliable restore, through web, FTP / FileManager or Online Backup for Mac
Files are also backed up to DriveHQ's state-of-the-art data center facility, which has multiple levels of data redundancy. Compared with in-house backup solution, DriveHQ Online Backup is more flexible and costs much lower. You can backup / access / restore files from anywhere at any time, even if you are on a trip; DriveHQ Online Backup is also more secure and reliable as it is offsite backup; your data can survive even under major disasters. (e.g. fire, flood, earthquake, etc.).
A screenshot of DriveHQ Online Backup for Mac is shown above.
13.3. DriveHQ FileManager Alternatives on Mac and other OS platforms
DriveHQ currently doesn’t have a Mac version of DriveHQ FileManager; we do plan to release a version for Mac in the future. For now, users can use other free FTP client software, such as FileZilla, which also supports drag and drop and is very easy to use. The user interface is also similar to DriveHQ FileManager. Certain advanced features are not available in 3rd party FTP client software, e.g. Sharing, Publishing, and Folder Synchronization. However, you can simply use DriveHQ.com website for sharing and publishing. For folder synchronization, you will need to download a 3rd party FTP folder synchronization application.
|
|||||||||||
|
|||||||||||
|
|||||||||||
|
|||||||||||
|
13.4 Support for other devices / OS platforms
DriveHQ website, FTP service, web / file hosting service, email hosting service are all compatible with other operating systems, such as Linux, iPhone, iPad, Windows mobile, Palm etc. with certain limitations based on the OS and device capabilities.
DriveHQ FileManager and DriveHQ Online Backup client software is not available on these platforms, however, usually you can find a good FTP client program on these platforms; you probably can also find FTP based backup software. Also, the DriveHQ.com website, SMTP/POP3/IMAP email services can be used on most OS platforms, smart phones, iPad, etc.
15. Enterprise Service and Private Label Service
15.1 About DriveHQ Enterprise Service
DriveHQ regular premium service is optimized for small businesses, professionals and high-end users. We also have enterprise service which is designed for large businesses.
DriveHQ enterprise service has the following advantages:
- More storage space, up to 10TB max storage space in a single service plan;
- Low unit price, esp. if you need a lot of storage space;
- Bundled with group account service and sub-user licenses; the 2-level group account service can easily support enterprises with over 10,000 users.
- Includes all DriveHQ services and features. (also incl. email hosting and email backup services)
- You can get a custom logon page that is much simpler, and does not have any DriveHQ marketing info; the DriveHQ website logo can also be customized to your company logo;
- You can host custom domain email server, static web server and FTP server;
- For enterprise users with a lot of data, uploading all files could take a very long time. You can ship up to 4 USB disks to DriveHQ; we can upload your files from our data center, which is much faster.
- Higher priority customer support than regular premium service users and free service users.
A sample Custom Logon page – much simpler interface with your own logo
Custom logo service – bundled with DriveHQ enterprise service for free.
15.2 Enterprise Service Pricing and Ordering
DriveHQ Enterprise Service pricing info is available online at:
https://www.drivehq.com/HELP/Solution/Cloud_IT_Service_Pricing.aspx
By ordering DriveHQ Enterprise Service, not only you get more features, more storage space, better customer support, but also you save money compared with ordering the bundled services separately. To order DriveHQ Enterprise Service, you can download the order form, fill in the form and sign it, then fax or scan & email it to DriveHQ.
You can also sign up a free DriveHQ account, then logon www.drivehq.com and go to My Account page, click on Deposit to make a payment. You can then email DriveHQ customer support about the service plan you want to subscribe. DriveHQ customer support can help you process the order.
As is the same as regular premium service, enterprise users can pay by credit card, PayPal, business check or bank wire.
15.3 Private Label Service
Private Label Service is also known as “White Label Service”; it means DriveHQ offers the backend services and technologies; however, on the front-end, the service is re-branded as your company’s service. Thus to your users, the service appears to be operated by your own company.
Private label service can be very useful for large organizations where brand name recognition is very important. It may also be necessary for some big resellers.
However, private label service has some disadvantages and is no longer recommended. The main disadvantages include:
- High start-up cost. This is because DriveHQ must setup a new website for the private label website, which requires a different web server and a different database schema. Not only it increases the hardware cost, but also it increases long-term maintenance cost.
- It usually requires significant amount of website & software customization work. The cost of such work usually cannot be shared by other enterprise customers.
Because of these, DriveHQ is working on a new “Reseller Model”, which will allow more customization than the current “custom logo and logon page” service at the same price.
If you are interested in a customized service, please contact DriveHQ sales. You need to tell how many users will use the service and how much storage you will need after 12 months. Also please tell us your project timeline and how much customization you want. DriveHQ sales will reply your emails very quickly.
16. Information for IT Managers, IT Consultants, Resellers and Small Business owners
While DriveHQ offers free basic service and low-cost subscription plans, our service is designed for businesses and high-end users.
If you are an IT manager, IT consultant, reseller or a small business owner, you will find our service extremely valuable to your business, why?
- DriveHQ offers a comprehensive set of remote storage and hosting services and features, incl. Online Storage & Sharing, Online Backup, FTP Server Hosting, Email Hosting, Web / File Hosting, Remote Collaboration, Remote Folder Synchronization services. It is a one-stop shop for multiple cloud-based services. You can save cost on Remote File Server, FTP Server, Offsite Backup, Email Server, Web server and Online Collaborations.
- DriveHQ offers top-quality user group management tools. IT managers, or any small business owners, can easily create / manage sub-users and sub-groups, assign different user roles, create folders and share different folders to different users / groups / sub-groups with different levels of access rights. DriveHQ service can make
- DriveHQ cloud-based system works better than your own system.
o DriveHQ remote file server supports secure remote file access, remote file sharing among internal employees and external clients. No expensive and complicated VPN solution is needed.
o DriveHQ Remote Offsite Backup service works anywhere, supports any number of computers; offsite backup is the only solution that can protect your data against major disasters, such as fire, earthquake, flood, etc.
o DriveHQ FTP server hosting service is a full-feature FTP Server Hosting service, which has almost all regular FTP server features, plus a lot more advanced features that are only available on DriveHQ. It is also seamlessly integrated with DriveHQ.com web-based services.
o DriveHQ Email Hosting service is designed for businesses to host private domain business email accounts. It has a lot of advanced features, incl. group address book, mailing list, spam filters, auto reply and auto-forward, etc.
o DriveHQ system is colocated with Hurricane Electric, one of the largest colocation service provider. The facility has 24x7 onsite security, surveillance cameras, redundant power supply and redundant network connections.
o DriveHQ system has full / multiple levels of redundancies. There is no single point of failure. The DriveHQ support team monitors the system 24x7; data is automatically backed up / mirrored. Compared with self-hosted solution, this can save you a lot of effort in system maintenance and service monitoring. It also saves you a lot of cost in maintaining a backup system.
In short, DriveHQ services can extend or replace your server capabilities, save you a lot of cost.
For IT Managers:
You can easily convince your senior manager(s) about the benefits of using DriveHQ.com cloud-based services:
- It saves cost on hardware, software and hosting;
- It makes things much easier on system maintenance and management;
- It makes your IT service available from anywhere, incl. sharing and collaboration with your clients;
- It makes your system more secure and reliable;
- Using Group Admin tool, the group administrator user has full control over everything; as the IT manager, you can easily support all your users’ needs online, it is even easier than your local system.
For IT Consultants / Resellers
A lot of IT consultants, IT service providers resell DriveHQ services. With over 1 million registered customers, many of them business customers, DriveHQ has developed extremely efficient business model and partnership models.
Why Partner with DriveHQ?
In short, because DriveHQ offers high-end enterprise-class services that create a lot of value and save a lot of cost for customers. Therefore, more customers are willing to pay for the services.
Cloud storage, server hosting and computing services are fast growing markets. It is also very competitive. There are a lot of cheap / free service providers; however, such cheap services have a very low profit margin. Most of them cannot generate any profit for themselves, not to mention their partners. On the other hand, DriveHQ has created a long-term viable business model for partners. There are a lot of IT consultants and small service firms resell our services to their clients. It has created a win-win business scenario.
The benefits of partnering with our services incl.:
- Increase your service offering, differentiate from your competitors:
o DriveHQ offers a lot of features and services, which can dramatically increase your service offerings; many of them are essential to your business customer’s IT needs.
- Improve your service quality:
o DriveHQ offers high-quality high-end services that have a very high customer satisfaction ratio; if you were to offer such services yourself, your product and service quality is unlikely to match our level.
- Save your cost; lower your risk:
o If you offer similar services yourself, the cost is generally more than 20 times higher. By partnering with DriveHQ, you can start reselling our services in minutes. You don’t need to invest in hardware, software and hosting; all you need is to sign up DriveHQ.com and getting familiar with our services / features.
- Boost your service revenue:
o By partnering with DriveHQ, you can get into the fast-growing lucrative online backup, online storage and FTP hosting service business with a proven profit model. This compares sharply with many other companies that offer free / cheap services with no profit model.
- Connect customers more closely with an online service, sell more software, hardware or services;
Who should partner with DriveHQ?
- Online Service Providers:
- ISPs; telecom and network service providers;
- Service providers in vertical markets serving:
o Accounting Firms;
o Law firms;
o Medical clinics;
o Real estate agents and appraisers;
o Photographers and design firms;
o Non-profit organizations and educational institutes, etc.
o Service providers for specific regions or languages;
- Software developers or publishers;
- Digital device manufacturers, vendors, OEMs, etc.
- IT consulting firms and solution providers;
DriveHQ has over 1 million registered users, incl. 10s of thousands of businesses. By using our services, these businesses have achieved big cost saving in hardware, software and system maintenance costs. DriveHQ has some very large companies using our services or reselling our services. We also have a lot more users selling our group account / enterprise service. For more info, please visit our Customer Testimonials page, or contact bizdev@drivehq.com.
DriveHQ has different partnership programs for different companies and individuals. These programs make it extremely easy to partner with DriveHQ, while offering great flexibility and extensibility.
- Co-branded or Private-label Service
- Quick Business Partnership Program
- OEM Partnership
- Group Service Reseller Program (Recommended!)
- Regular Affiliate Program
Co-branded or Private-label Service
DriveHQ Co-branded or Private-label Service is designed for companies with large existing user base or big marketing channels. Potential companies include:
|
|
Internet service companies; Broadband ISPs, telecom and network service providers; Service providers in vertical markets; (e.g. accounting, legal, medical, IT, real estates, education, etc.) Service providers for specific regions or languages; Software developers, publishers, digital device vendors, etc. |
Business model:
Co-branded / private label service is no longer recommended. DriveHQ will launch a new partnership model, which will allow resellers to customize their website / services.
Co-branded or Private-label customer will pay DriveHQ an initial setup fee plus one-time customization charge. After the service is launched, customer shall pay DriveHQ based on storage usage and number of users. Customer can customize the service logo, pricing, UI themes, email templates, client software UI; hide certain features, etc. Customer can leverage on DriveHQ's transaction and billing system, or use their own existing billing systems. Customer owns the users unless the service is discontinued.
DriveHQ also offers system integration service and on-demand consulting service at a very low rate. We have standardized the service. Usually a co-branded or private-label service can be launched in 4 to 10 weeks, dependent on the amount of customization.
Quick Business Partnership Program (bundle DriveHQ software / services at no charge)
|
|
Quick Business Partnership Program is designed for small businesses. Small businesses can bundle the free version of DriveHQ's client applications and online services. No contract is required. You can freely distribute / bundle DriveHQ client software with your own software, hardware, CDs/DVDs/Books/Magazines or services; you can integrate with DriveHQ online storage, backup and sharing services and FTP / Email hosting services. There are no setup fees and service charges. You can start offering high-end DriveHQ software and services to your customers in no time. |
Business Model:
The partnership will be win-win and is open to discussions. DriveHQ can supply necessary API documentations to partners so that partners can integrate or offer DriveHQ service from their software, service, website or hardware device, etc. DriveHQ also supports many standard APIs / Protocols such as HTTP/HTTPS/FTP/SMTP, etc.
If the partner requires no customization from DriveHQ, then partner is entitled to the standard affiliate commission, which pays up to 30% of net revenue;
If the partner requires DriveHQ to customize any web pages or logos, then the affiliate commission will be deducted with DriveHQ service charges.
Partners have the right to upgrade the partnership to Co-branded or Private-label Service at any time.
OEM Partnership - It pays to bundle DriveHQ software and services
|
|
If you are a hardware device manufacturer, you will find DriveHQ software and services can dramatically enhance your product value. DriveHQ service can closely connect your customers with your hardware, and thus connect your company with your customers, which increases your customer loyalty to your products and help you generate more sales. You could also get revenue share from DriveHQ. In the past, most digital devices (digital cameras, camcorders, webcams) have bundled desktop photo or video software. In the rapidly changing digital media industry, most consumers now demand for online sharing and publishing digital contents. The future of digital devices and multimedia software is to connect people. DriveHQ offers great online storage and sharing services; we also have high-quality web-based client software that delivers much higher value than traditional desktop software. |
Business Model:
Most software companies charge OEMs for bundling their software with OEM's hardware devices. DriveHQ offers high-quality, high-end software for free bundling. Moreover, we might pay OEMs for bundling our software!
For Digital Camera, Camcorder, WebCam and Digital Frame manufacturers:
Photo or video applications are less useful today as the operating system has already provided very good support for multimedia files. ( Bundling DriveHQ software and services can create a lot of new values: )
1. Sharing large multimedia files online with friends and relatives remotely. DriveHQ FileManager is a great application for sharing digital contents online. Users can drag and drop files, preview files; share and publish files online.
2. Many consumers also need a secure backup solution to backup their digital files online. DriveHQ Online Backup can automatically backup files in real-time or in scheduled time.
3. Many consumers and businesses also need FTP service to share digital contents with their friends or customers;
For USB storage device manufacturers:
While extremely portable and is much faster than online storage, USB storage has inherent drawbacks of:
1. Cannot access files remotely;
2. Can only be accessed from one PC at one time;
3. Cannot share or collaborate with other people;
4. Is less reliable and less secure than online storage. If you lose a USB key, other people could get access to all your data.
5. Requires plug and un-plug which is not convenient.
DriveHQ FileManager client software extends the USB storage feature to the Internet. You can access your files from anywhere at any time without needing to carry a USB storage. You can share your files and set access rights so that different people can access different folders only. Online Storage and Local USB storage can be combined to deliver much higher value to consumers.
For PC manufacturers:
The industry trend is online storage will become more and more popular and important. Many users now have a strong need to upload files to online storage, share files with remote friends, colleagues or clients. CD/DVD drives have become less important from this perspective.
DriveHQ FileManager and DriveHQ Desktop Express makes remote online storage as easy as local drives; it is also as reliable and secure as your local drives. Bundling DriveHQ FileManager not only offers extra storage to your customers, but also offers them a remote file server so that they can easily share and collaborate with other people.
Users can automatically synchronize local folders with remote folders on DriveHQ server; they can also schedule automatic backup tasks to protect their important files.
For PDA and Smart Phone manufacturers:
Consider bundling DriveHQ FTP service, SMTP / POP3 / IMAP email service.
Group Service Reseller Program
(Buy large amount of storage at whole-sale price; resell at a much higher retail price)
Group Service Reseller Program is designed for IT Consultants, solution providers, system integrators and small resellers. It is extremely easy to start with little up-front cost. Basically, you can order DriveHQ storage space and user licenses online, then resell sub-user accounts / sub-groups and storage space to your customers. You can resell the service at the same DriveHQ service price, or at a lower price to better attract your customers.
To help resellers to sell more services, DriveHQ offers "Custom Logo and Landing Page" service to Group Service Resellers for free (A value of $149.99/year). Resellers can have a custom logon (or landing) page as: http://USERNAME.firstcloudit.com/. After login, the DriveHQ website logo will be changed to the reseller's logo.
Resellers usually bill their customers directly. A lot of resellers already offer other services to their customers. So DriveHQ services can be bundled with their existing services. This offers the best flexibility in service pricing. Resellers are free to price the service at a lower or higher price than DriveHQ. DriveHQ transaction / billing service can also be used if the reseller cannot bill its customers directly.
By ordering large amount of storage space at the whole-sale price, you can resell our service to individual users or small business users with a very good profit margin, e.g:
If you order 100GB, 20-user group account service, you pay:
$699.99 + 119.99 = $819.98.
If you resell the service to 20 users for 5GB each, then you can make:
$79.99 x 20 = $1599.8
You can start with a low subscription and upgrade your max storage / group user licenses at any time later without losing un-used service credit.
If you can resell our service to a lot of customers, please contact DriveHQ sales for more discount. In general,
- If you can resell to 3 customers or 100GB, we will offer you 10% off.
- If you can resell 200GB, we will offer you 20% off;
- If you can resell 300GB, we will offer you 25% off;
- If you can resell 500GB or more, we will offer you 30% off.
As you can see, if you resell to a lot of users, then your net profit margin can reach as much as 70%, which is much higher than DriveHQ, and certainly much higher than if you setup your own service.
Regular Affiliate Program
DriveHQ affiliate program is designed for any individuals or companies who can refer or promote DriveHQ services. DriveHQ designed sophisticated affiliate tracking algorithms. If anybody visits DriveHQ.com with your referralID, then if the user signs up DriveHQ.com in 4 months, this user is marked as referred by you. You will receive a generous up to 30% commission payment. Below is the commission rate table. Please note the commission rate might change from time to time. Please visit DriveHQ.com website for more up-to-date info.
|
Commission for Reselling Group Account Service:
You don't get commission for reselling Group Account Service. This is because the partnership model itself allows for a very high profit margin. For example:
If you resell "100GB Group Account service" to 20 customers, you pay DriveHQ $699.99 (Storage) + $119.99 (user licenses) per year; Since DriveHQ price for 5GB is $79.99/year, your net profit will be about: $80 * 20 - 700 - 20*6 = $780.
Since you don't have network operational cost, your net profit margin could be very high. Also, some IT firms and consultants provide additional support to their clients, e.g. onsite setup, phone support, trouble shooting, etc. They can charge a higher price than DriveHQ’s regular price. For example, you can charge $100/year for 5GB service if you can justify the additional value you put in.
Commission for co-branded or private-label service:
You don't get commission for these partnership programs. These programs have a very different profit model for you. Please contact bizdev@drivehq.com for more info. Payment:
How do I receive affiliate program payment
You can request a PayPal payment when your commission reaches $50. |
DriveHQ server / client software licensing, service APIs / SDKs and customization service
DriveHQ has developed great technologies and products; we are committed to help other companies develop customized solutions, products or services that are tailored for the specific company or market. DriveHQ software / website is designed with easily customizable and localizable GUI skins and resource files. It is also built with independent components such that you can easily choose a sub-set of features.
DriveHQ has a complete set of software development kits (SDKs), APIs and documentations. We have developed highly efficient proprietary upload / download APIs; we also support open standard based APIs such as FTP, HTTP, SMTP, POP3 and IMAP. If you are interested in our APIs, please send an email to DriveHQ BizDev. You can also use the standard FTP API to integrate with DriveHQ online storage.
DriveHQ client software / service can be tailored, integrated, bundled or customized to meet your business needs.