DriveHQ Online Backup has two processes: DriveHQBackup.exe and DHQBackupSvc.exe.
DriveHQBackup is the GUI program, which is used to create / manage / monitor backup tasks, check or update user account info and order service subscription, etc. Once the user account is setup and backup tasks are created, the GUI program is not needed to run the backup task.
DHQBackupSvc is the backend service program, which is used to schedule and actually run the backup tasks. Once the GUI program has created the backup tasks, this service program is responsible to run the backup tasks at the scheduled times.
By separating the backup software into two programs, DriveHQ Online Backup can backup a computer even if nobody is logged on. The DHQBackupSvc.exe service program can automatically start before anybody logs on.
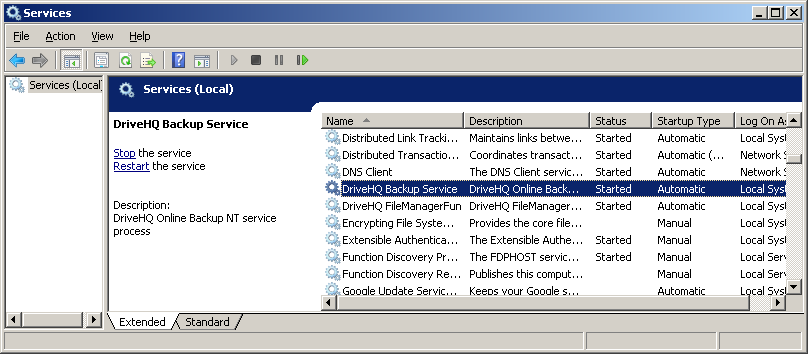
When you start DriveHQ Online Backup GUI program, it will try to connect to DHQBackupSvc.exe process. If it fails to connect, then backup cannot be performed. You must check if the backup service has been started. To locate DriveHQ Online Backup service, please go to Administrative Tools --> Services. See the screenshot below:
When you install DriveHQ Online Backup client software, this service will also be installed. It will start automatically.
By default, this service runs as the "local system" account, which has access to all local files / folders, but it cannot access remote folders / files. Also this account is different from the current Windows logon user.
As mentioned above, by default, DriveHQ Online Backup service program logs on as the "local system" account, which cannot access a network folder. You can easily change the service logon username to a user who has the right access to the shared folder(s) (usually your own account).
To change the service logon username, please double click on "DriveHQ Backup Service" in the Services window. It will open the properties dialog, click on the "Log On" tab, it will display the following dialog:
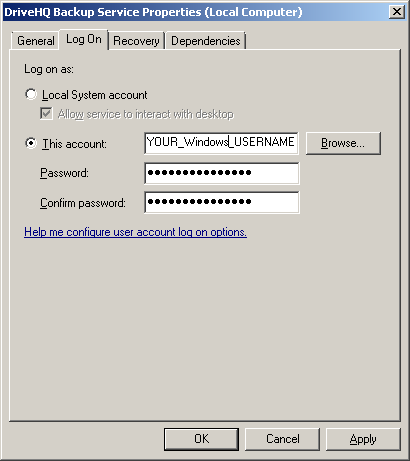
From this screen, you can check "This account" radio button, and then enter a username and password to logon. Note this username is your Windows username, not DriveHQ username. You need to make sure this username can access the network shared folder / drive.
After you’ve finished, click on Ok to save the changes. Then you need to stop the service and restart it to refresh the change.