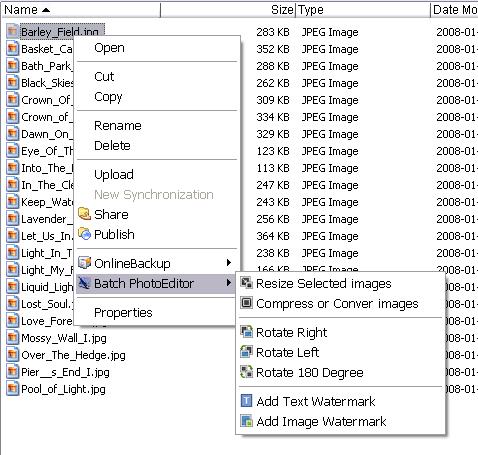
DriveHQ FileManager allows users to edit photos in batch. Batch Photo Editing function is a very useful function to many users. You can right click on multiple image files in the local pane and start batch photo editing by selecting from the popup menu, as shown below:
1. Right click on one or more image files in the local pane and you should see the popup menu. Choose the Resize Select Images.
2.Select the appropriate size you want, you can resize images to half size or double size, or resize to a fixed size. You can also choose a resample method. The Bicubic method provides the best quality, but it is also the slowest method. Bilinear method is much faster and provides a pretty good quality and is the default method.
3.Click OK button.
Note: You can check the Save As Default checkbox. Next time the application will use the selected size as the default value.
To access this feature, you should:
1. Right click on one or more image files in the local pane and you should see the popup menu. Choose Compress or Convert Images.
2. Enter an appropriate number in JPG quality box. Compressing a JPG image does lower the image quality; however, at the quality level of 75, most people won't see any difference.
You can rotate many images in one batch operation; you can choose Rotate left, Rotate right and Rotate 180 degrees. To access this feature: Right click on one or more image files in the local pane and you should see the popup menu. Choose Rotate Right or anyother directions you want.
You can use this function to add text watermark to one or more images in one batch operation. This feature is very useful for protecting your copyright.
To apply text watermark to images:
1. Right click on one or more image files in the local pane and you should see the popup menu.
Select Add Text Watermark.
2. In the text dialogue box, type the text you want to add in the images.
Furthermore, you can drag and resize the text to the position it.
3. Text options
Center Point Coordinate: In case you select multiple images with different resolutions, the software uses a relative text center point coordinate and font size. (relative to 1000x1000 pixel images). E.g. if you have an image with a resolution of 2000x1000, and the center point is (100, 200), font size is 12, then it will be adjusted to (200, 200), and the font size is 12*sqrt(2)=17. You can drag and resize the text to position it.
Font: You can select a font type for the watermark text;
Color: You can select a color type for the watermark text;
Size: You can select a font size for the watermark text;
Effect: Select one or more of the following button
4. You also can adjust the text opacity.
5. Click OK.
Note: You can save the current input value as the default value by checking the Save As Default checkbox.
You can use this function to add image watermark to one or more images in one batch operation. This feature is very useful for protecting your copyright. The relative image center point coordinate and image size is the same as applying text watermark. You can select an image, then drag and resize to position it. You also can adjust the image opacity.
To add image watermark to images:
1. Right click on one or more image files in the local pane and you should see the popup menu. Select Add Image Watermark.
2. Select an image from the local computer, then drag and resize to position it.
3. Picture logo options
Center Point Coordinate: Enter appropriate numbers in the edit boxes or Click the Up-Down controls. This allows you to re-positon the logo in the picture.
Size: Enter appropriate numbers in the edit boxes or Click on the Up-Down Controls. This allows you to adjust size of the picture logo.
Opacity: You can adjust the logo opacity.
4. Click OK.
Note: You can save the current images and parameters as the default value by checking the Save As Default checkbox.